Apple & Google Pay for Web are payment methods that allow viewers to pay for online content using their Apple or Google Wallets.
For viewers to be able to use these methods, they will have to:
Be in a supported country (click here and here for details),
Use a browser that supports Apple or Google Pay, and be logged into their browser with the account on which they’ve set up their wallet. They can still use a different email for their actual InPlayer paywall account.
Have their Apple or Google Wallet already set up with a valid payment method, like a credit card. Note that the Google and Apple Wallet cards are separate from the cards saved in Google Play and iTunes and the credit cards saved in the browser.
Note that Apple and Google Pay for Web are only available for pay-per-view (ppv) price options. They are not available for subscriptions.
If you wish to enable Apple & Google Pay for Web payments on your InPlayer account, just contact your InPlayer account manager, or send us an email at clients@inplayer.com.
When using Apple Pay, you also need to do the following:
In your Stripe account, from the Apple Pay settings page, click + Add new domain.
Enter the top-level domain or sub-domain where you will be implementing Apple Pay (e.g. stripe.com or shop.stripe.com).
Next, download this domain association file and host it at /.well-known/apple-developer-merchantid-domain-association on your website.
For example, if you’re registering https://example.com, make that file available at https://example.com/.well-known/apple-developer-merchantid-domain-association.
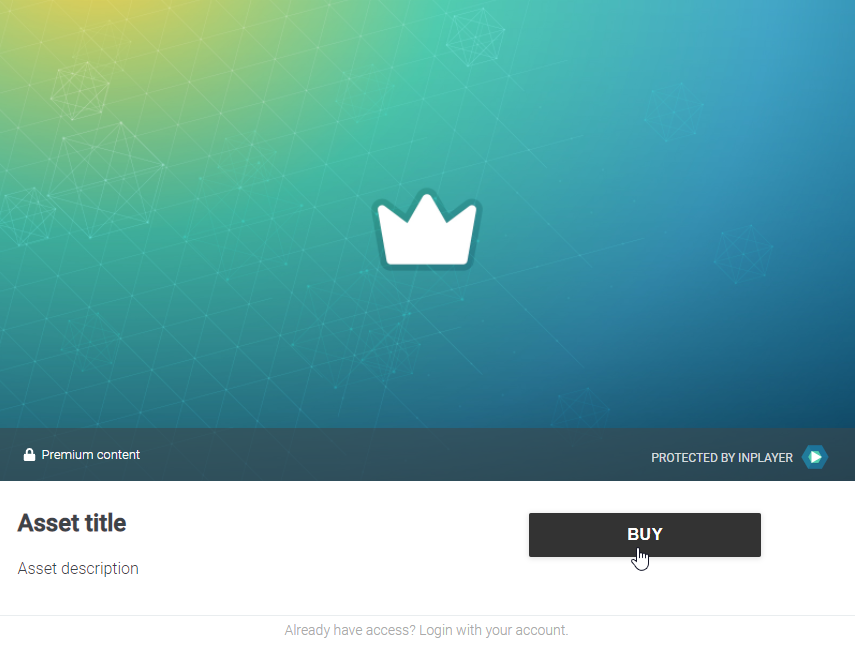
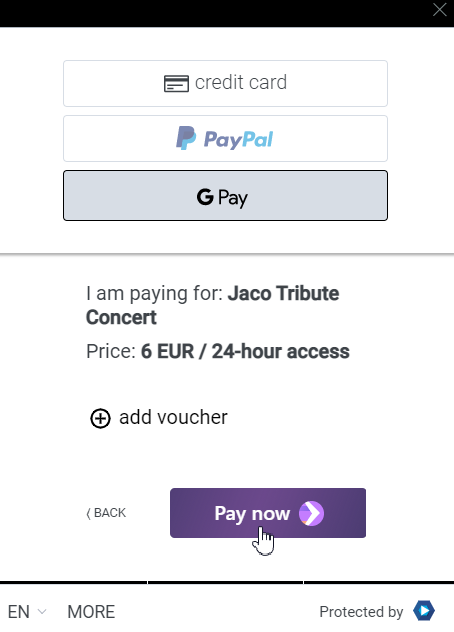
This is the experience a viewer will have when making an Apple or Google Pay purchase.
Once they go to your webpage, they click the BUY button on the asset.
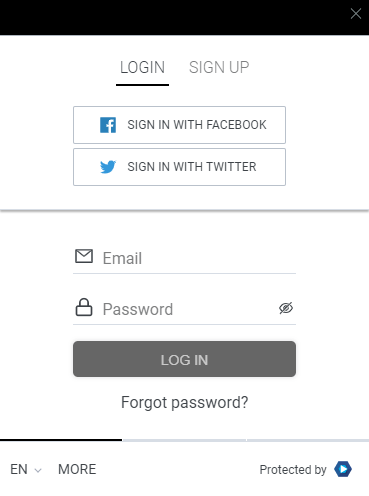
They log into their account (or sign up for a new one).
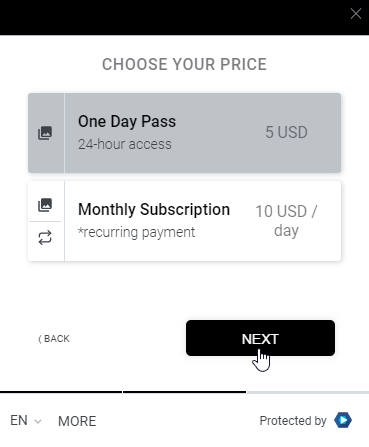
They choose the pass they wish to purchase and click NEXT.
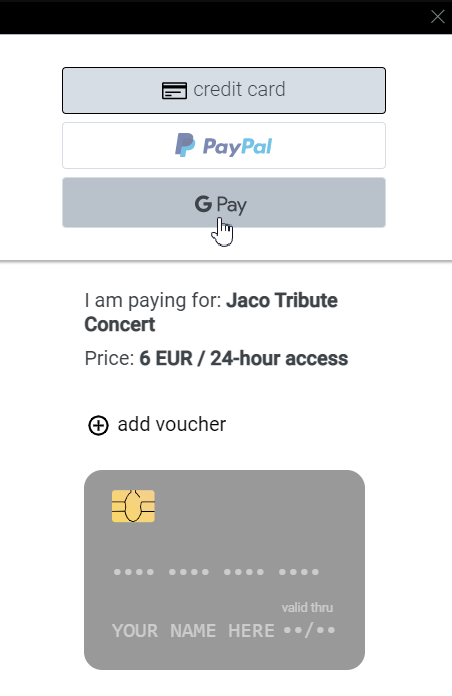
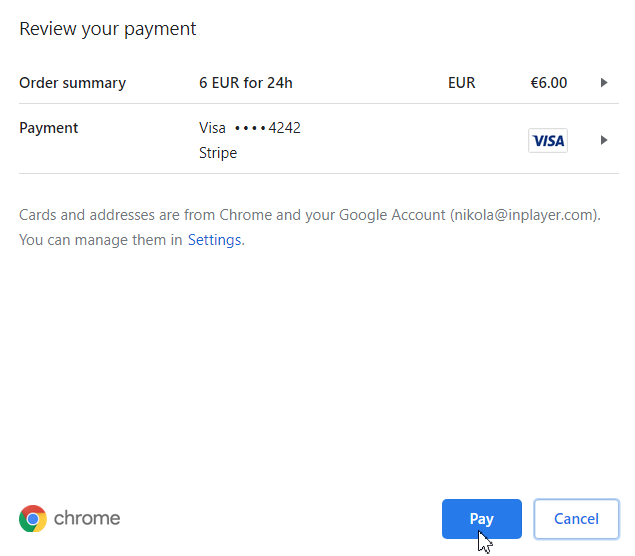
They are forwarded to the final payment screen. Here they click on either the Google Pay or the Apple Pay button at the top of the screen. Whether the viewer sees the Google Pay or the Apple Pay button will depend on the browser the viewer uses. For Chrome, they will see Google Pay, and for Safari they will see Apple Pay.
They click on Pay now.
They will then be taken to their Apple or Google Wallet where they will be able to choose their card and complete their payment.
Once the payment is complete, the paywall will disappear and they will be able to see the content.
This concludes our guide.
If you have any questions, don’t hesitate to contact us at clients@inplayer.com.
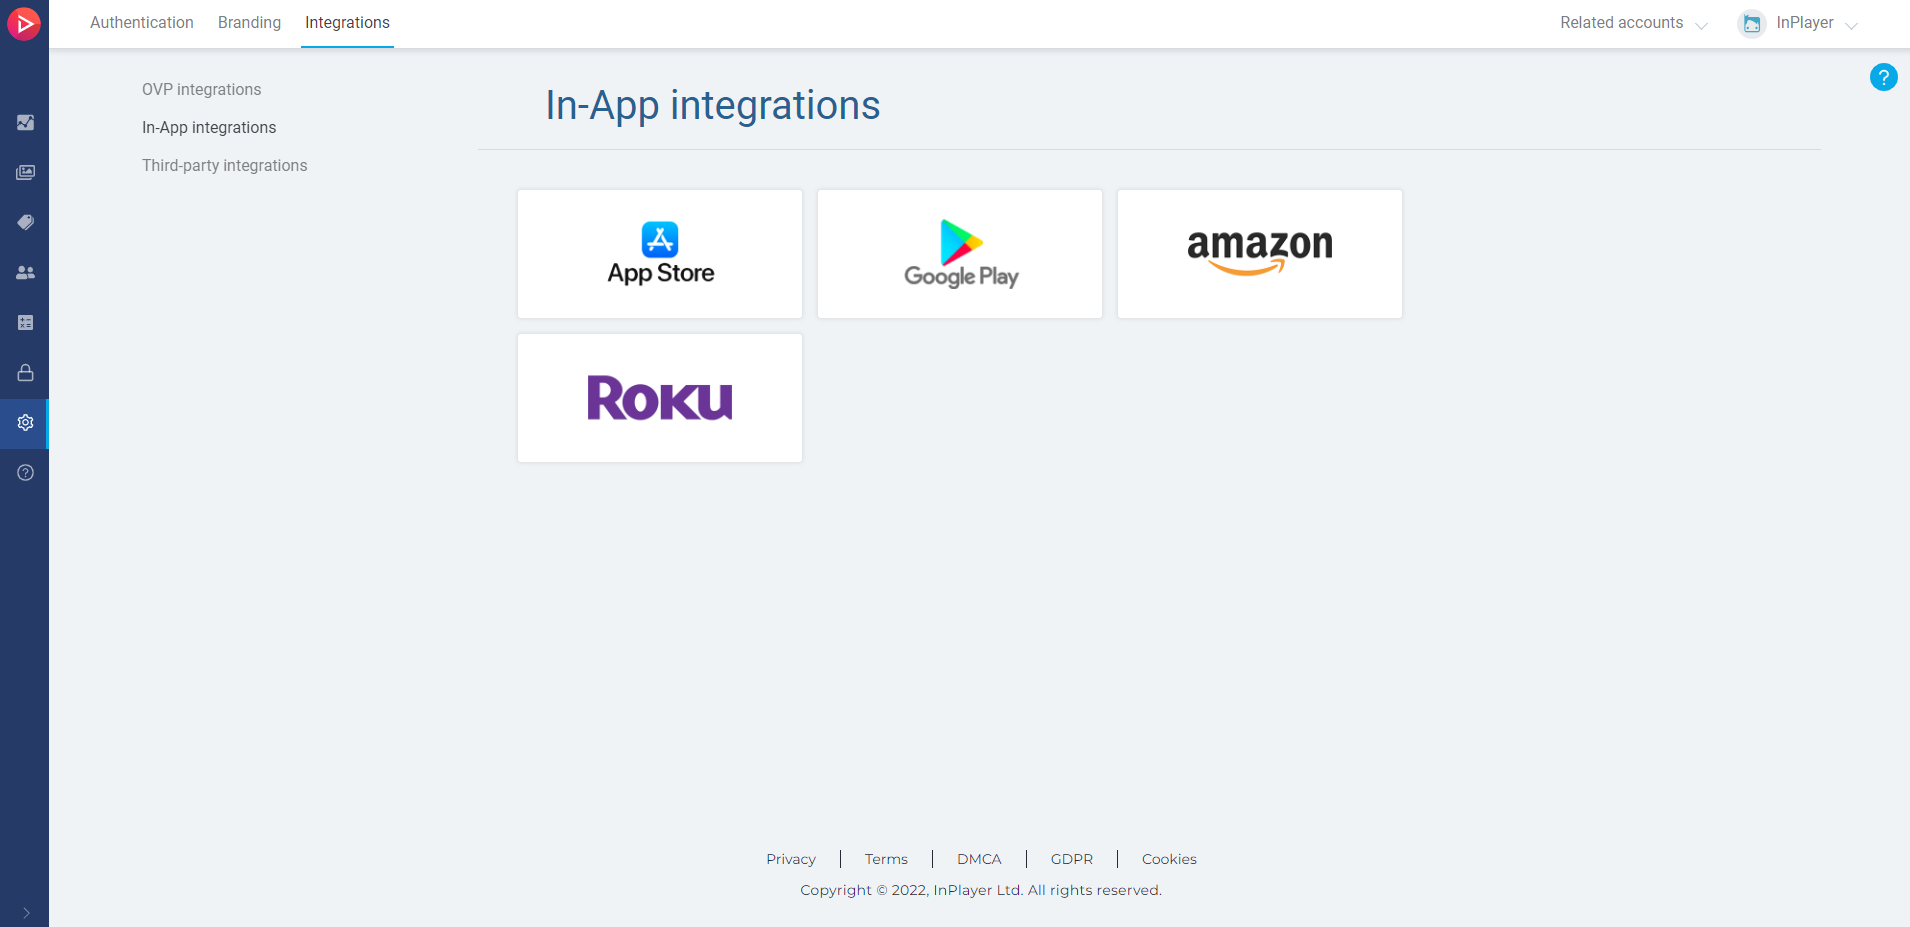
Our platform supports in-app payments for Android which means you can integrate the paywall in your Android apps and sell your content there.
Enabling Android payments
If you wish to enable Android payments on your InPlayer account, just send us an email at clients@inplayer.com or contact your InPlayer account manager.
The viewer experience of purchasing an InPlayer asset via your app is exactly the same as the experience of making a regular in-app payment.
There are no extra steps to follow. The viewer just follows your app’s regular payment flow.
Note that the viewers always need to log into the app where they watch the content with the same account as the one they used to purchase the content originally.
If you have any questions, don’t hesitate to contact us at clients@inplayer.com.
This guide describes how to set up InPlayer in-app payments for your Android app. When setting things up, please make sure to take your time and follow each step in the below instructions carefully.
If you are planning on using in-app purchases, make sure to let us know so we can enable the proper payment gateway on your account.
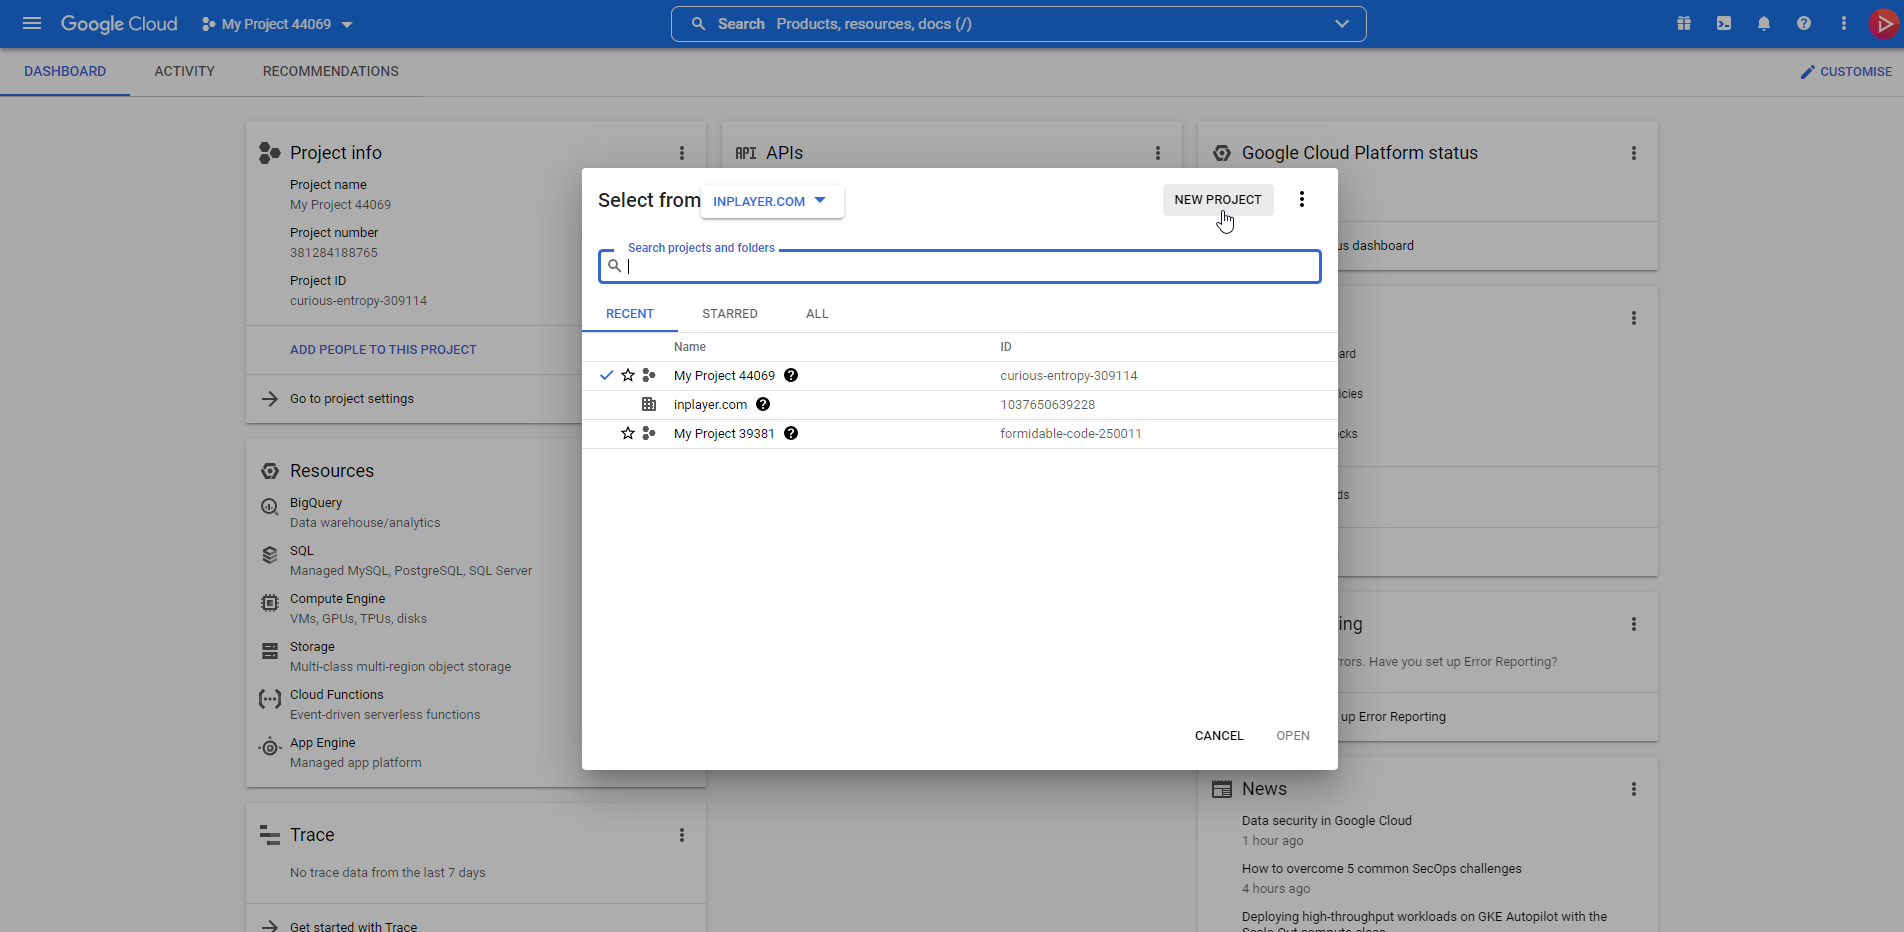
You will need to create a new project and a topic.
Note that this guide assumes that you do not already have a linked project in your Google Play Console. If you do, instead of creating a new project, use the existing one and create the topic there.
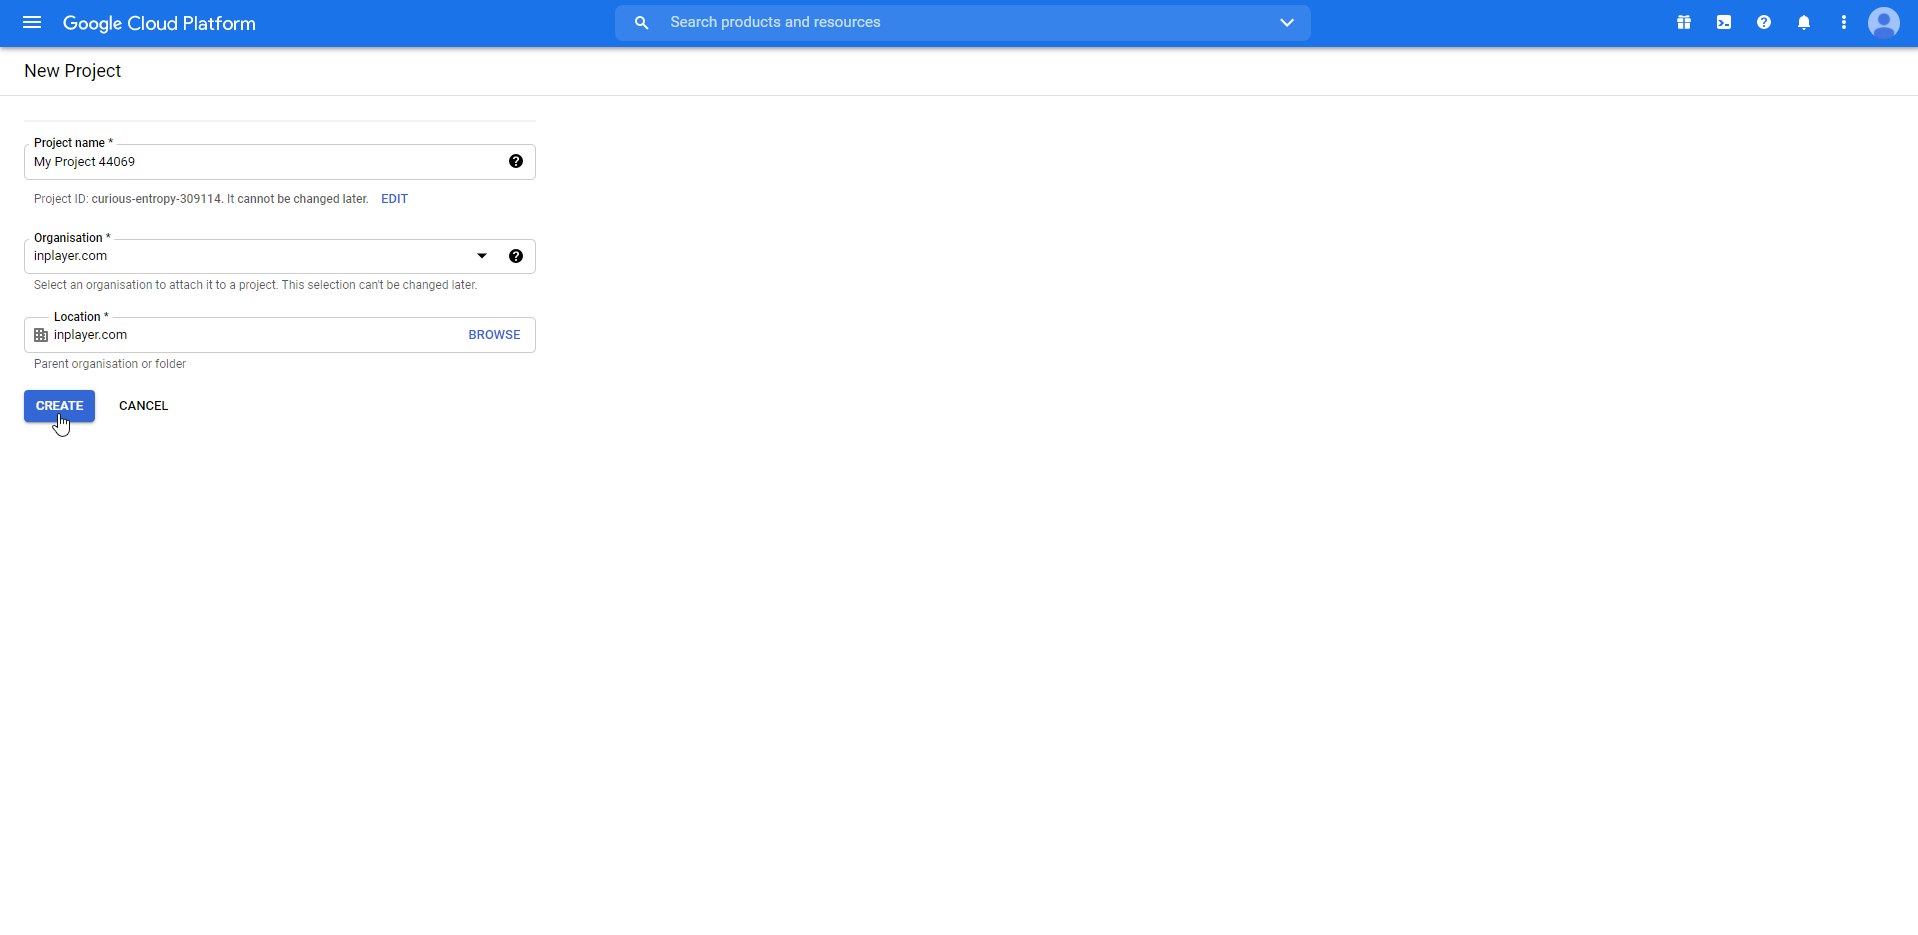
Creating the project
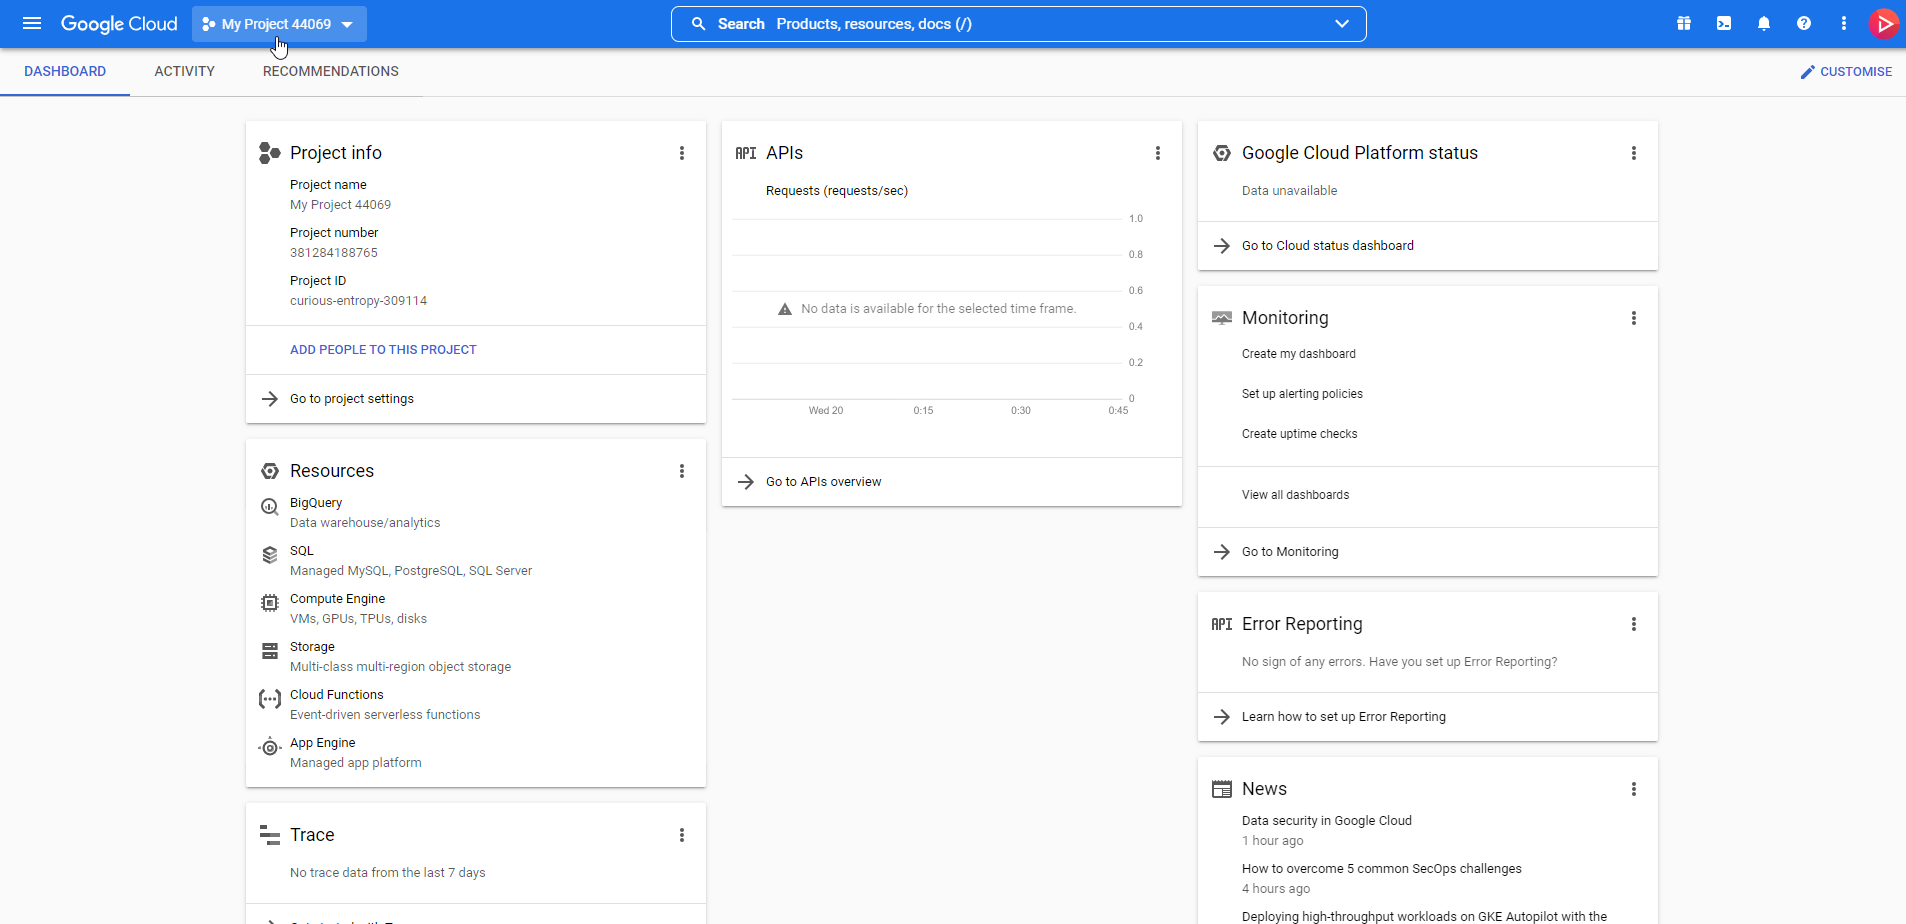
Start by creating the new project. (If you already have one, skip this step and move to creating the topic.)
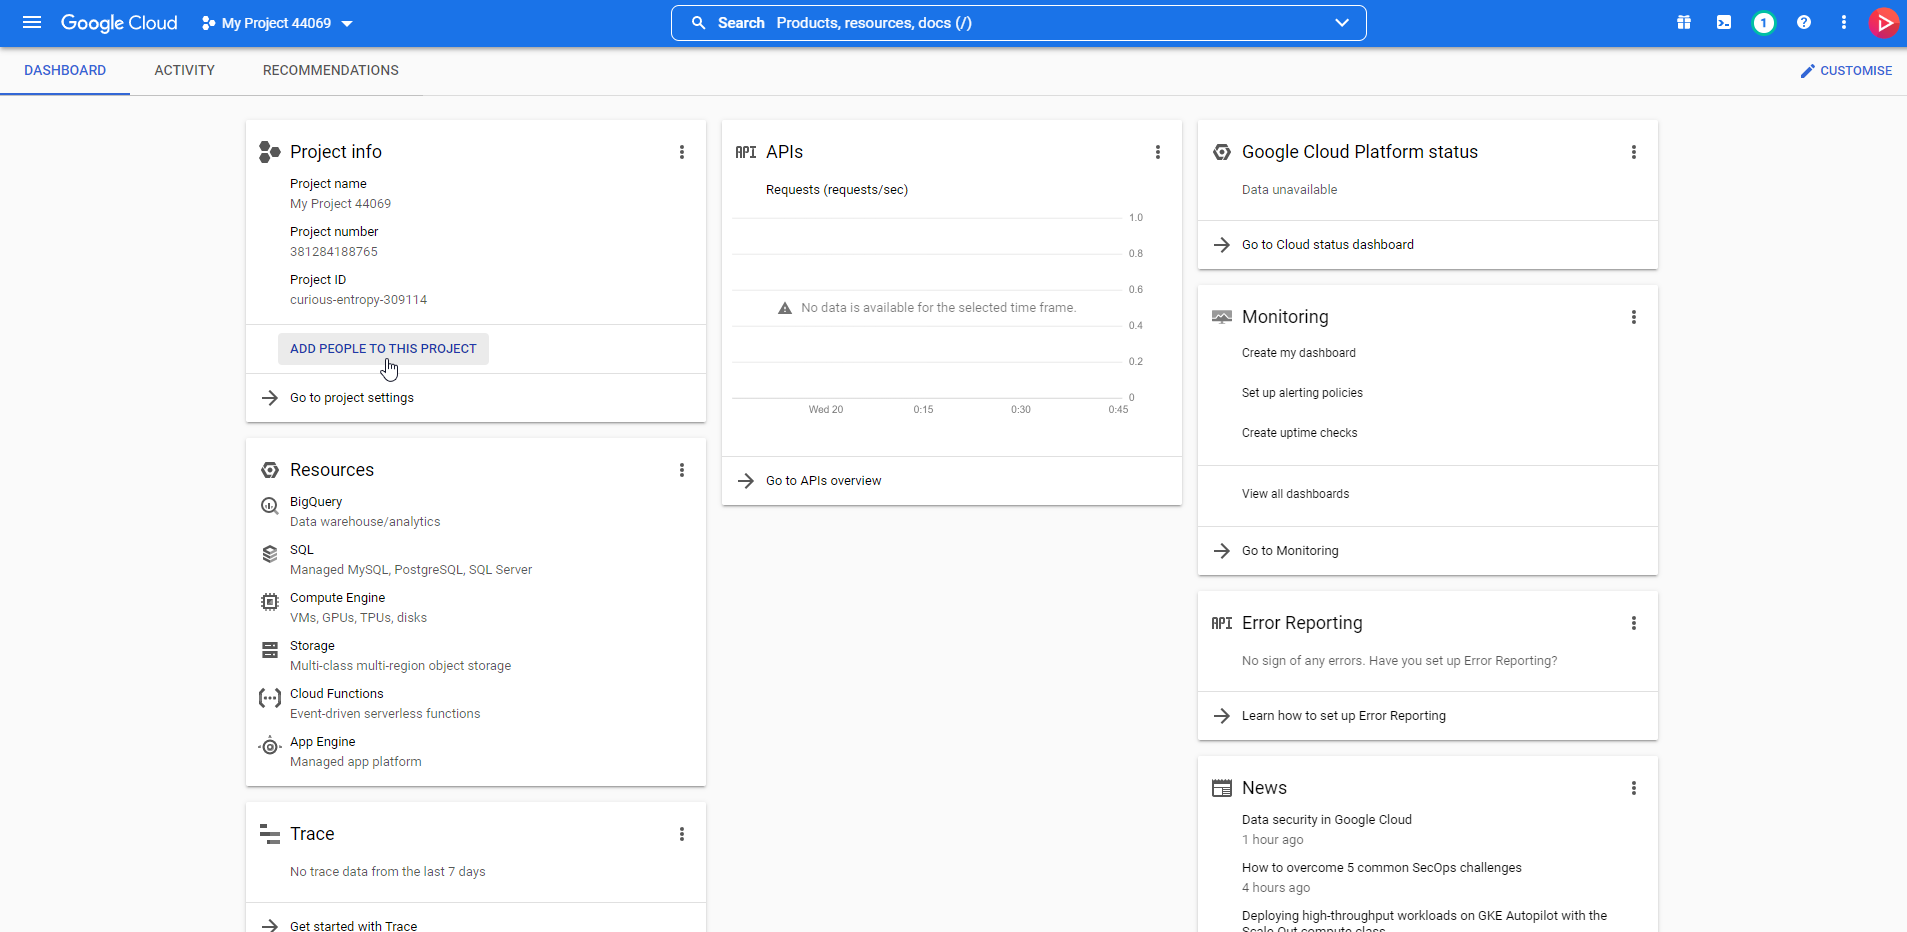
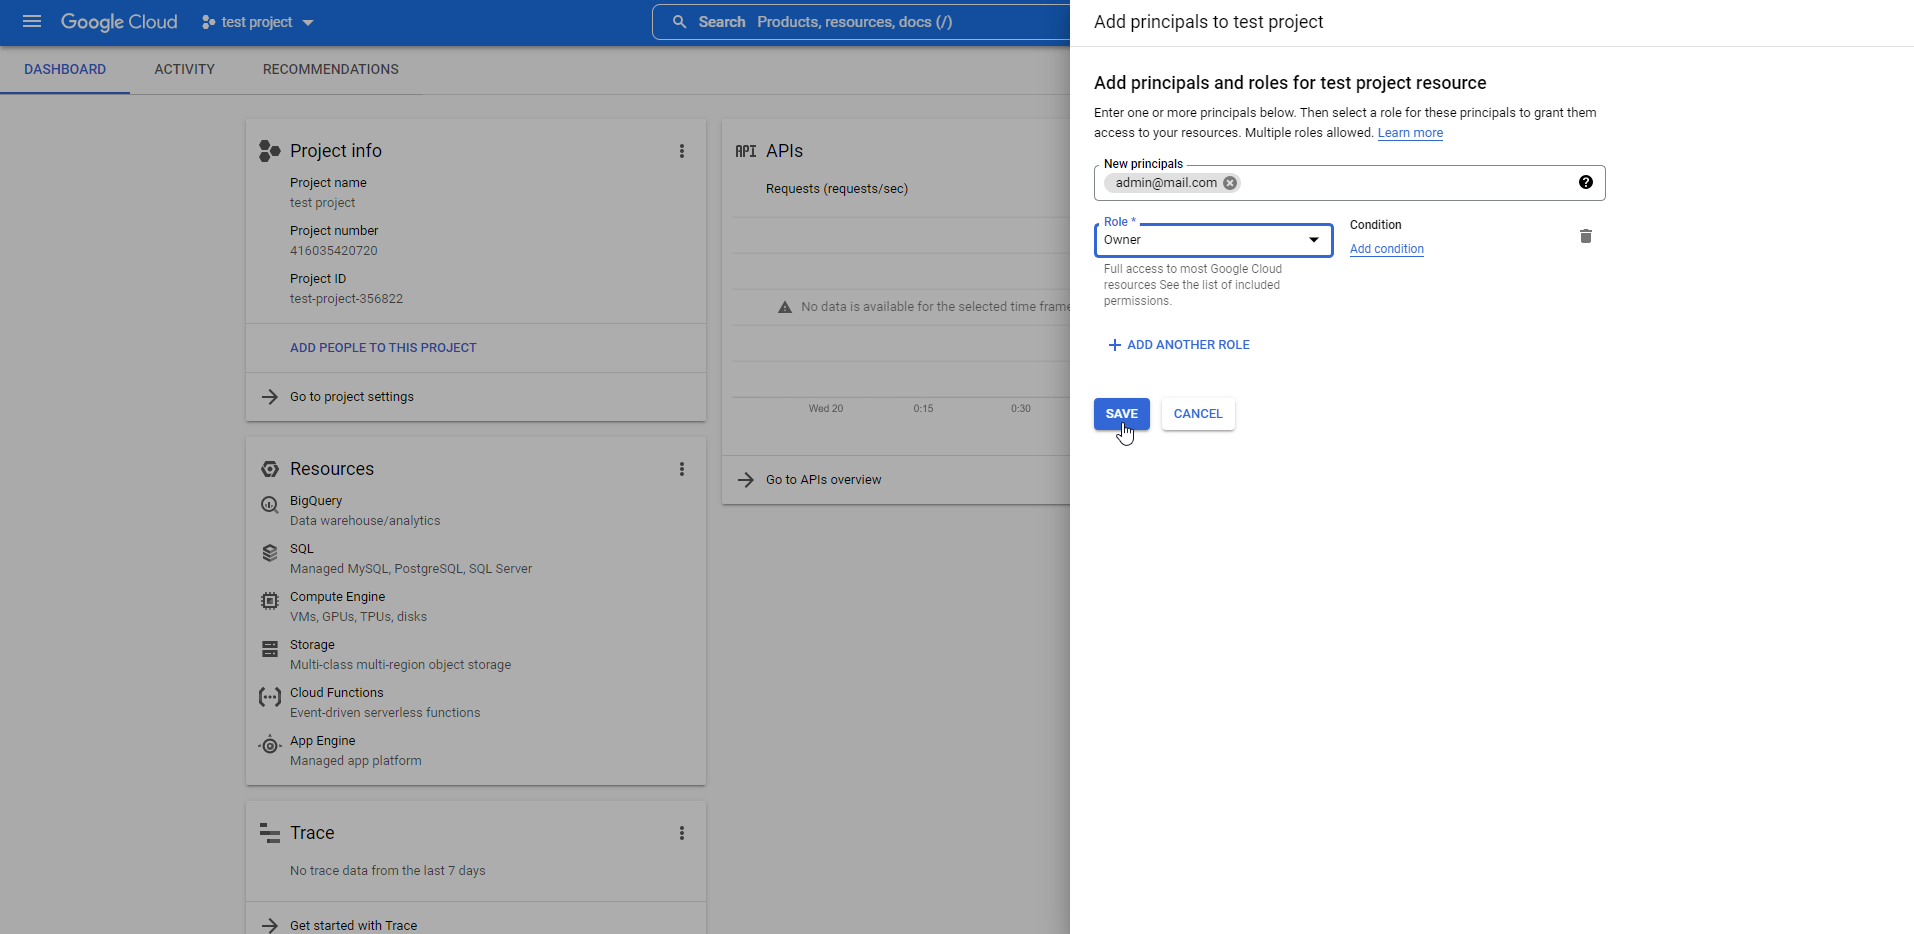
In the new project, click on ADD PEOPLE TO THIS PROJECT.
In New principals, add the admin email of your Google developer account.
Under Roles, select Owner.
Click SAVE.
You can now create the topic.
Creating the topic
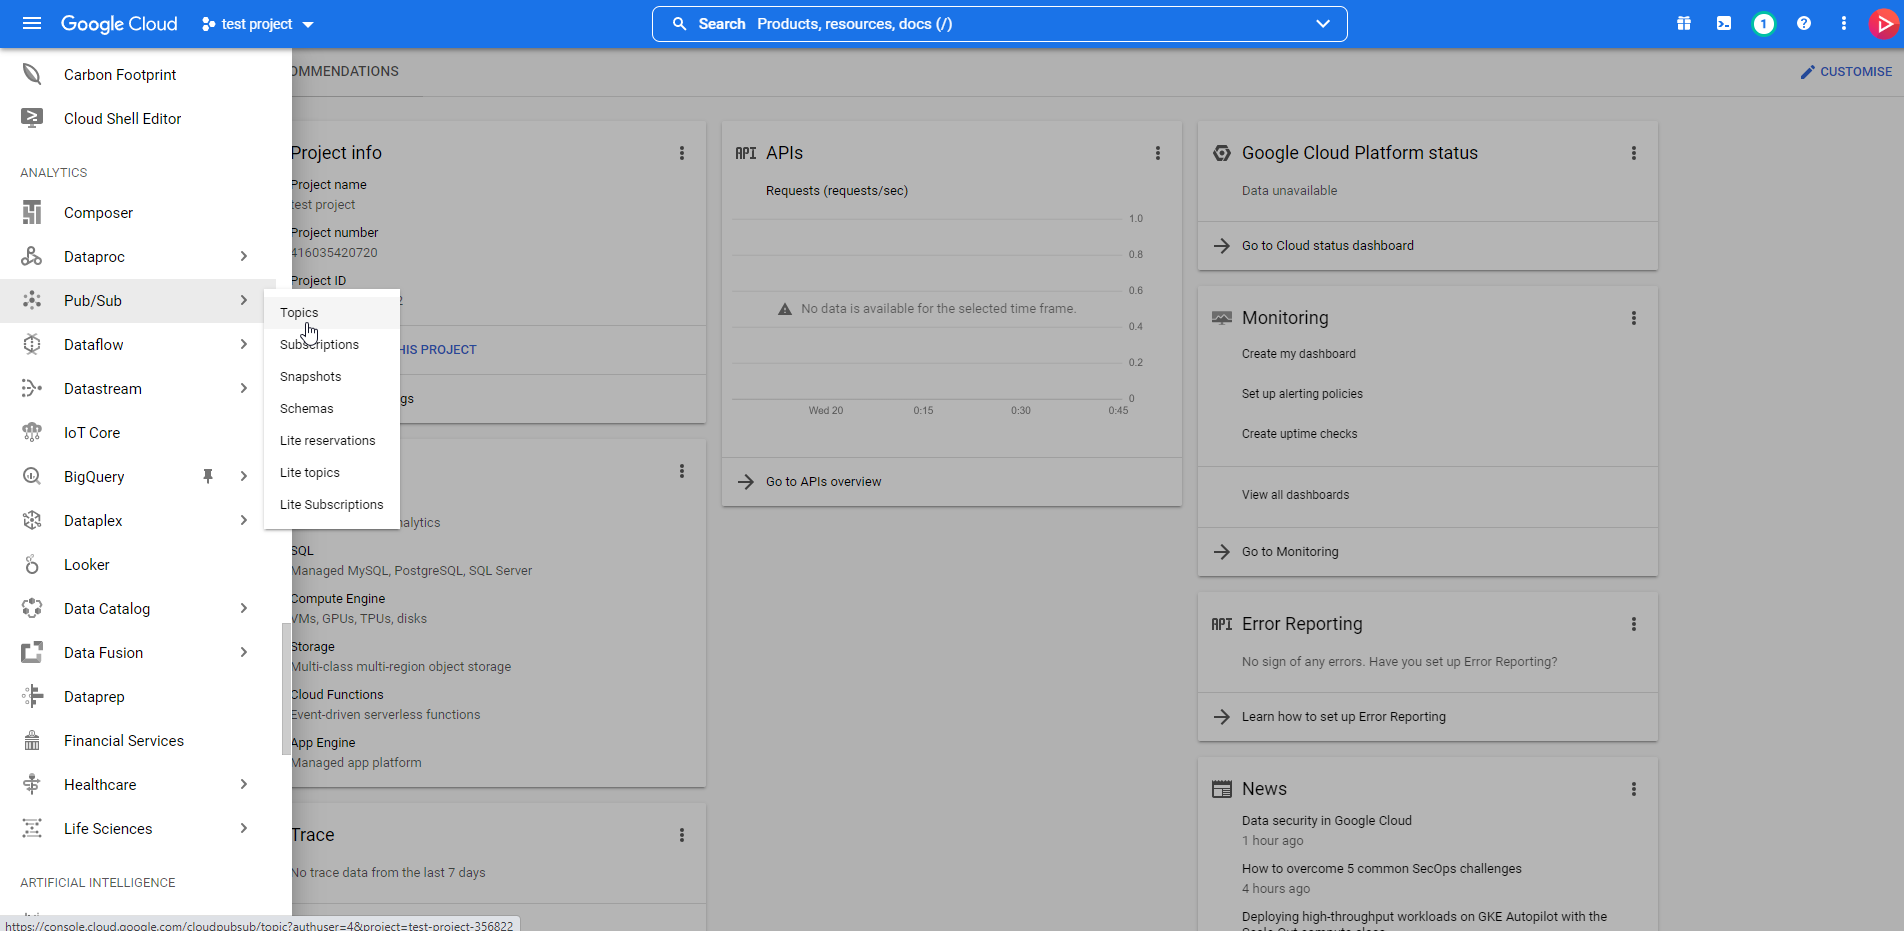
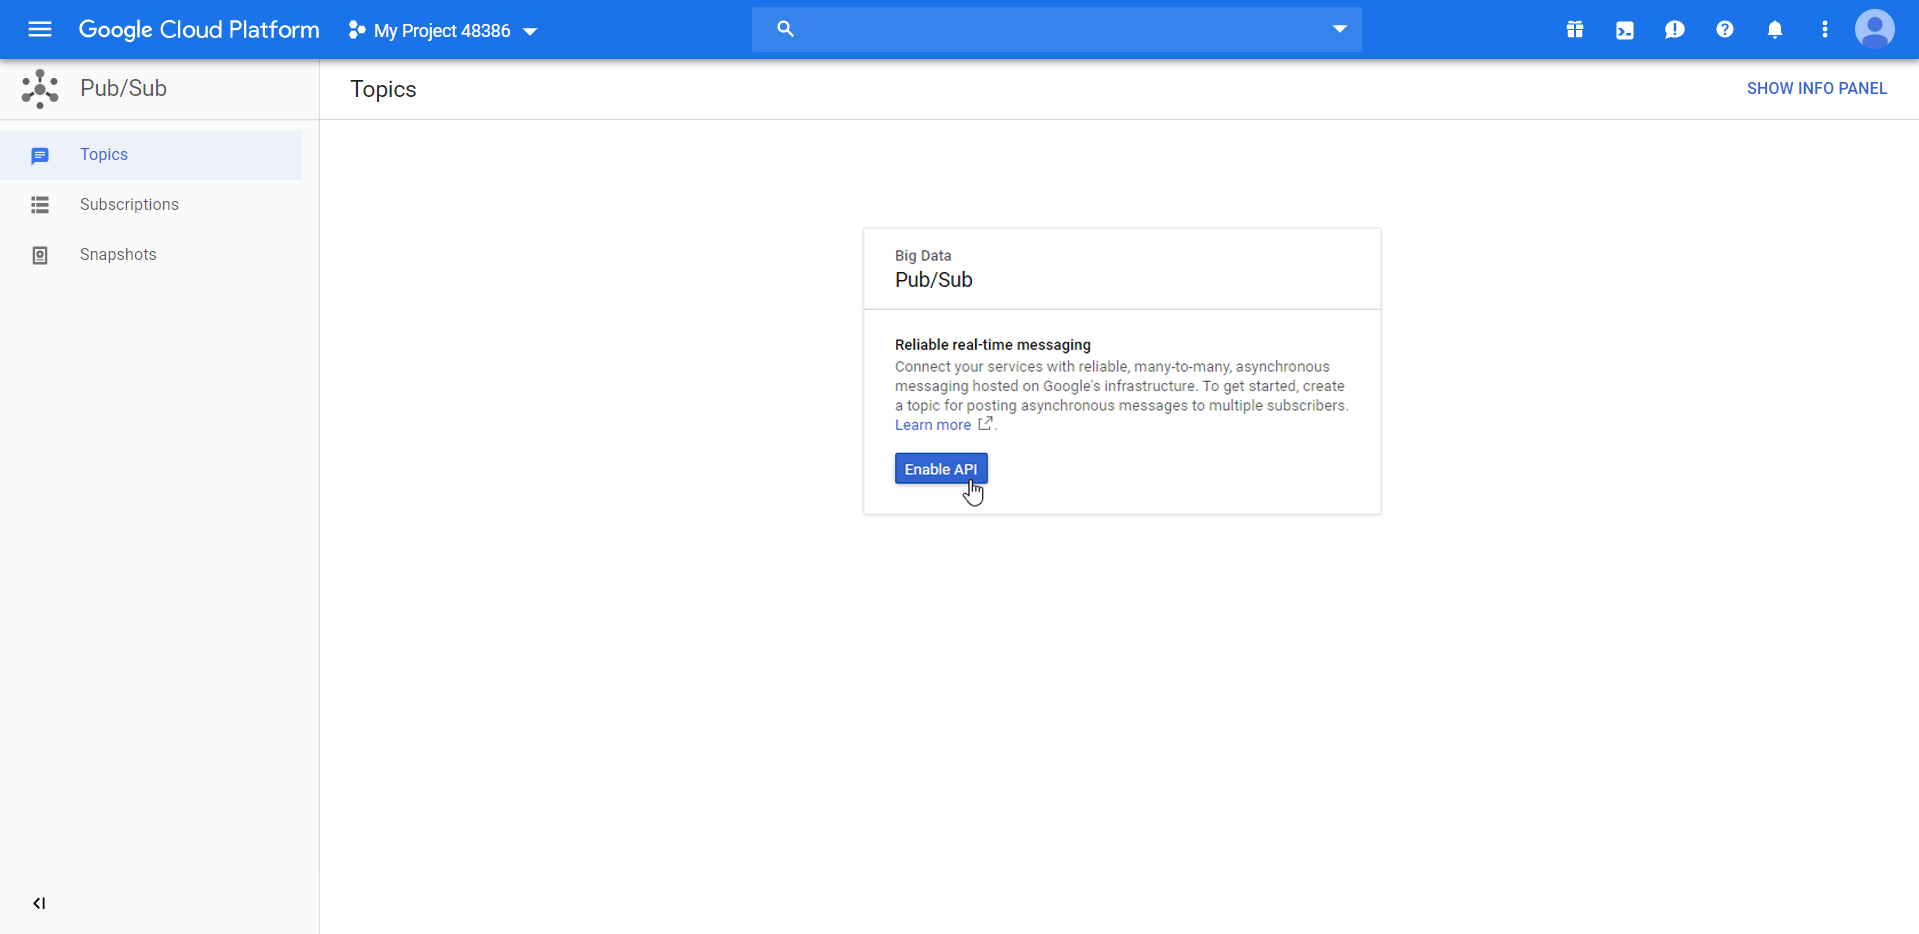
From the left-hand menu, scroll down to Pub/Sub, and click on Topics.
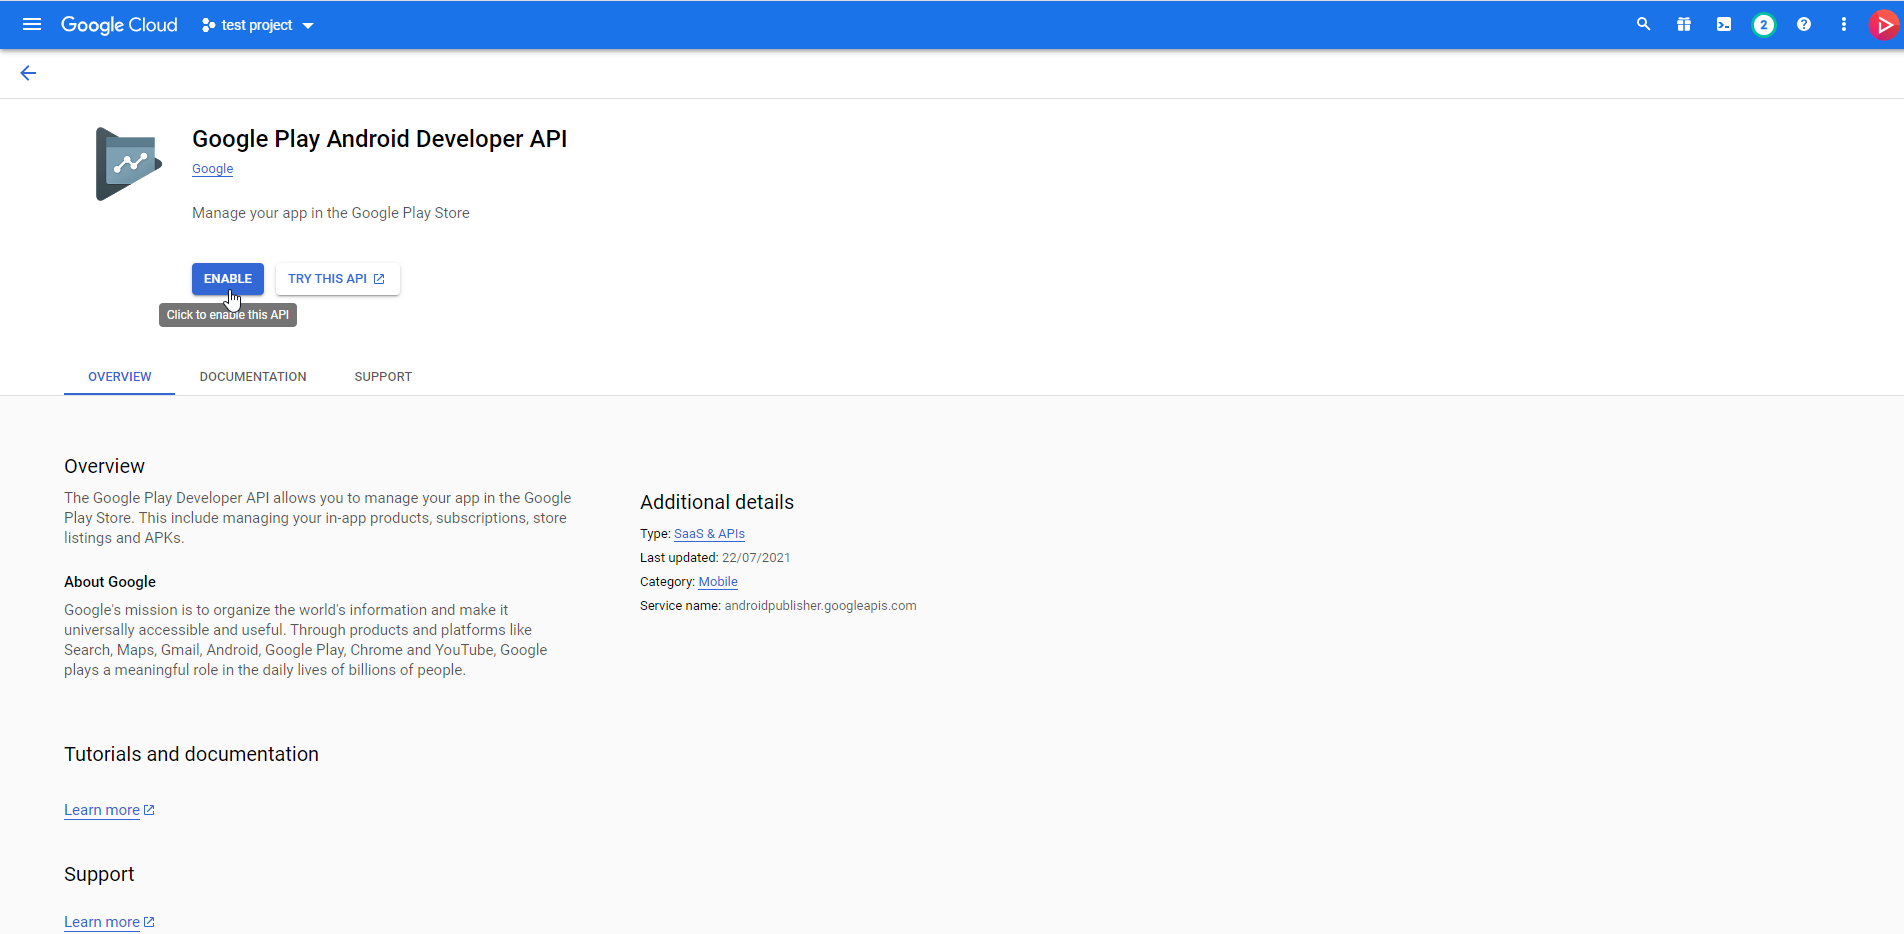
Click on ENABLE API.
This enables API notifications to the InPlayer platform.
You might not have to click ENABLE API, if you have already enabled APIs on your console. If so, just continue with the next step.
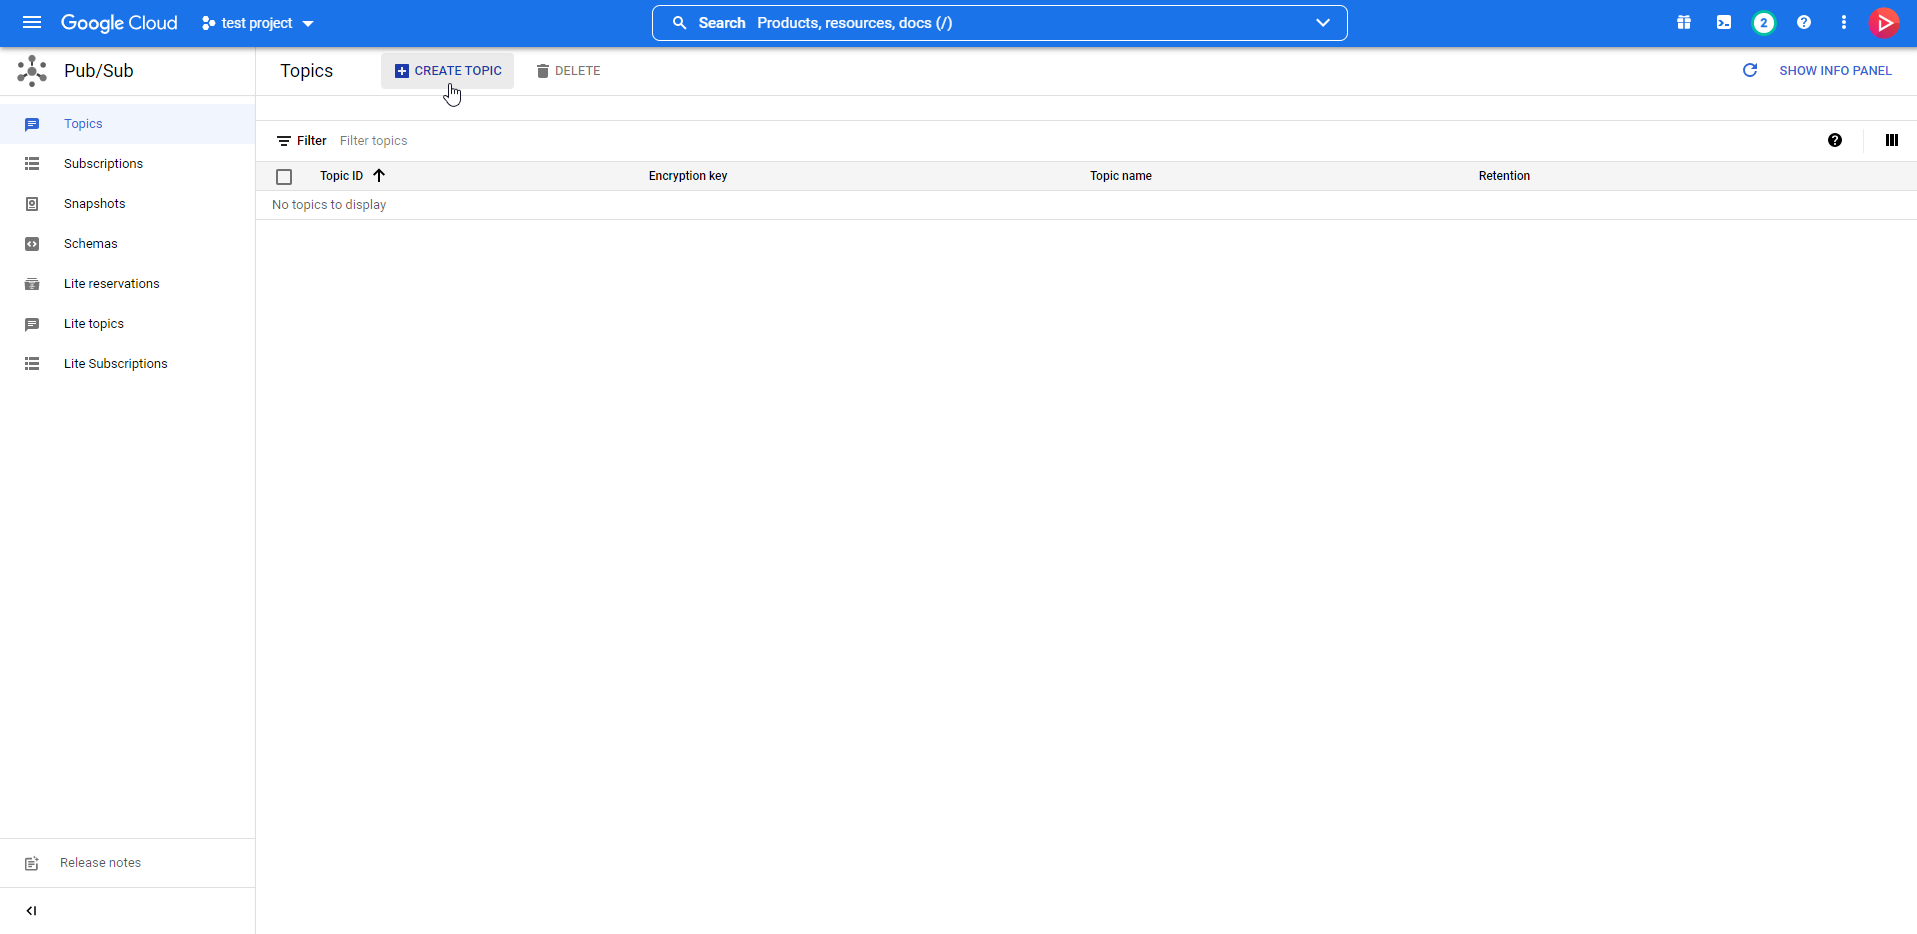
Next, click on CREATE TOPIC.
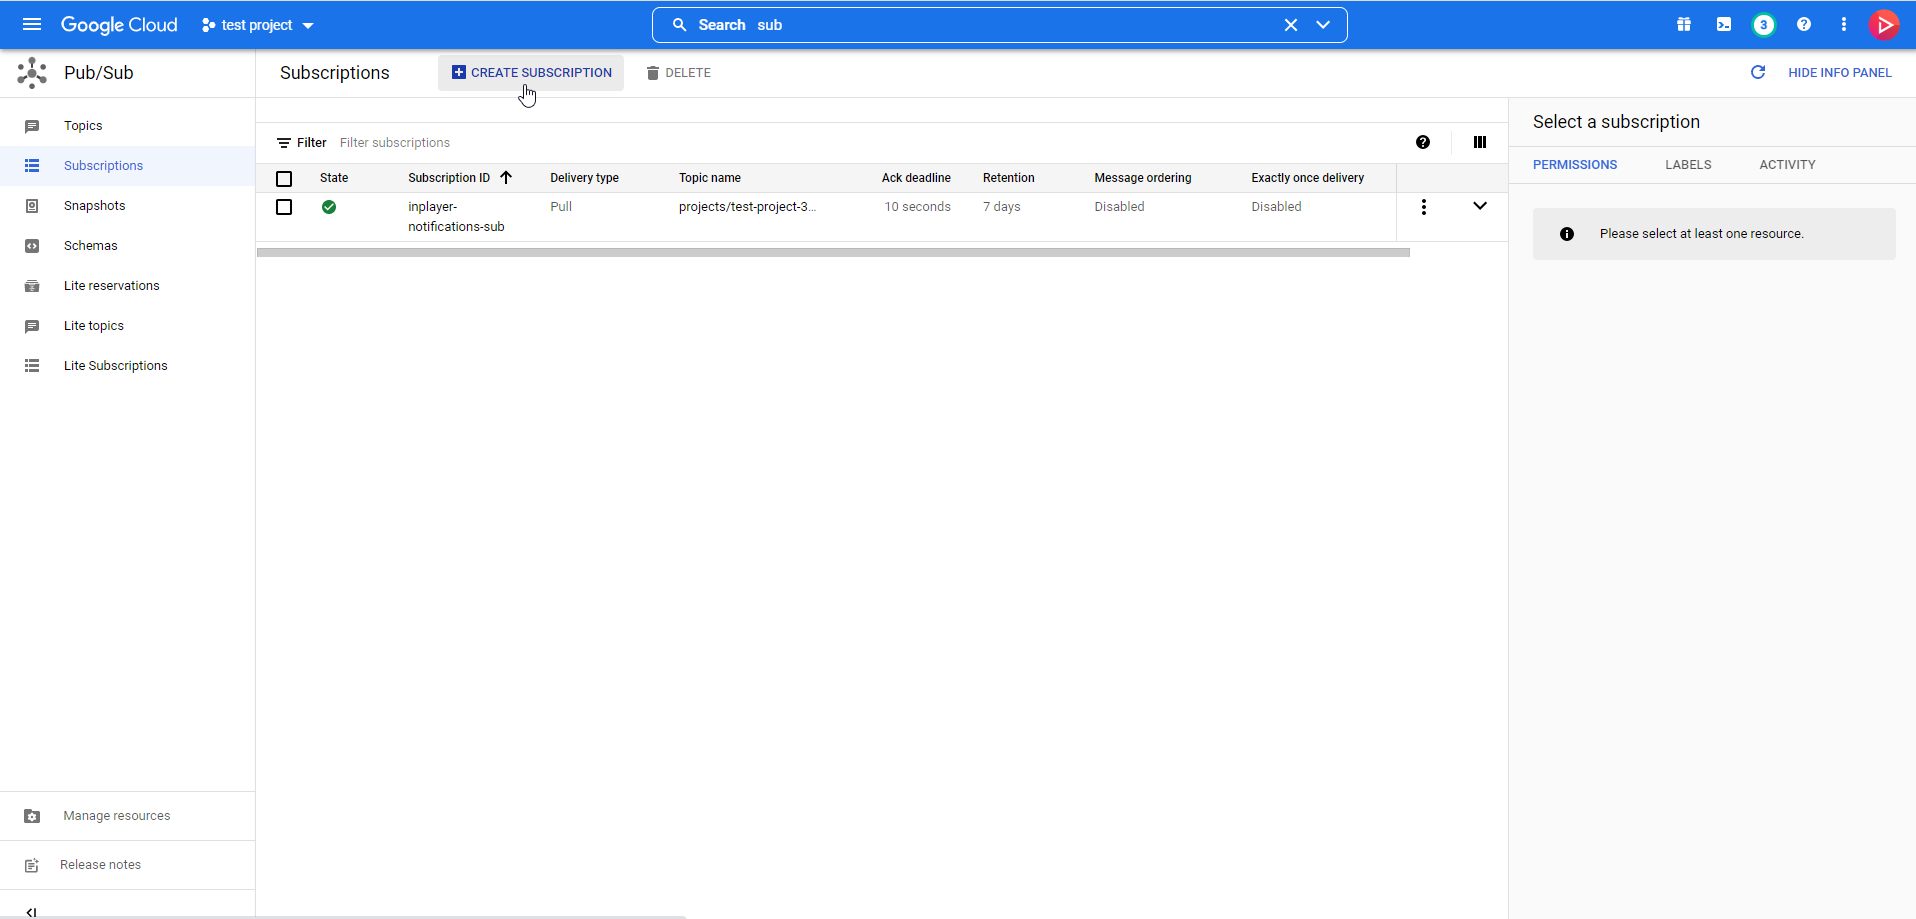
For Topic ID, enter inplayer-notifications. Copy the Topic name shown under the Topic ID field and save it somewhere on your PC. You’ll need it later. Finally, click CREATE TOPIC.
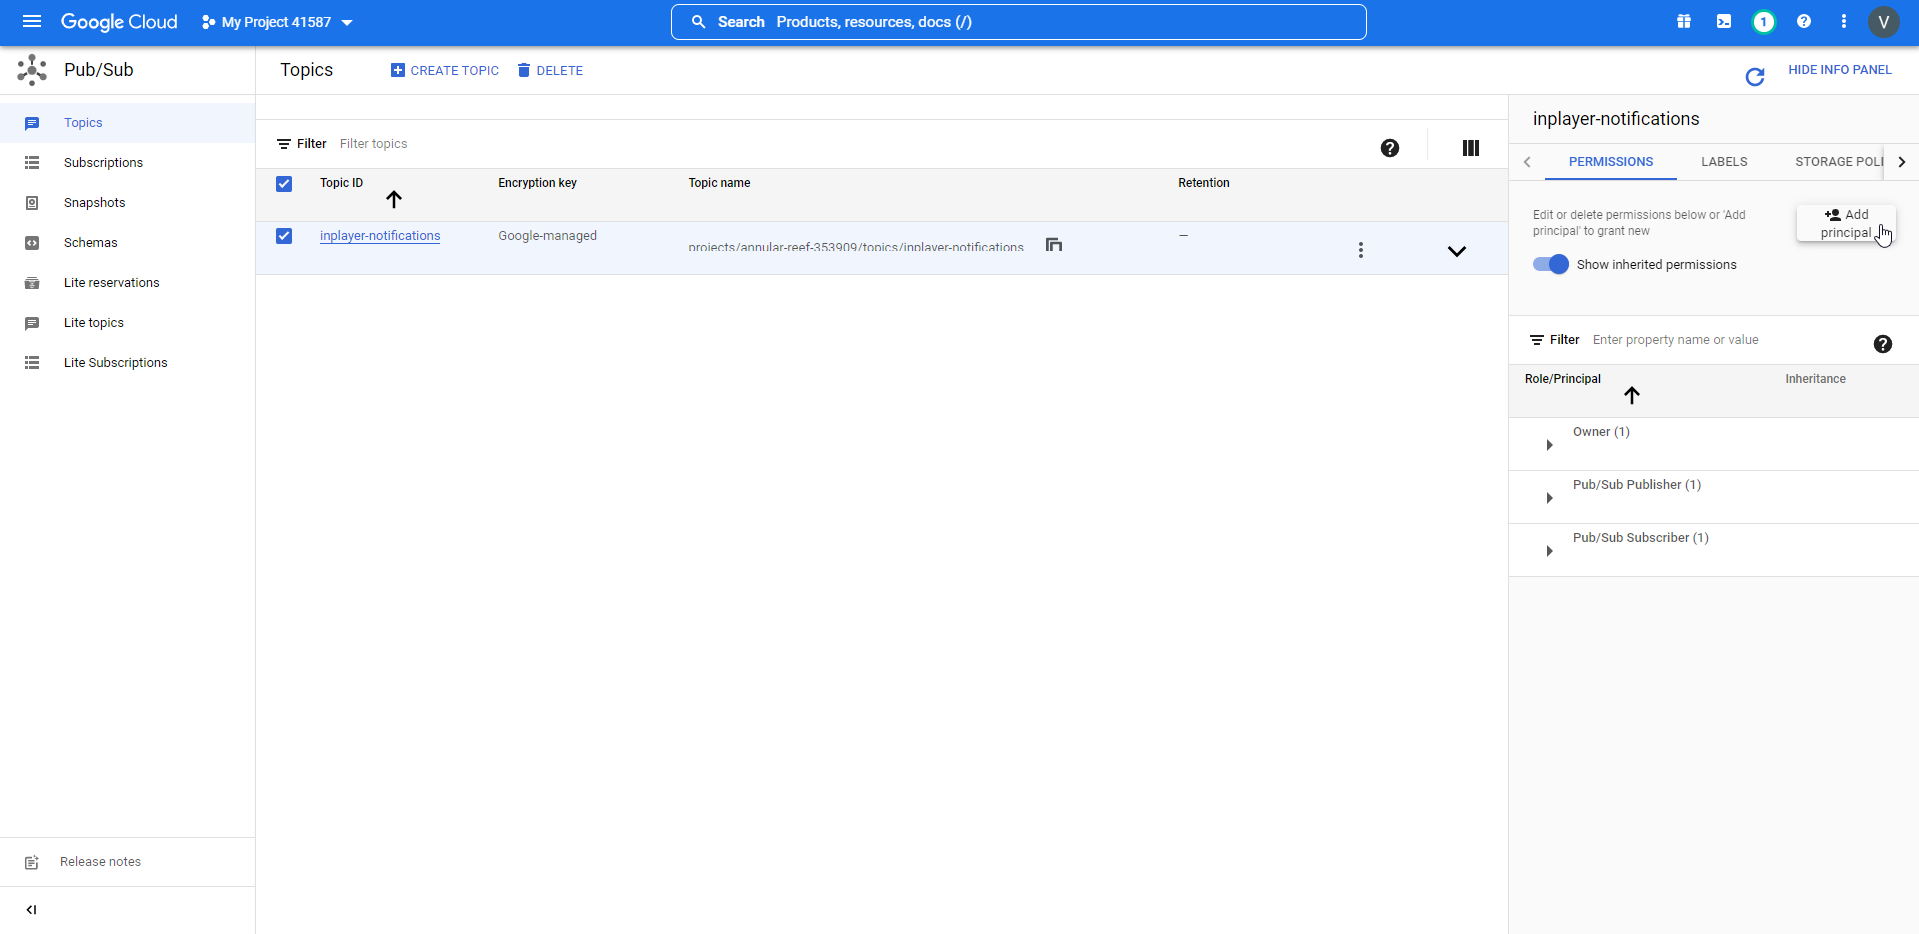
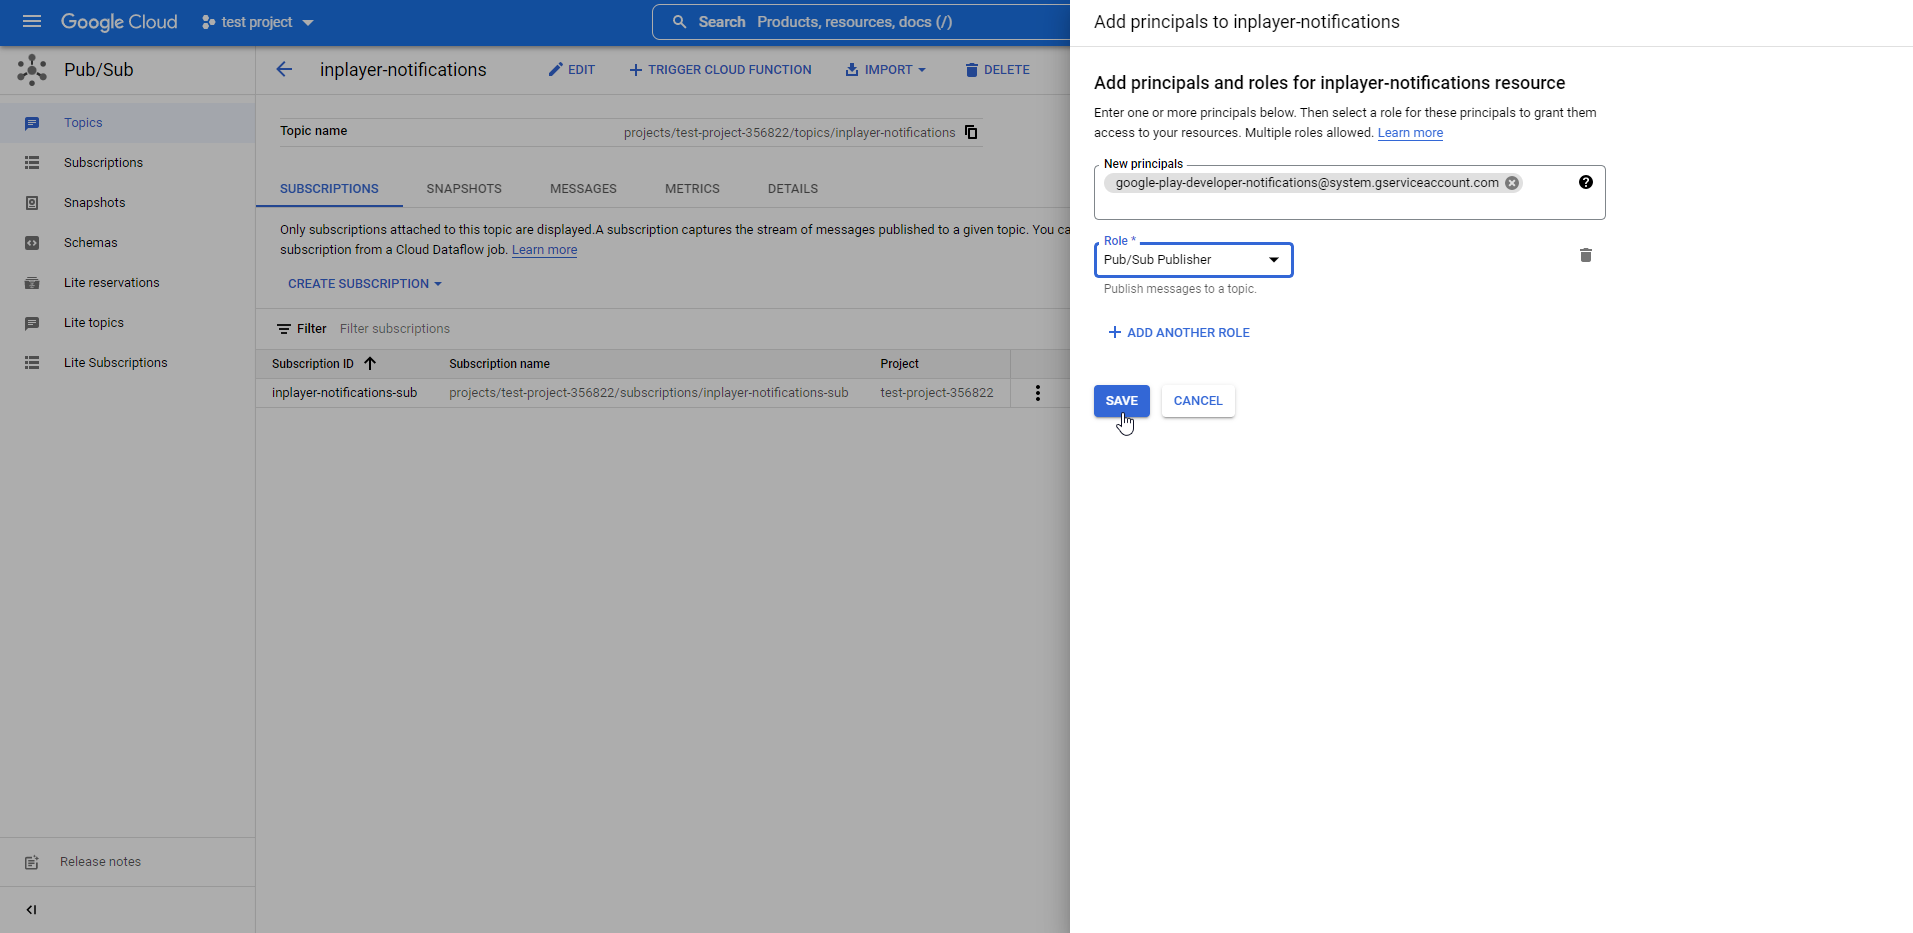
In the info panel on the right, under Permissions, click ADD PRINCIPAL.
If you don’t see the info panel, click SHOW INFO PANEL at the top right of the page.
Under New principals, add the following URL: google-play-developer-notifications@system.gserviceaccount.com
Under Role, go to Pub/Sub, and select Pub/Sub Publisher.
Click SAVE.
Go to the API library, select your project, and click ENABLE to enable the API for it.
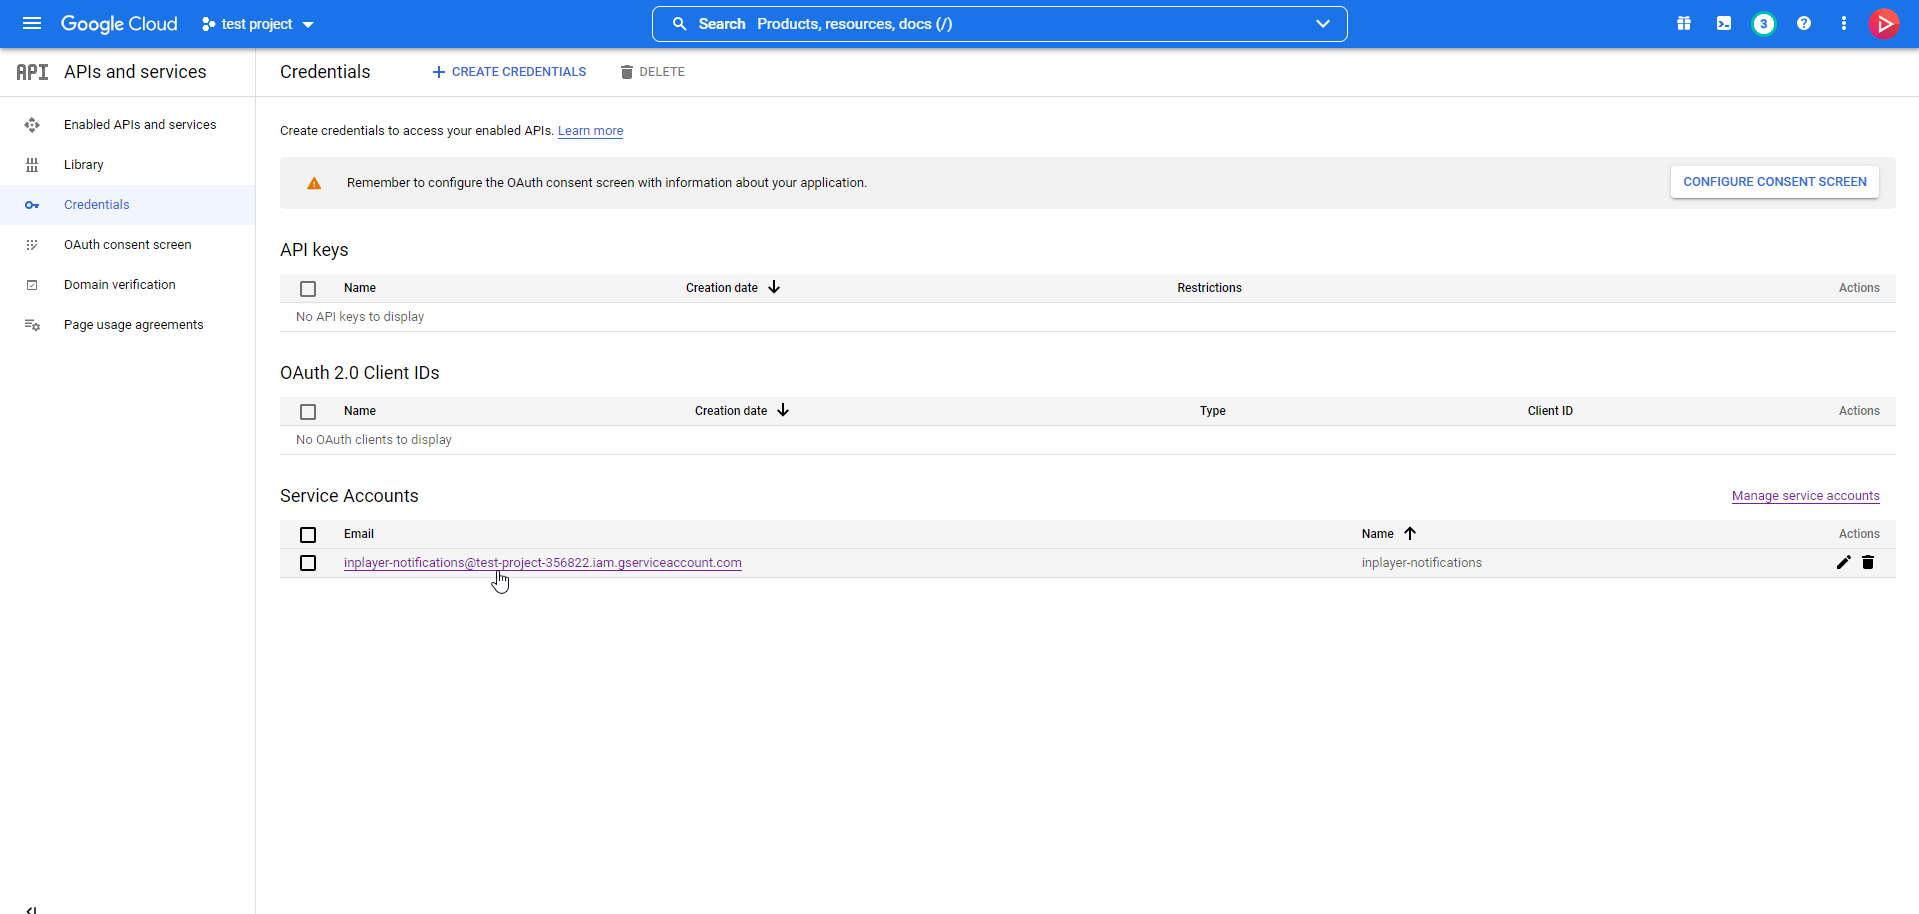
Next, you need to create a service account.
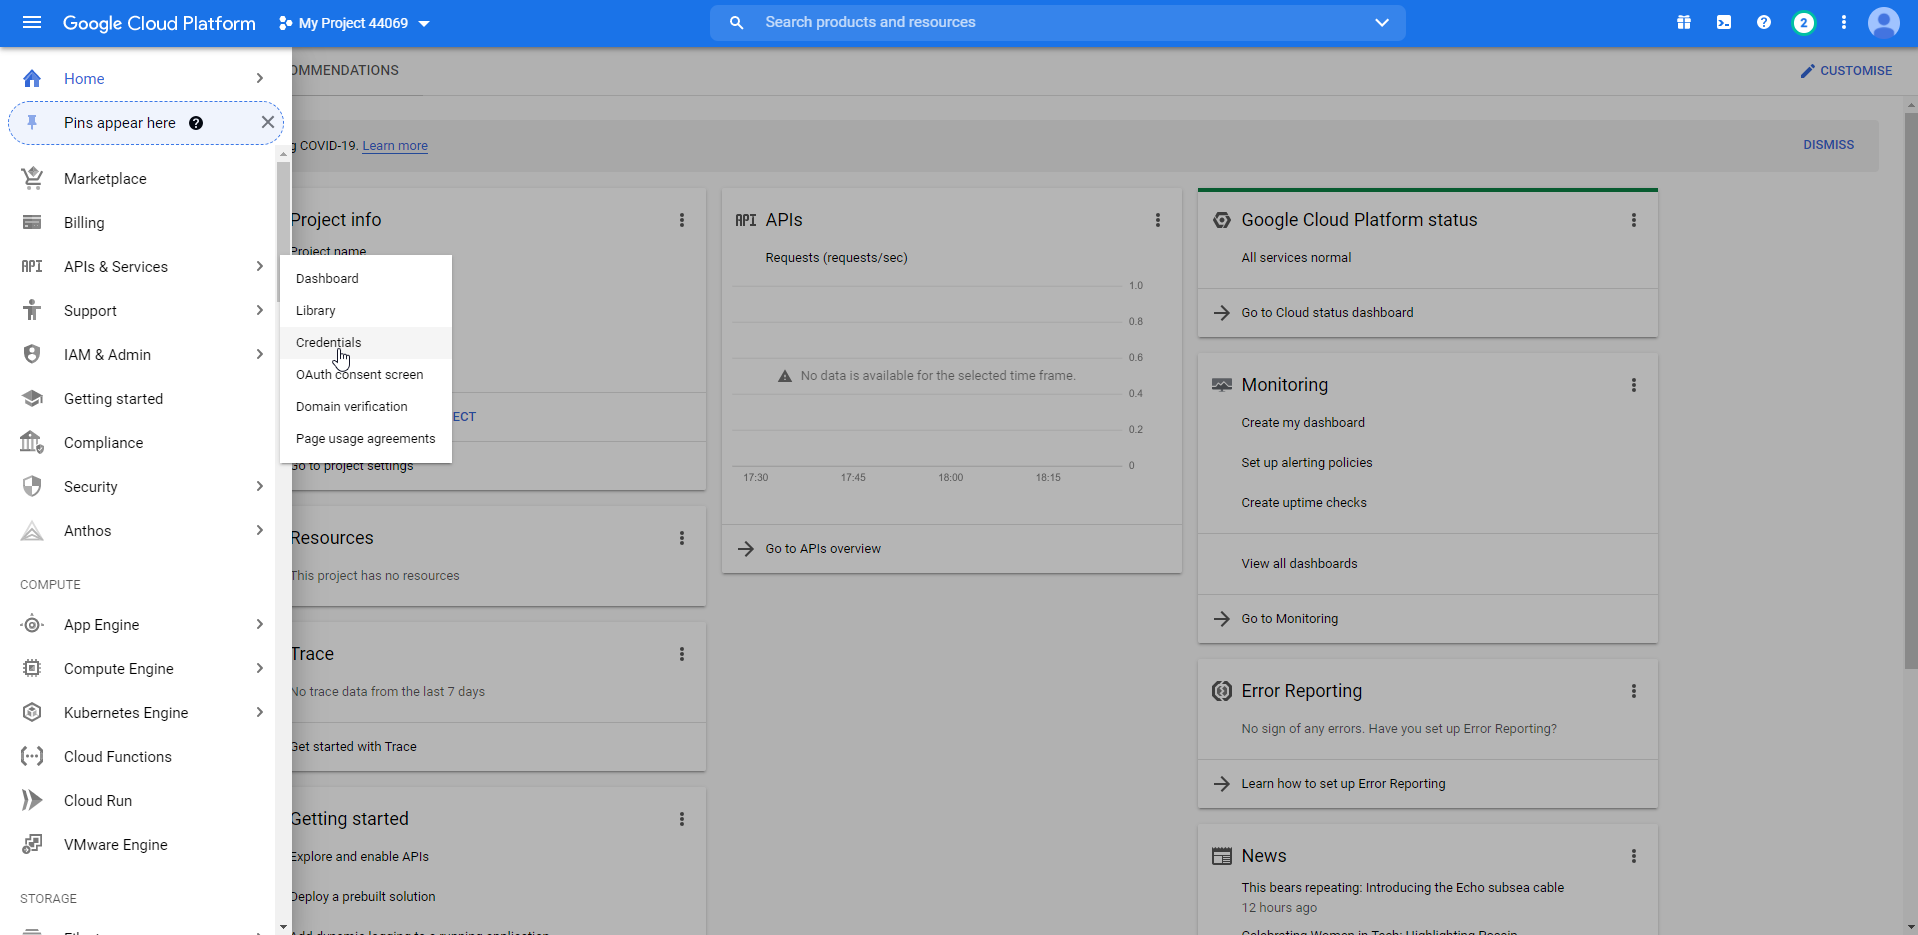
Go to the Google Cloud Platform, and from the left-hand menu, go to API & Services and then to Credentials.
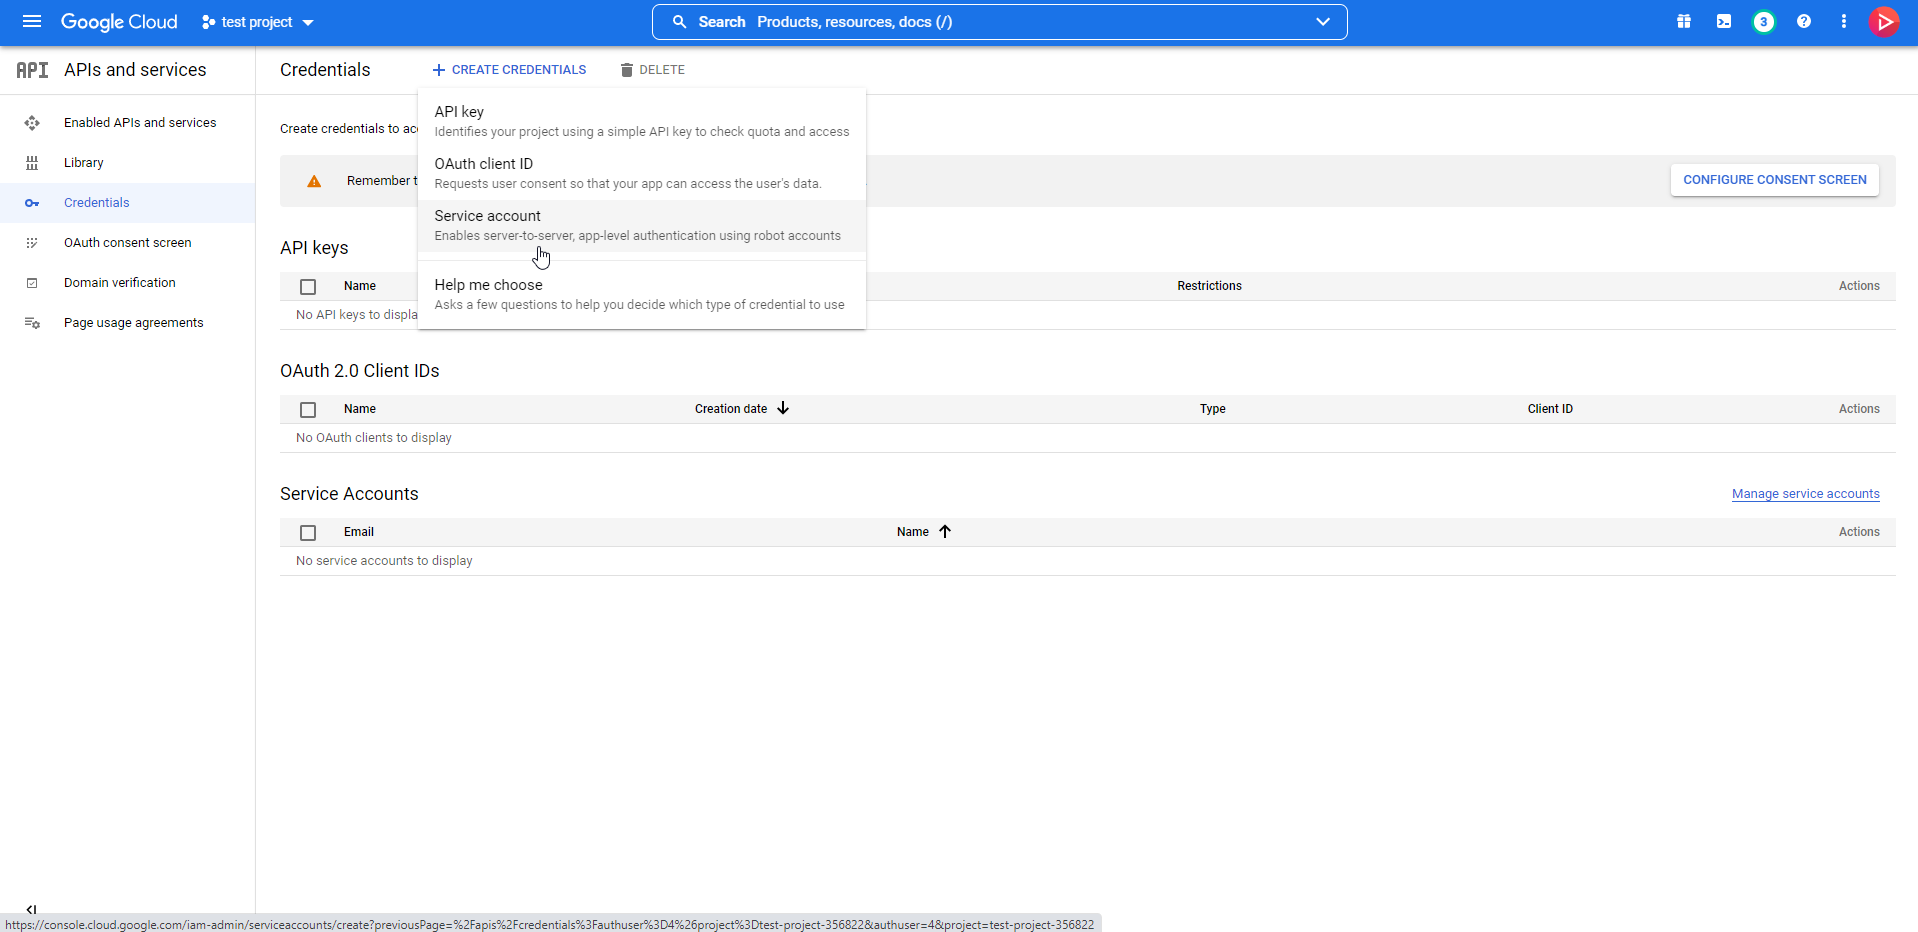
Click on CREATE CREDENTIALS and select Service account.
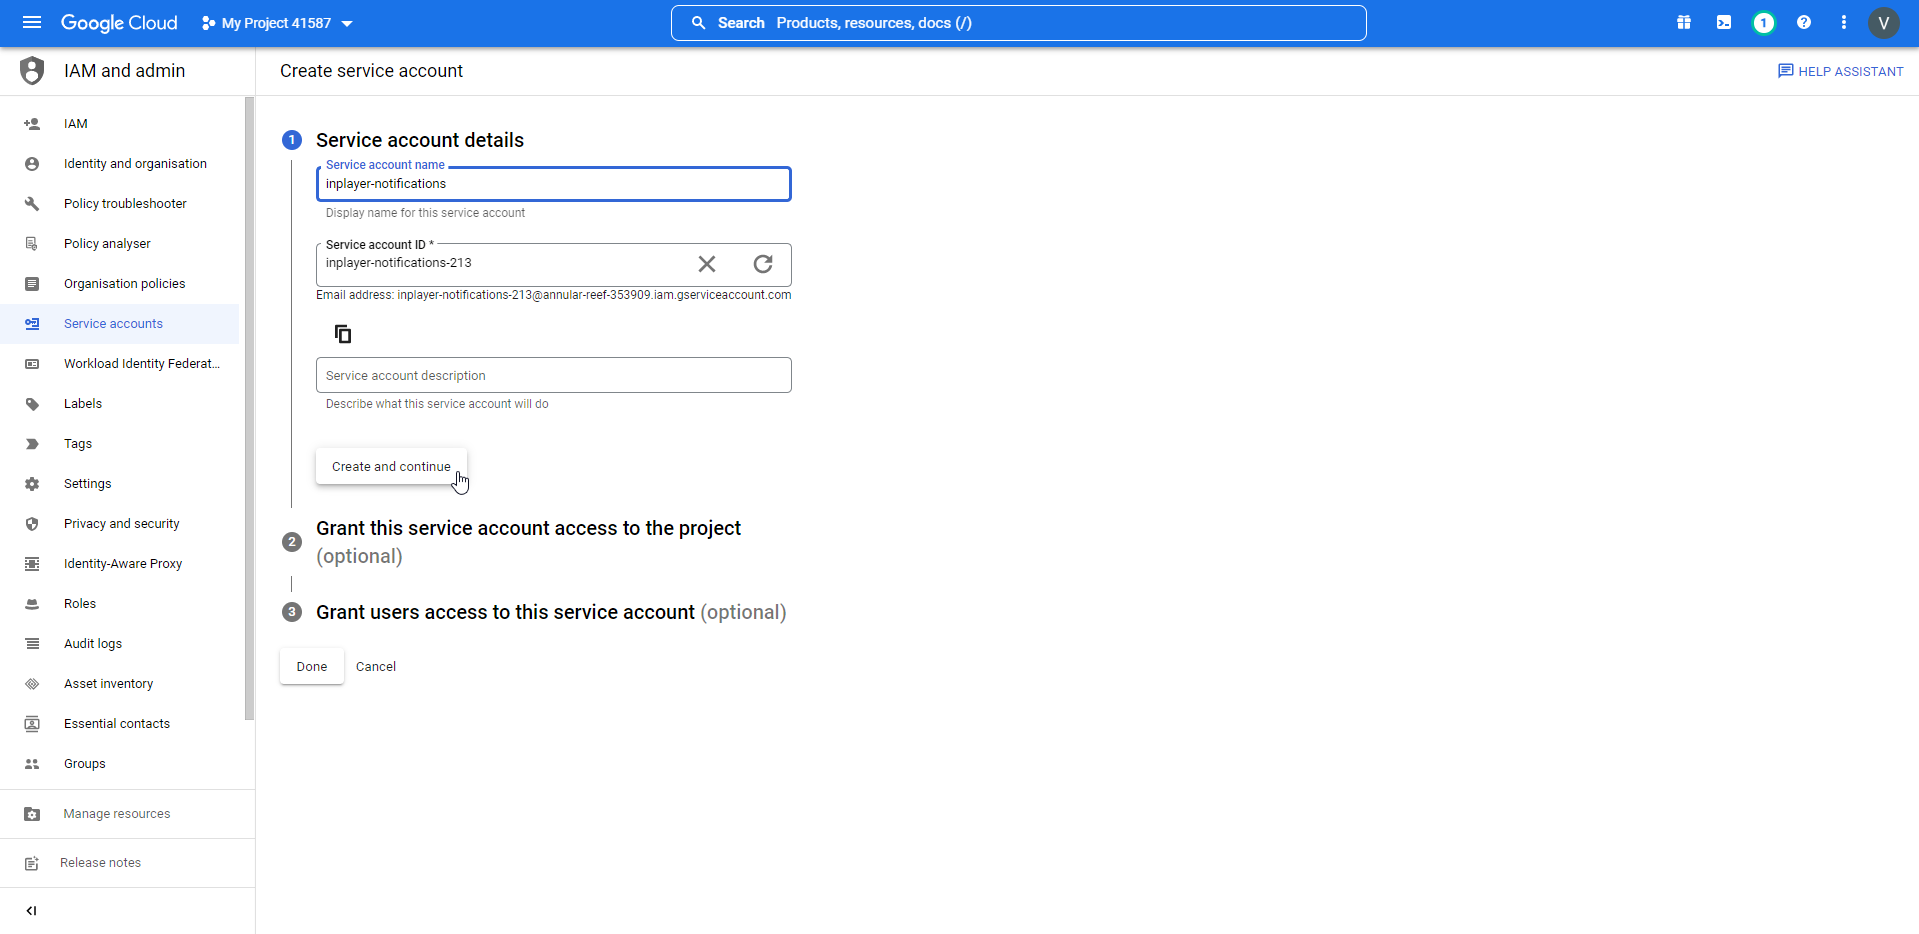
Set up the new service account.
In Service account name, enter inplayer-notifications.
Click CreateandContinue.
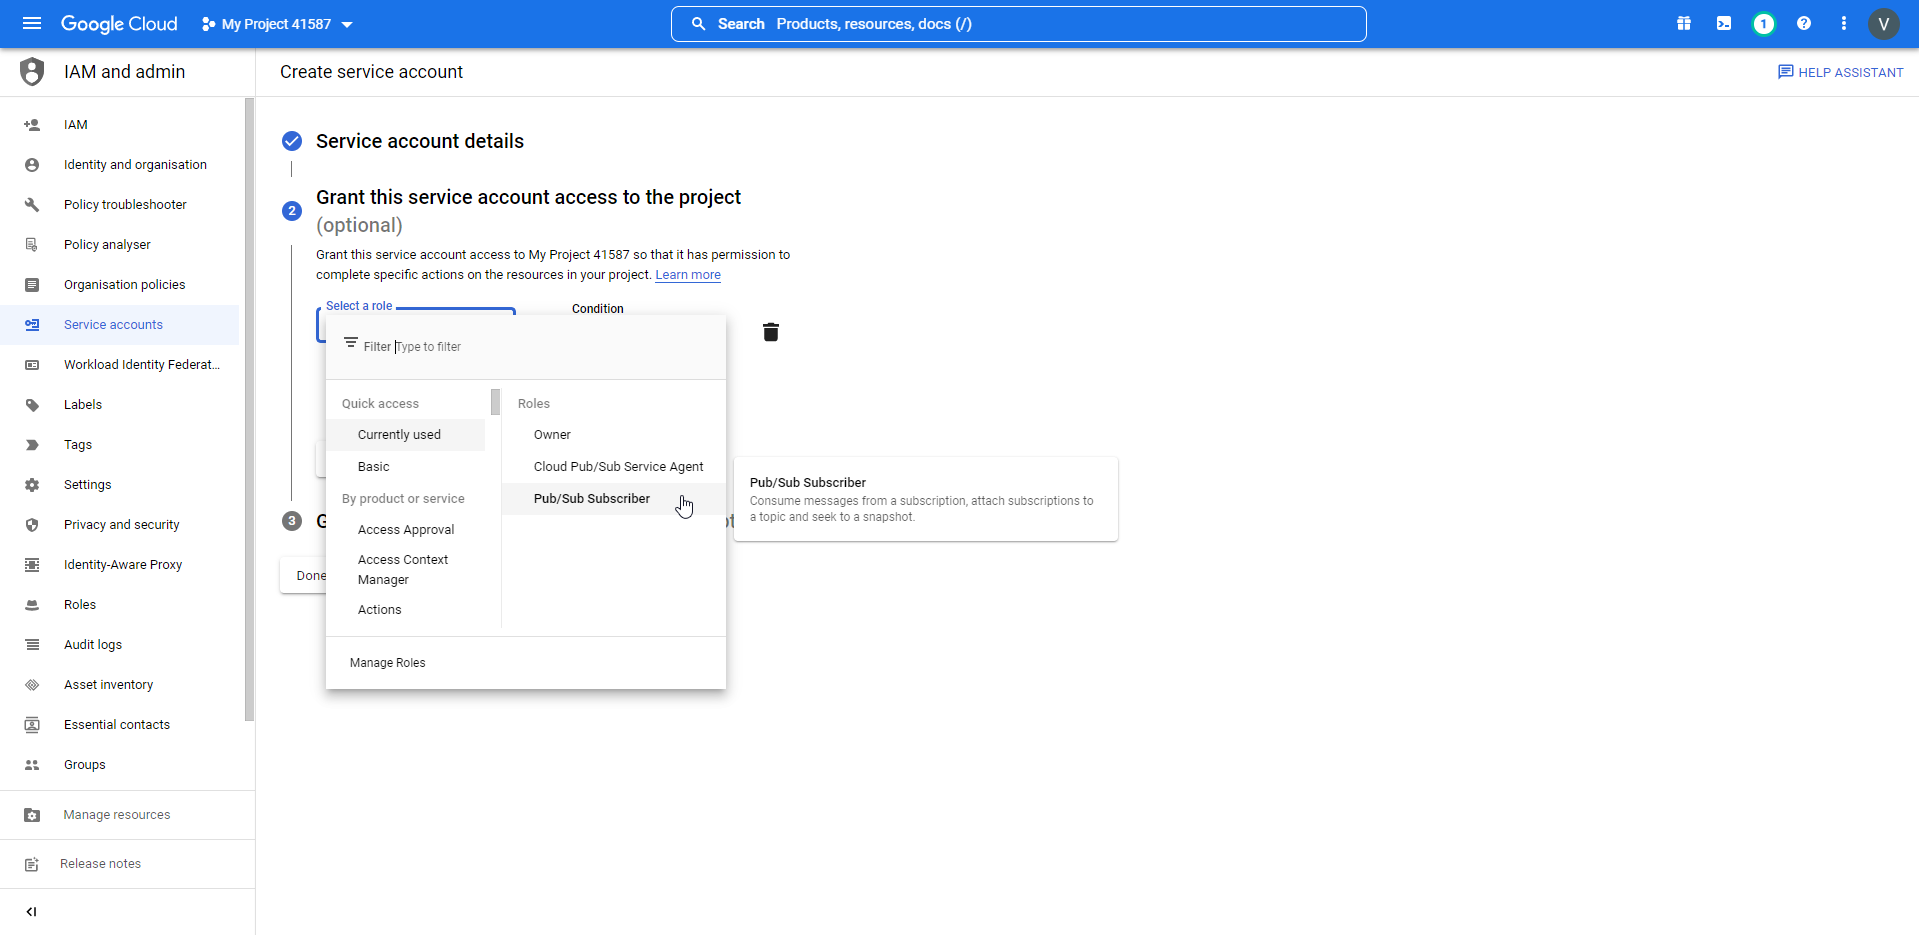
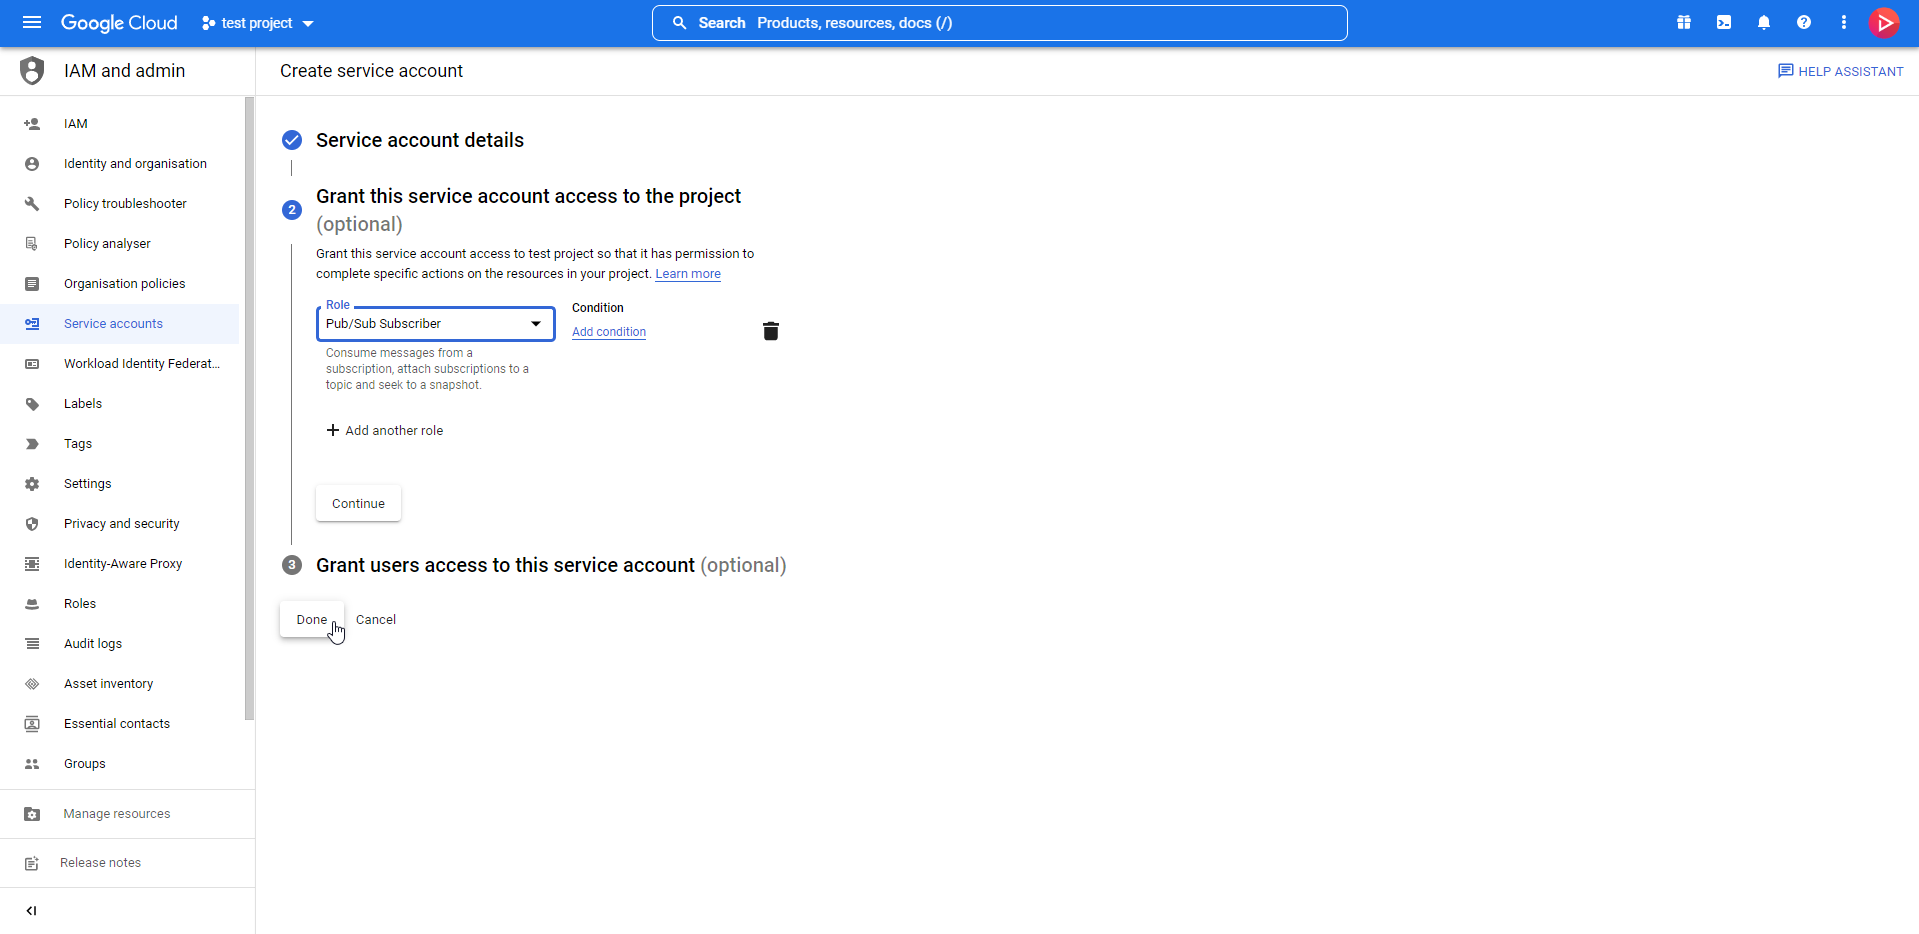
Under Role, go to Pub/Sub and select Pub/Sub Subscriber.
Click Continue.
Click Done.
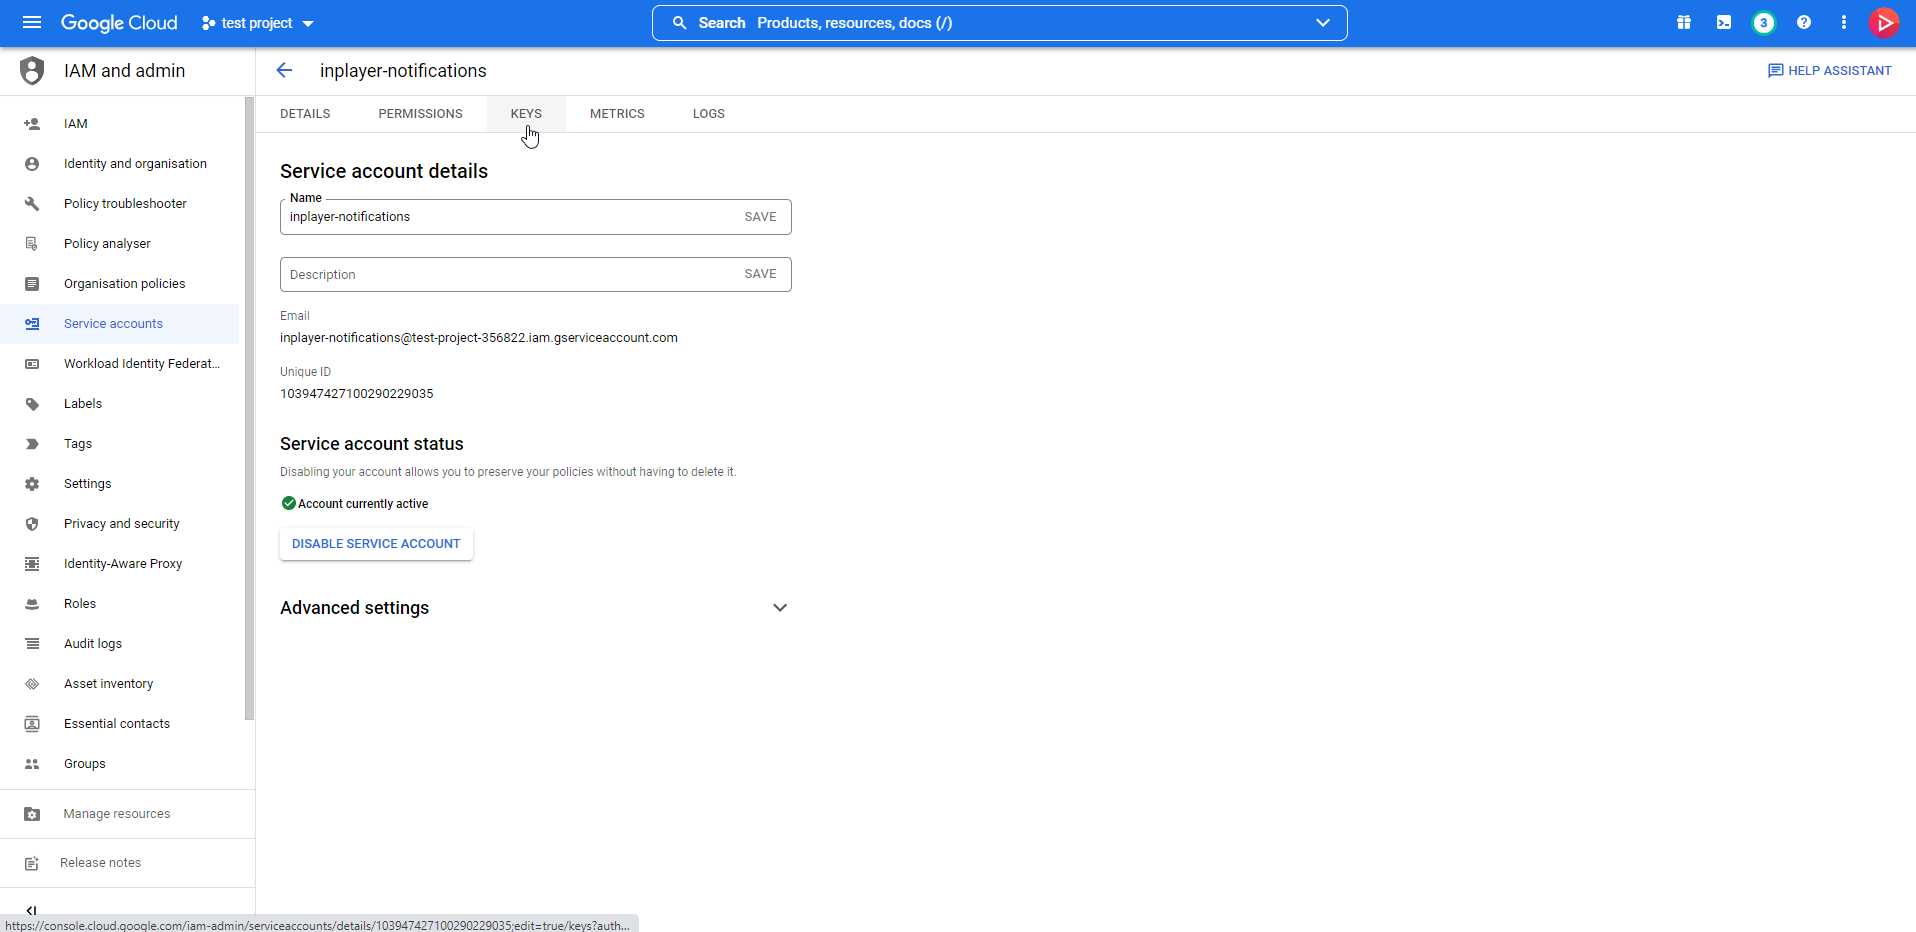
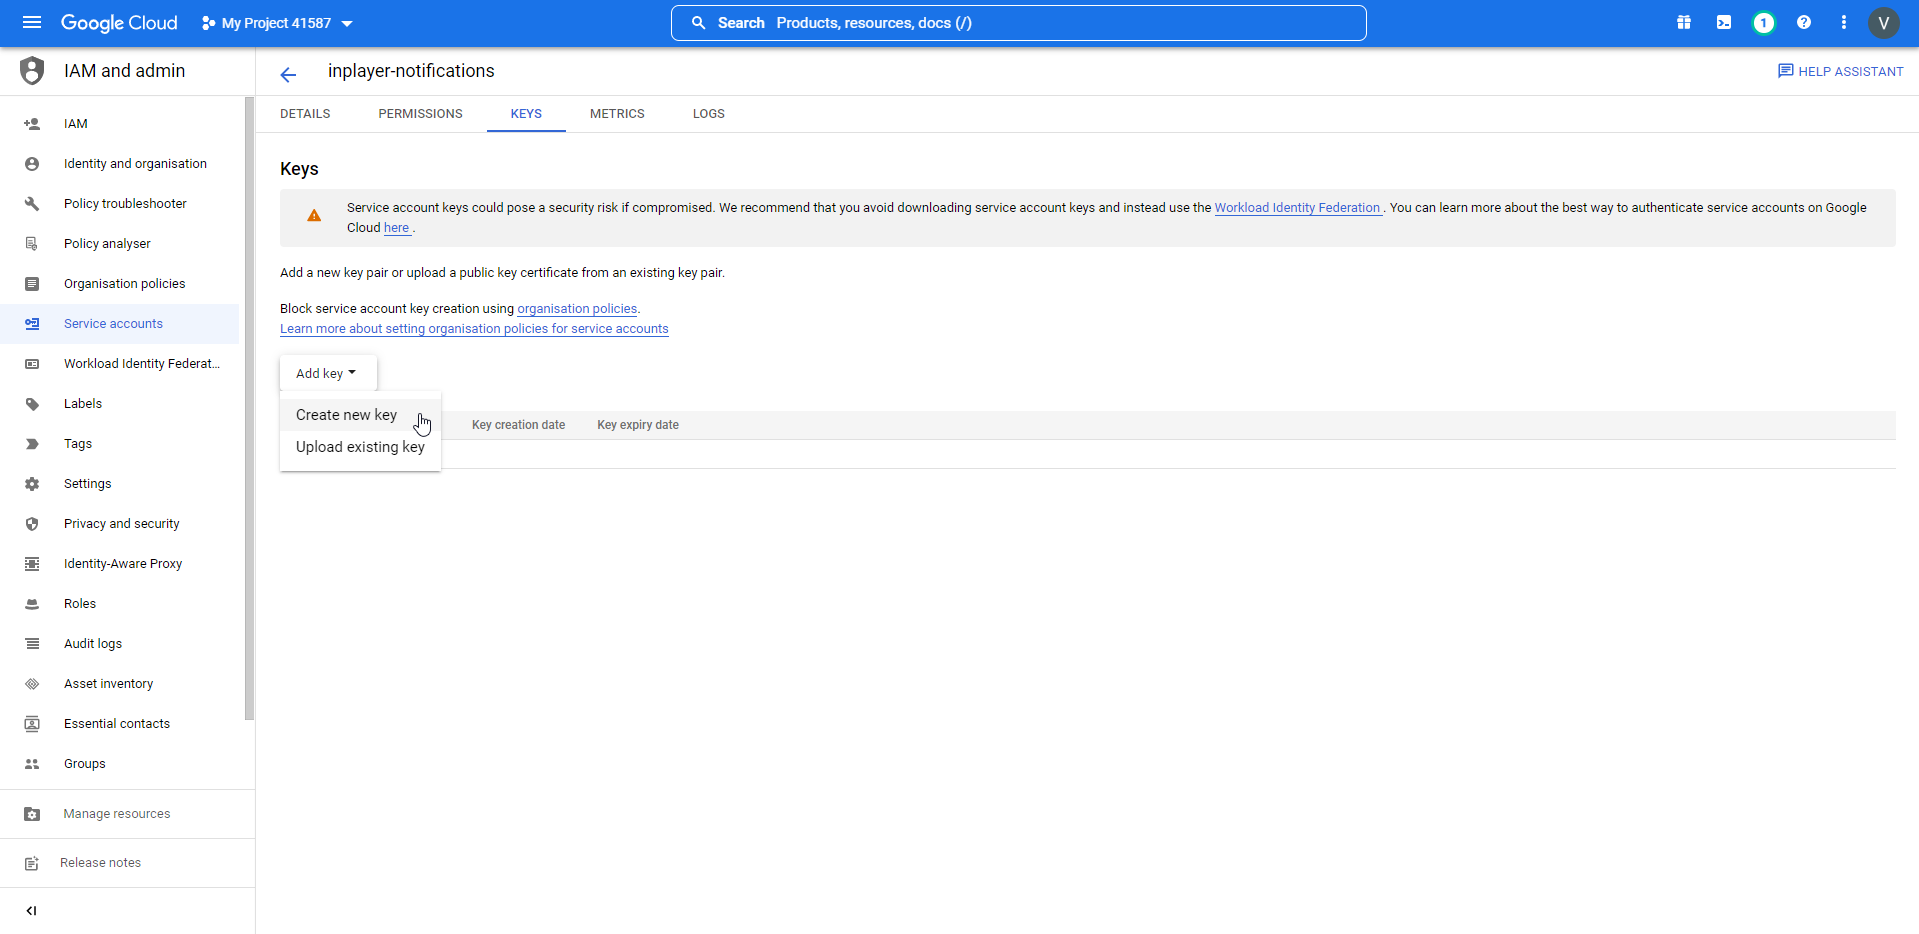
Open the service account you just created.
Go to the KEYS tab.
Click on Add key and Create new key.
Under Key type, select JSON.
Click Create.
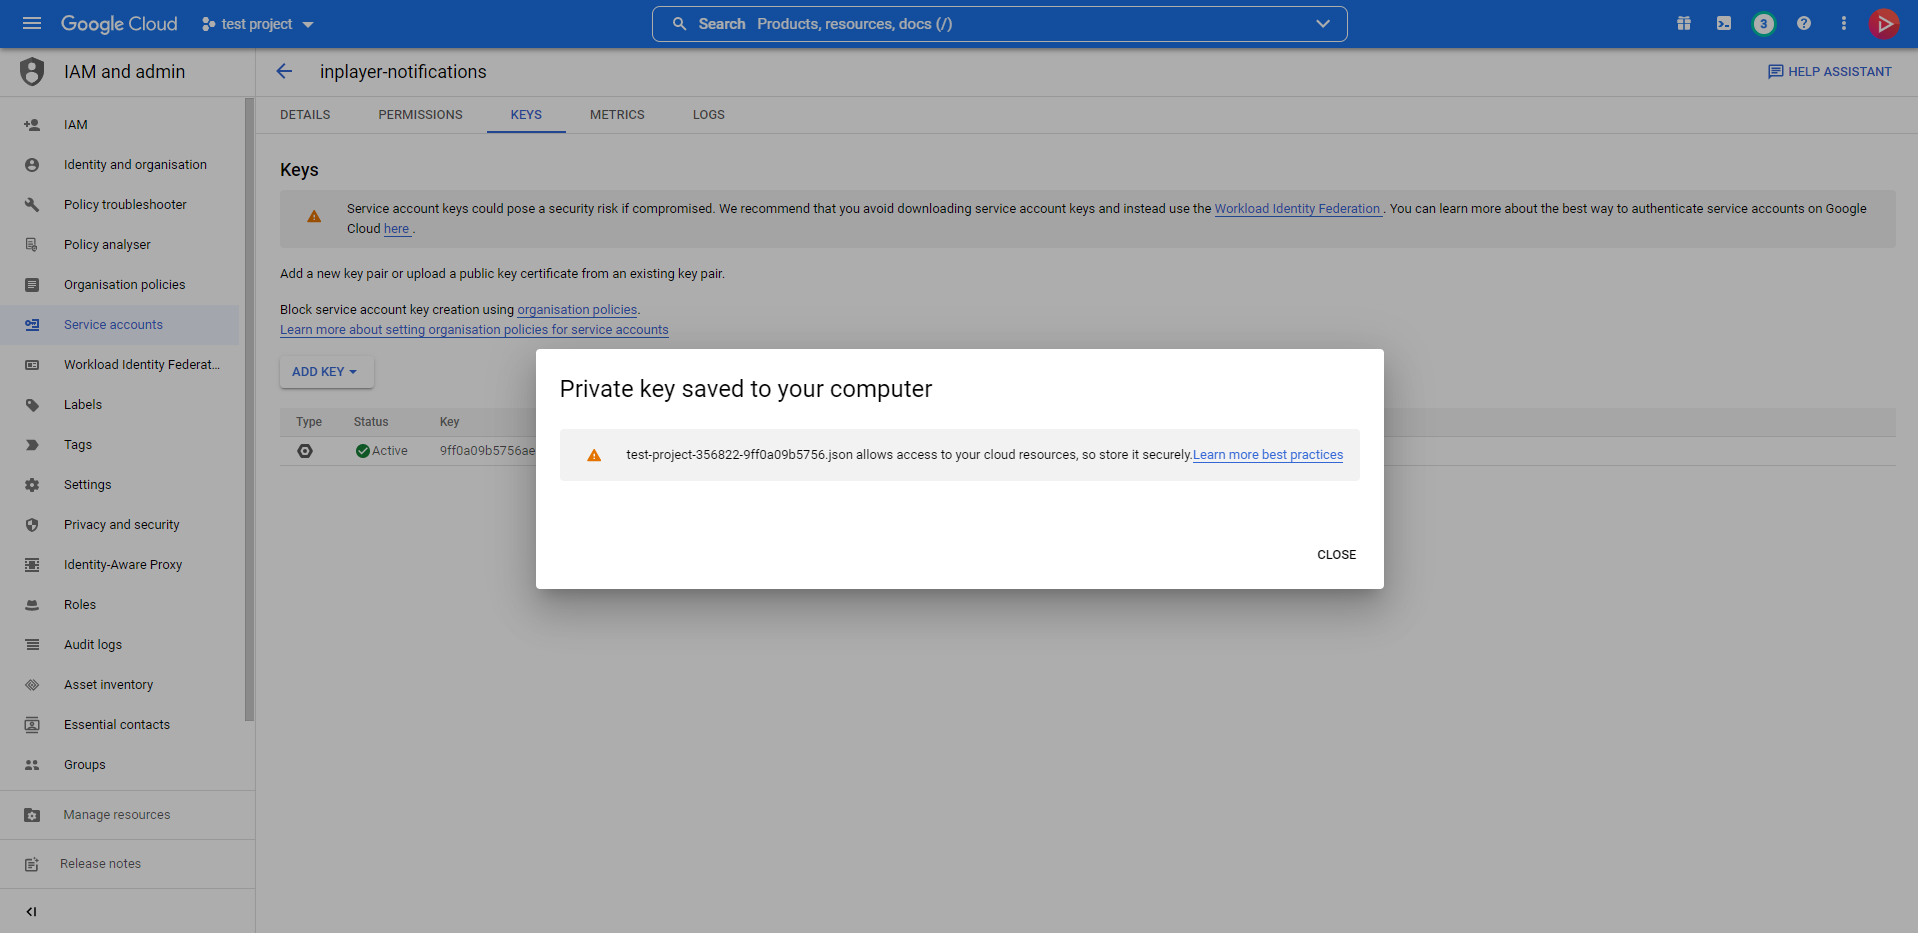
The file with the service key will be downloaded to your device.
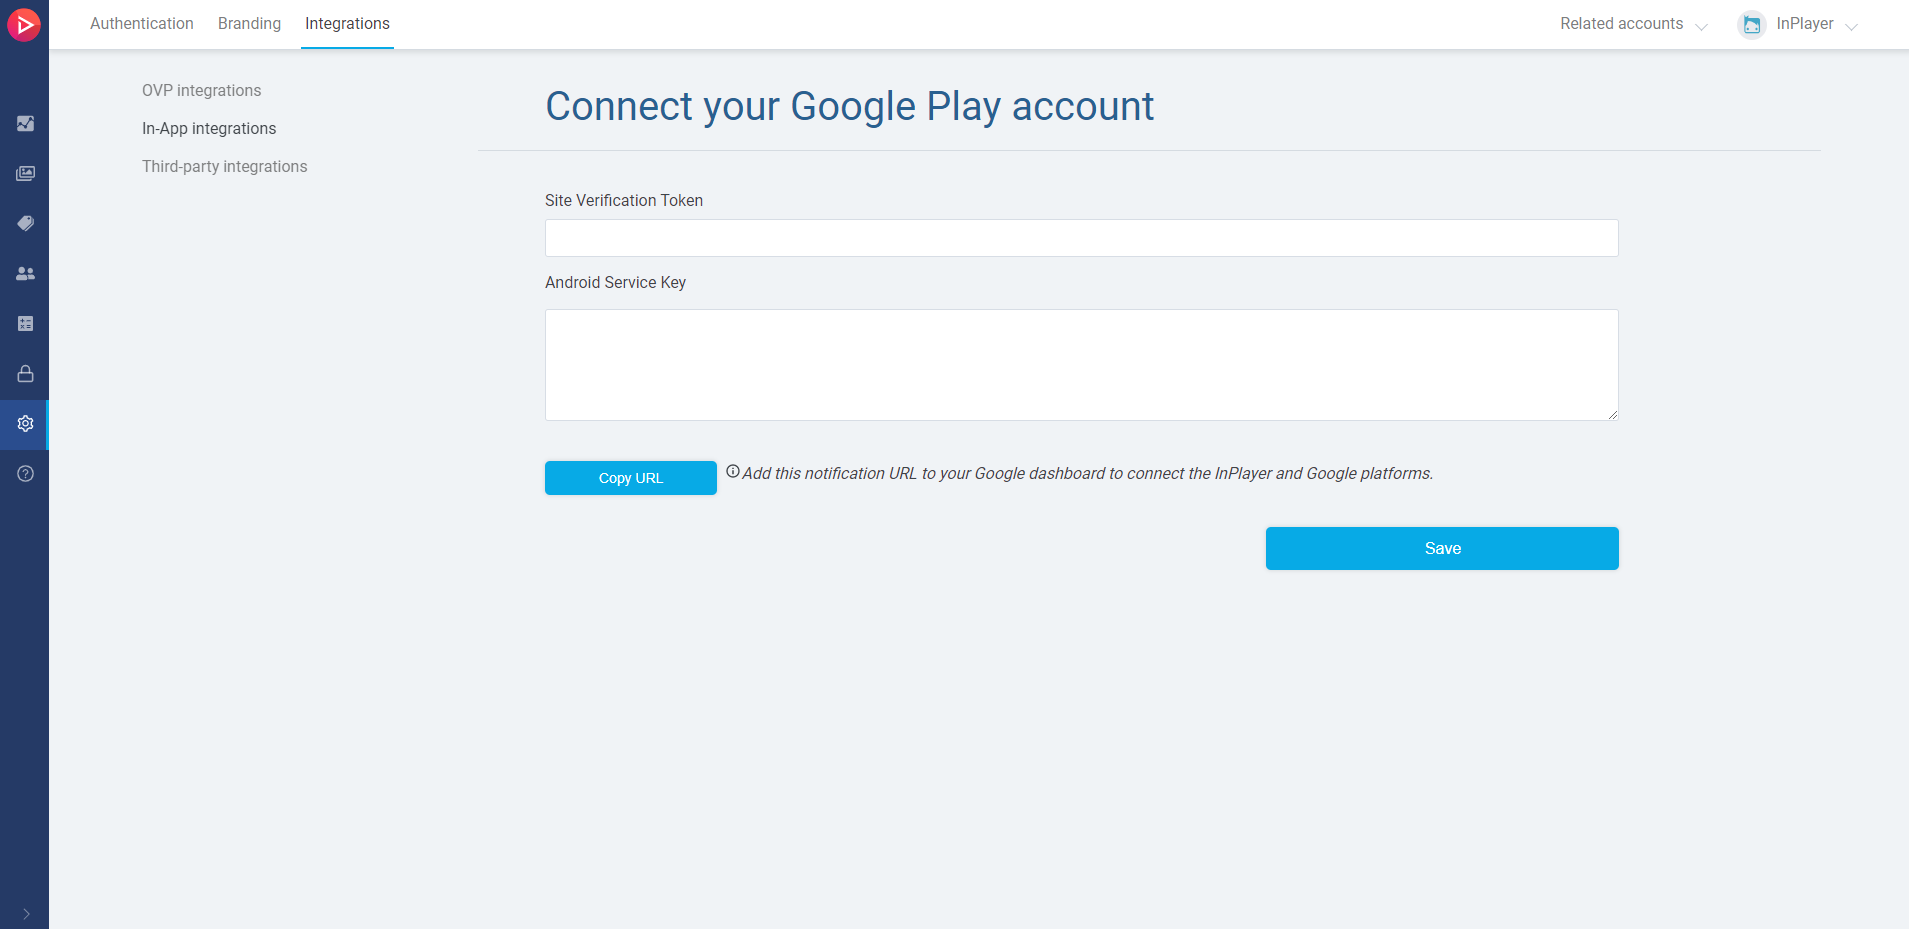
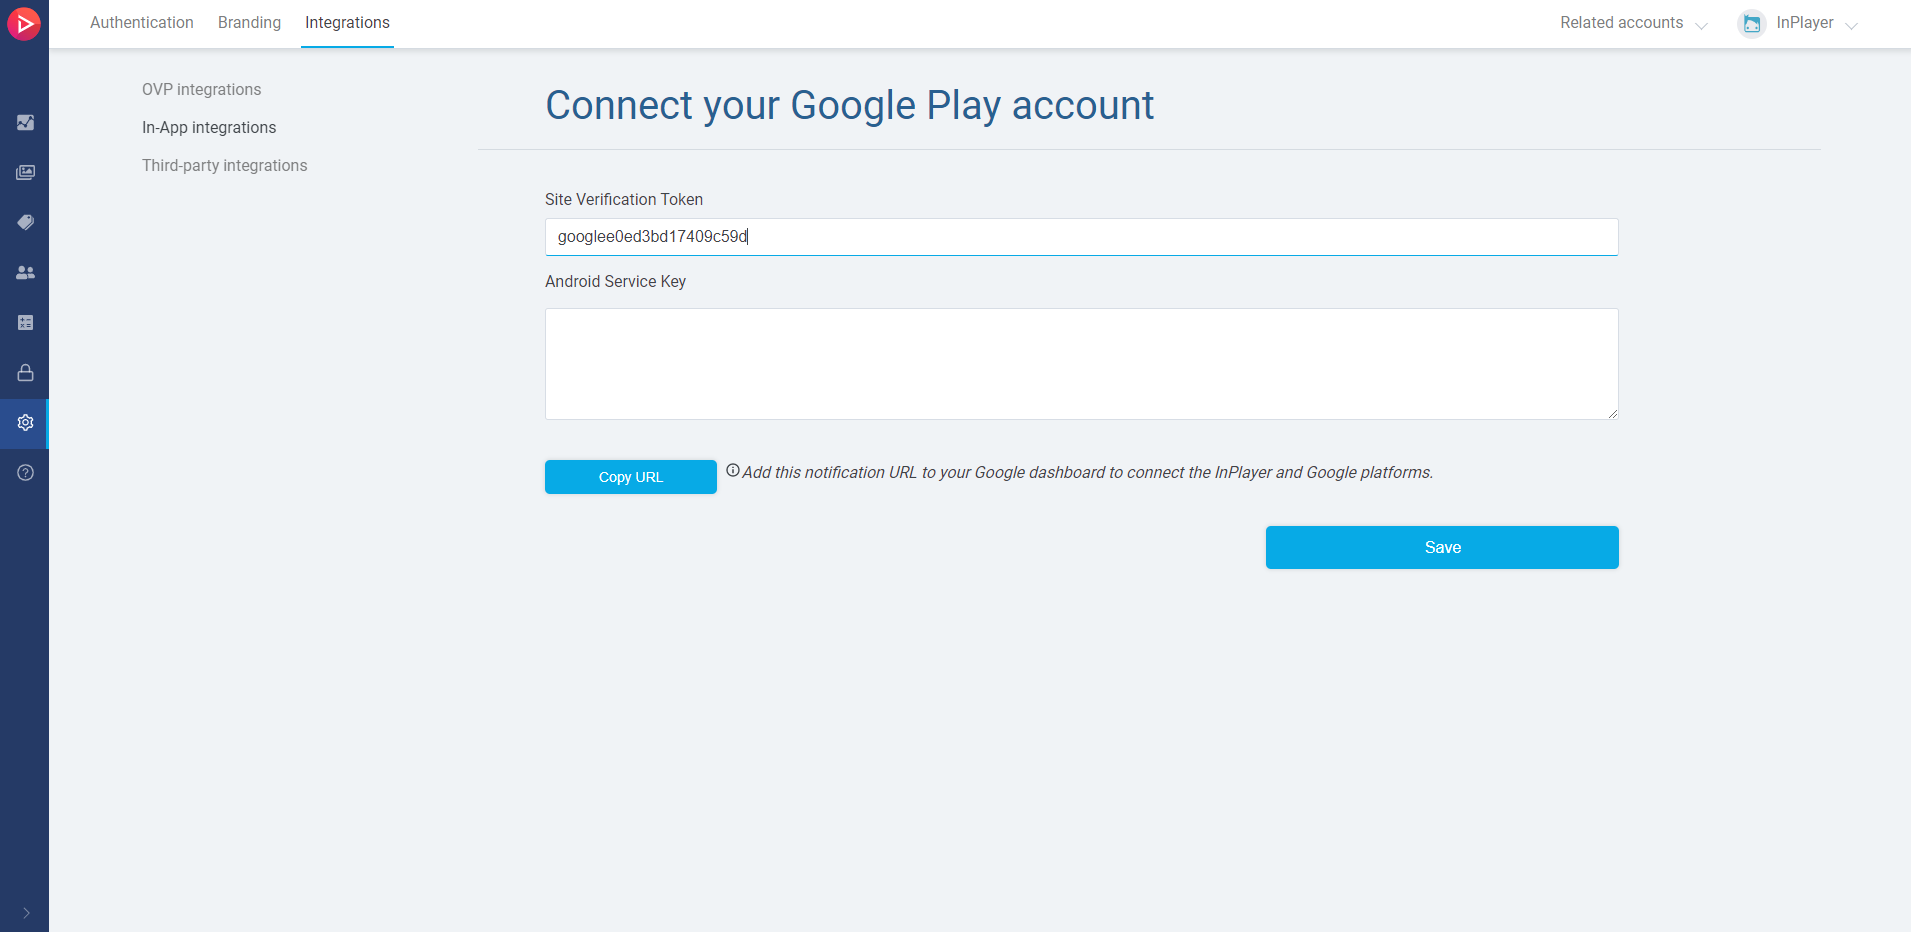
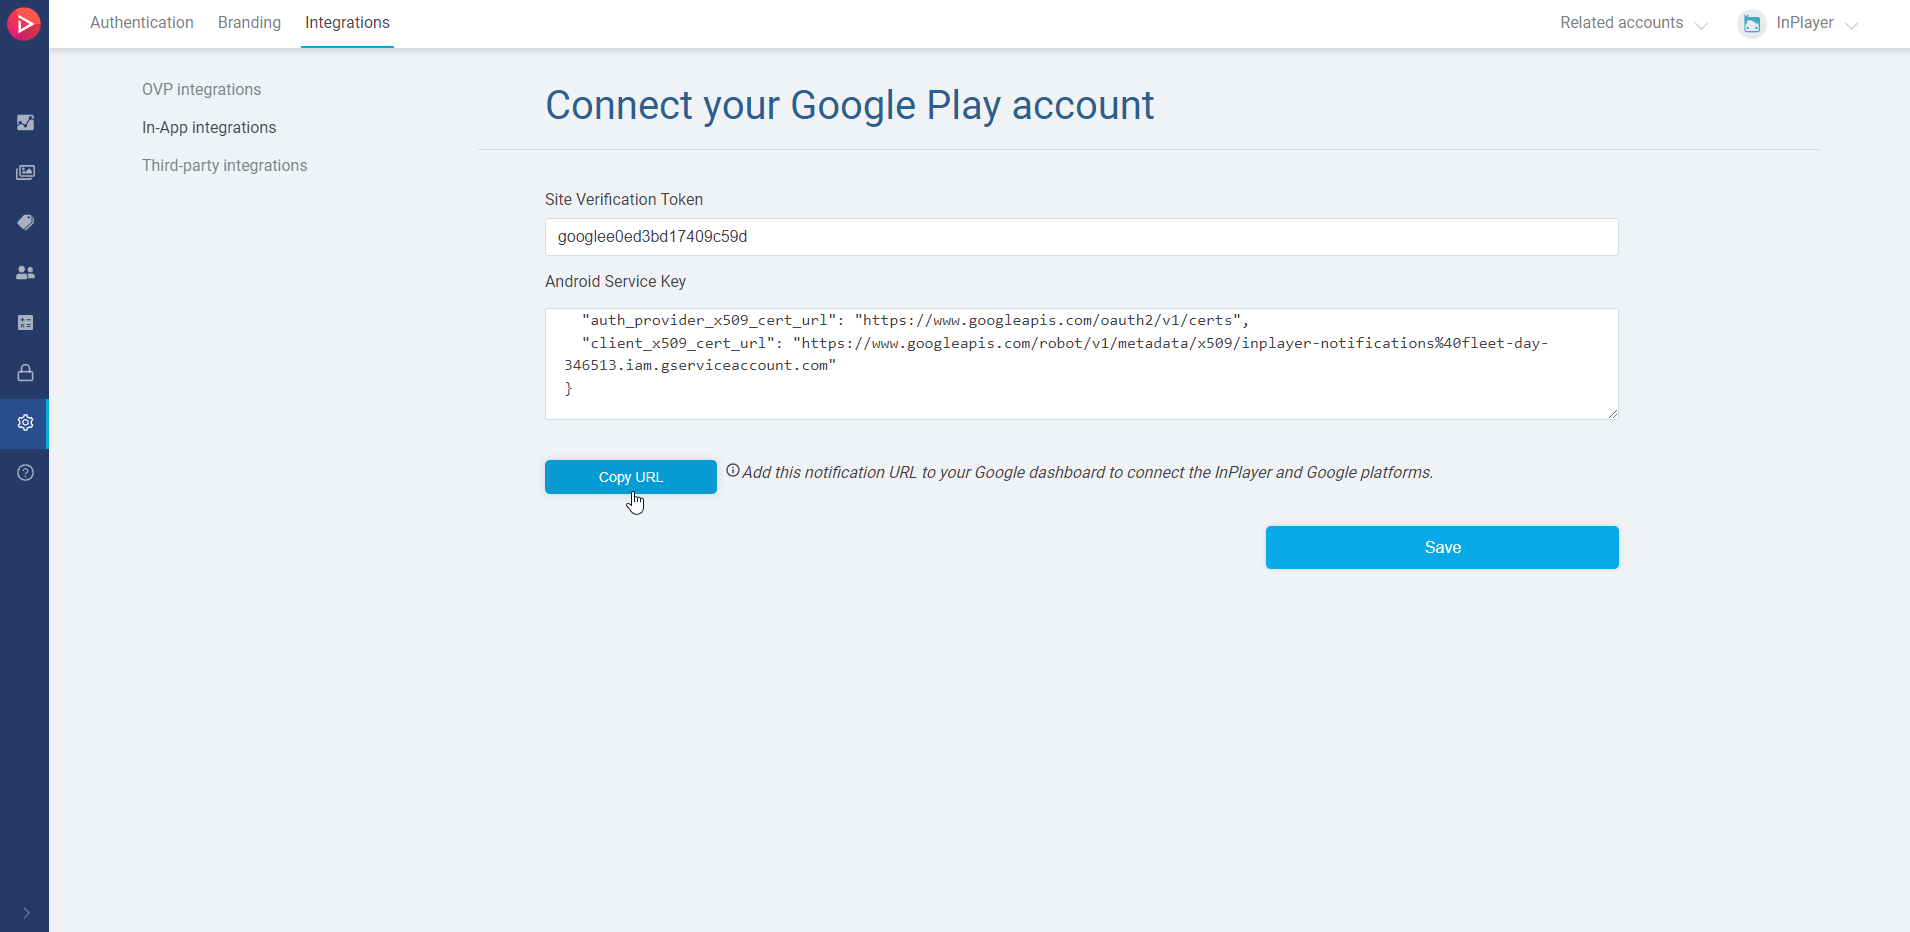
Open the file in a text editor. Copy the entire content of the file and paste it in the InPlayer dashboard.
Once you have both the Site Verification Token and the Android Service Key in the InPlayer dashboard, click Save.
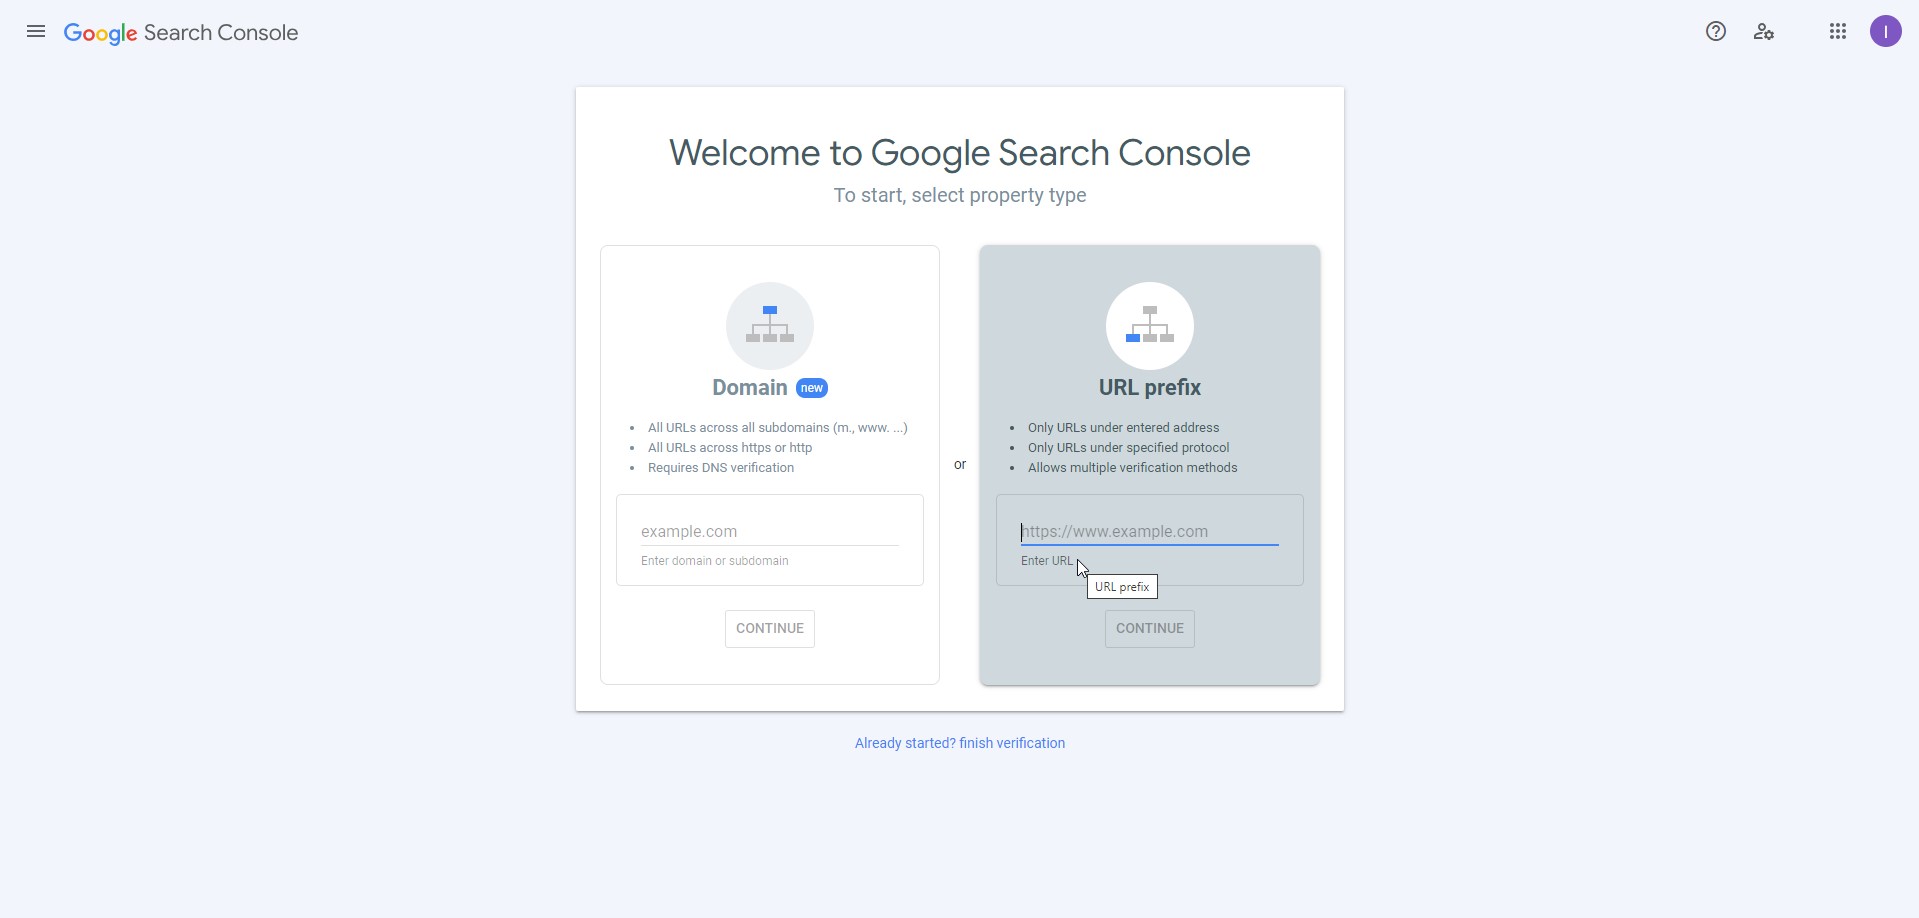
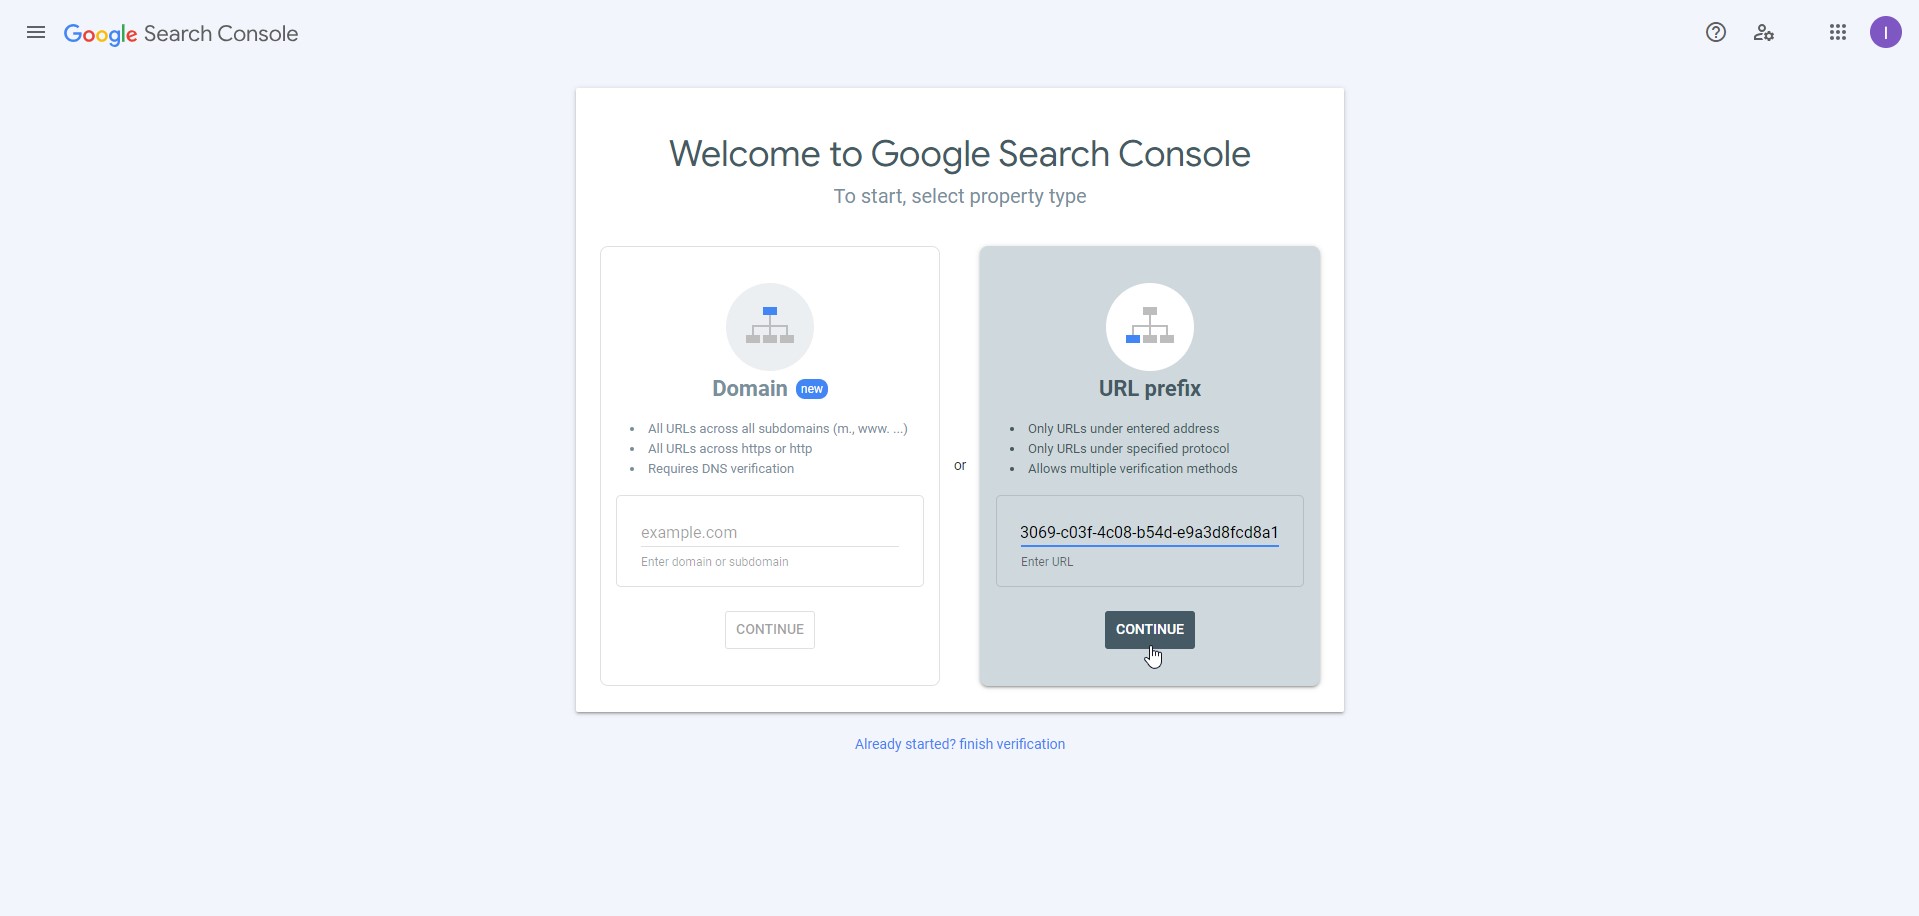
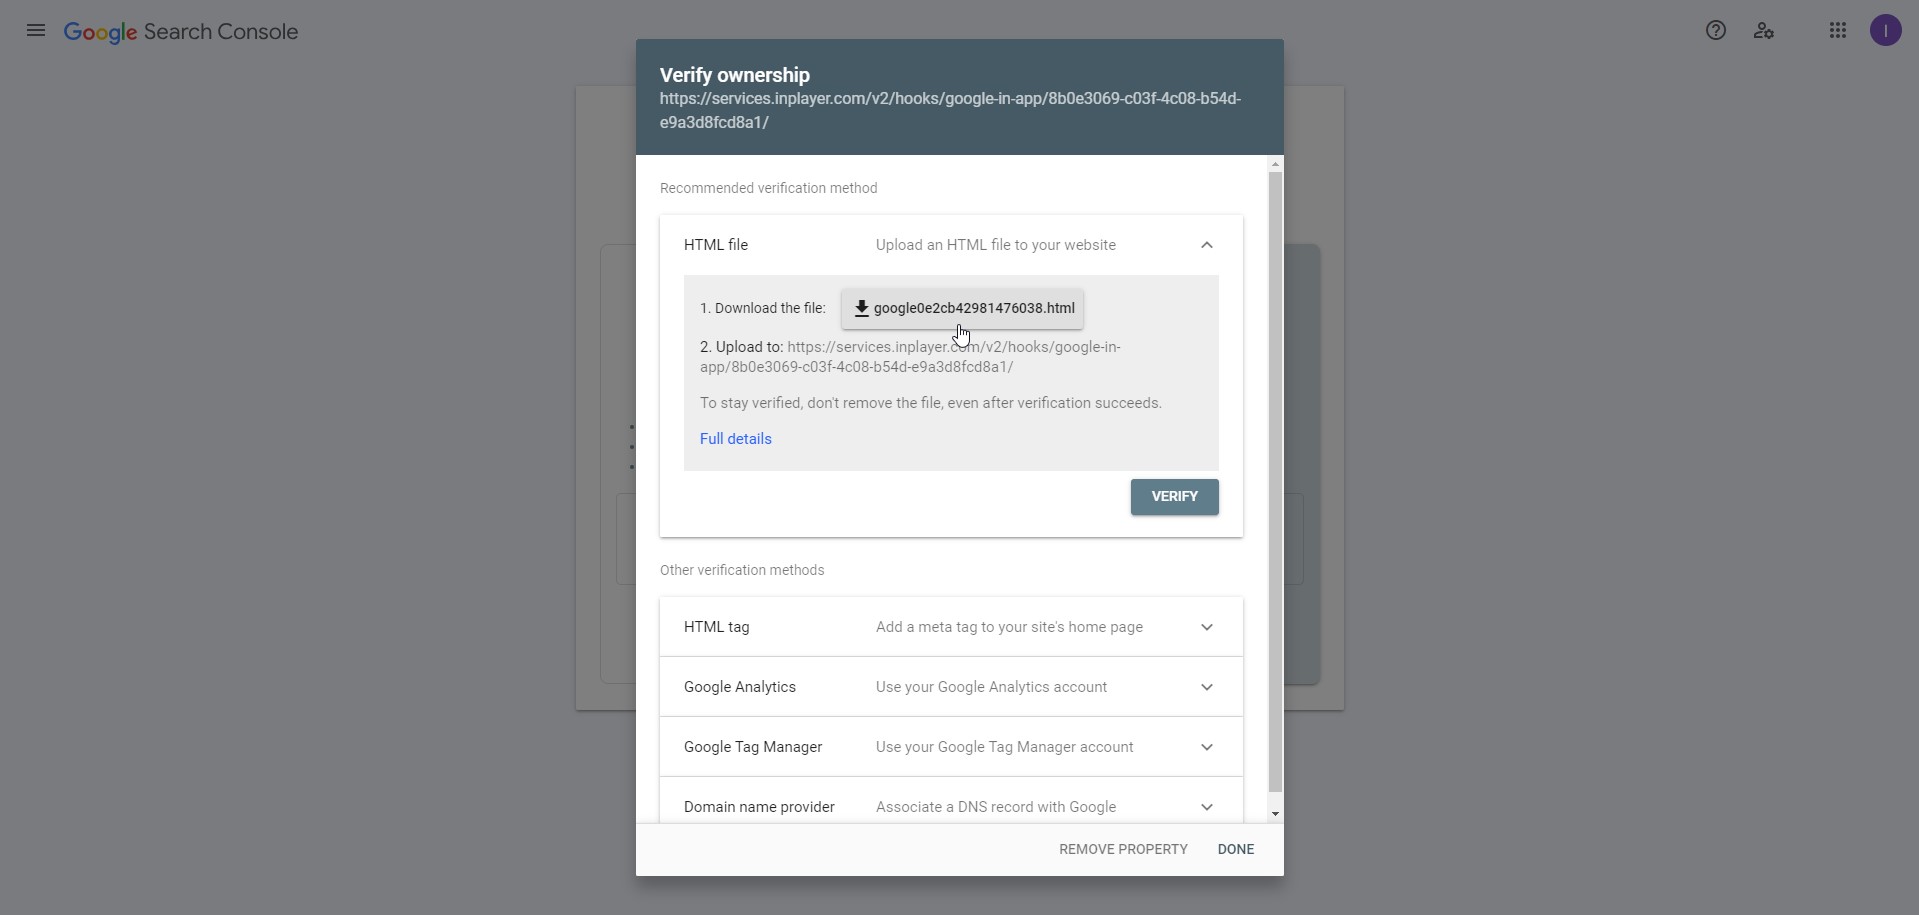
You can now go back to the Google Search Console and verify the Site Verification token as well.
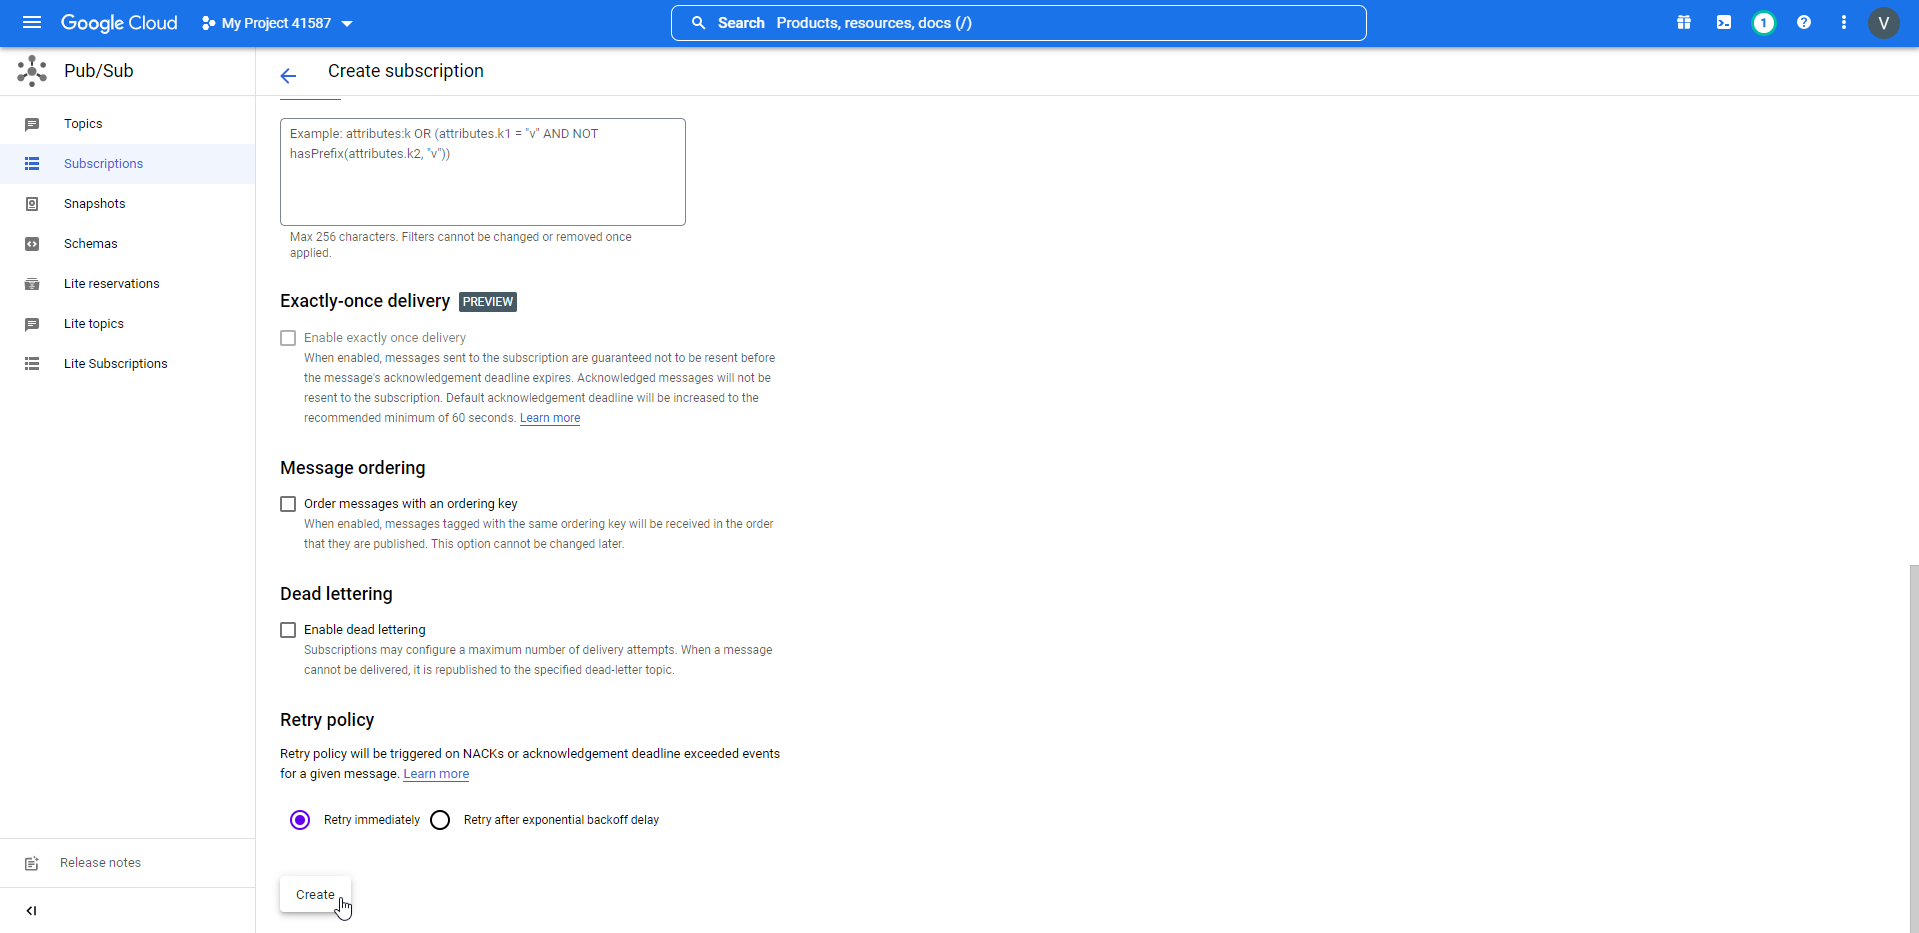
Now you need to create a new subscription.
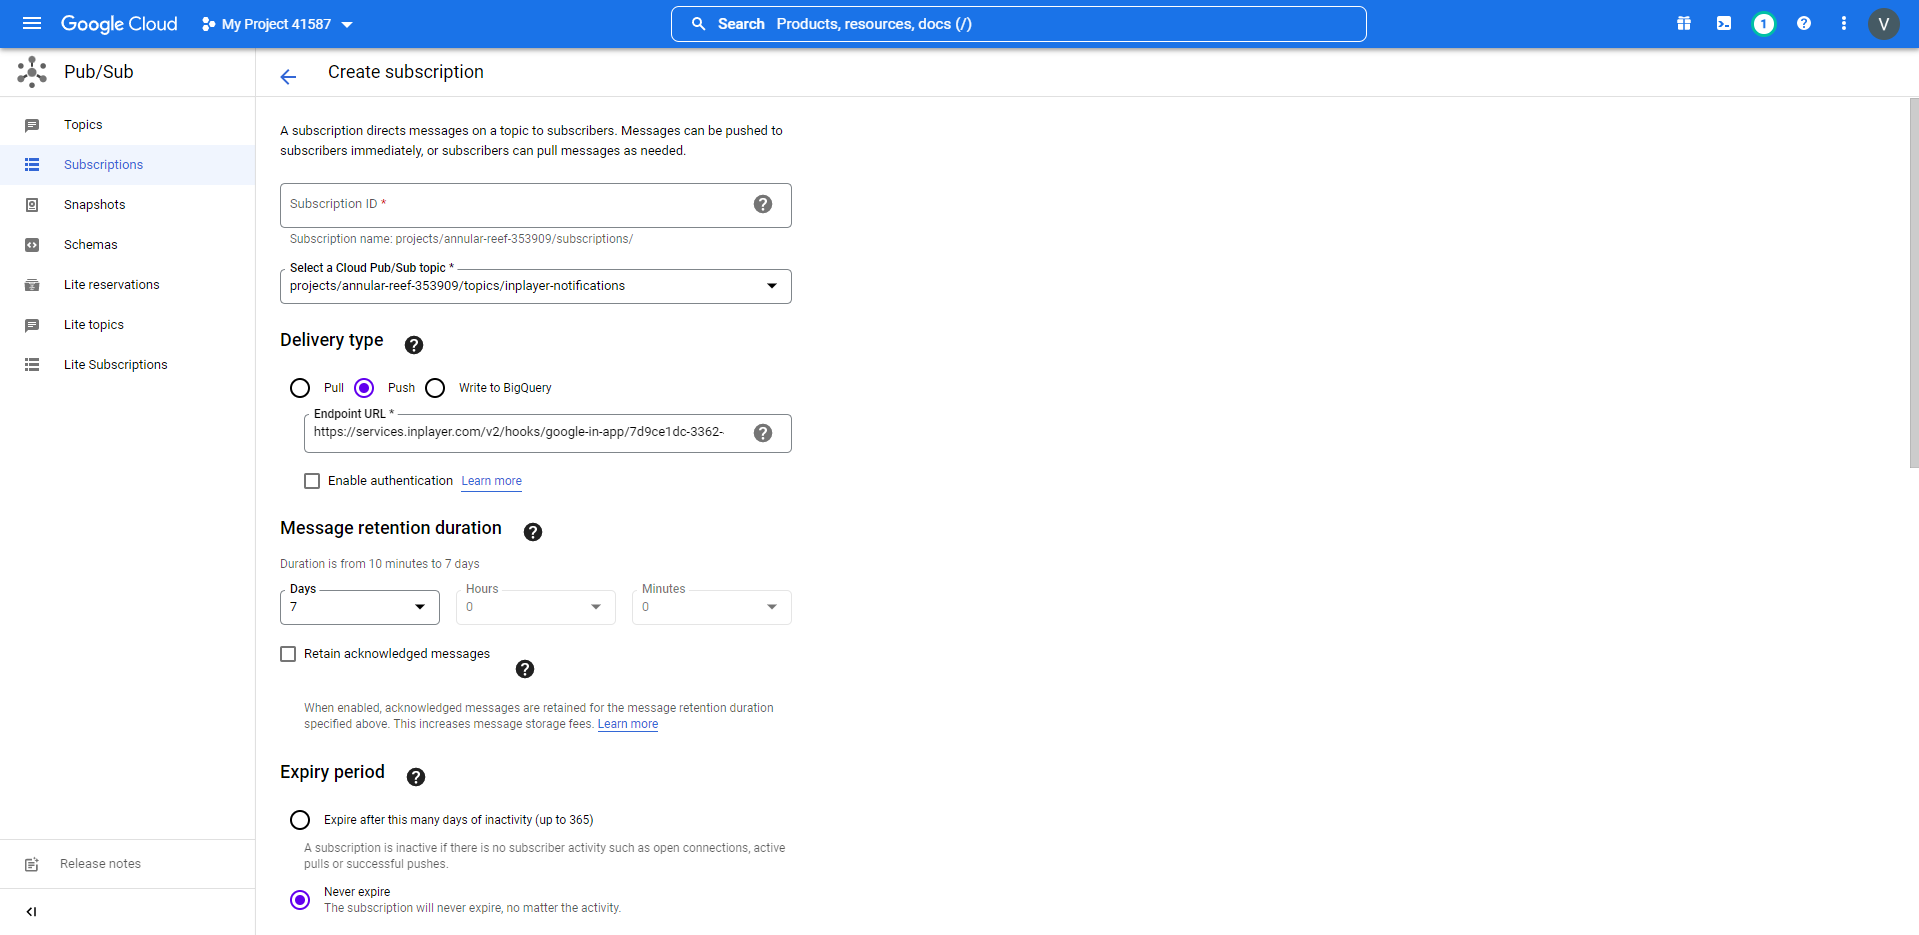
Go to the Subscription page of the Google Cloud Platform, and click CREATE SUBSCRIPTION.
Set up the new subscription.
Give it an ID.
From the Select a cloud pub/sub topic dropdown menu, select the same topic you created earlier.
Under Delivery Type choose Push, and in Endpoint paste the InPlayer notification URL.
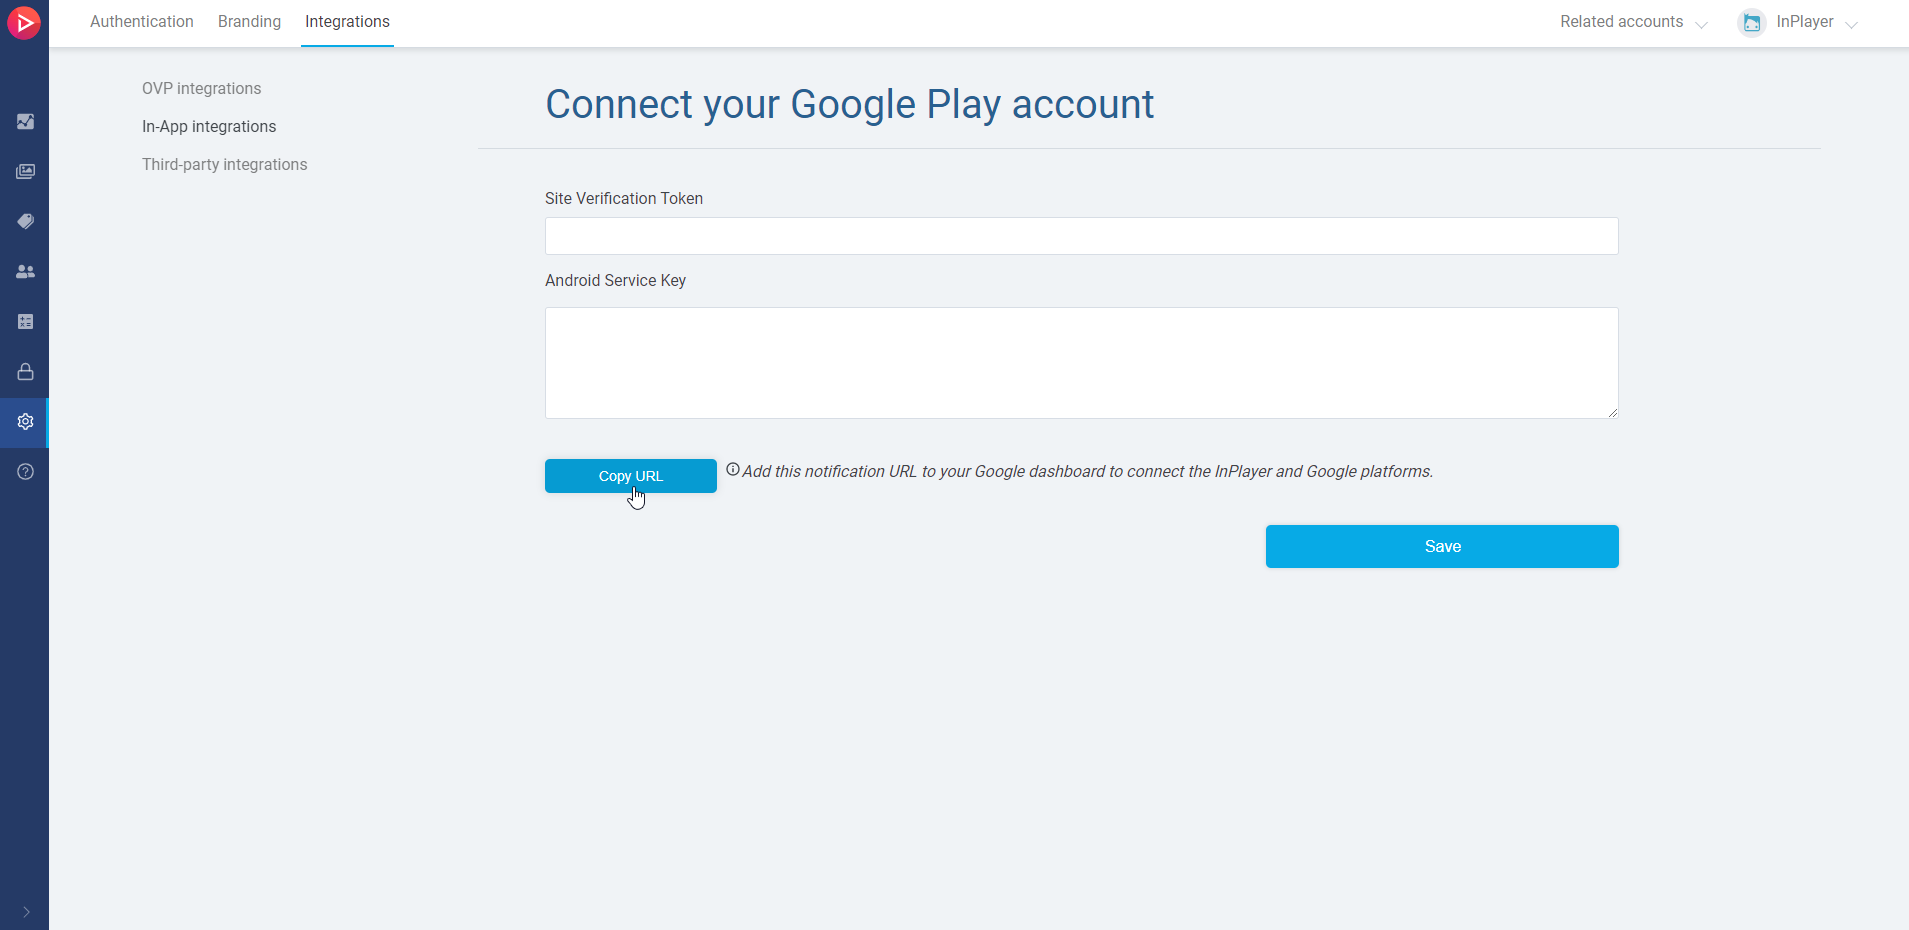
To get the URL, go to the Integrations tab of your InPlayer dashboard.
Click the Copy URL button.
Paste the copied URL in the Google Cloud Platform form.
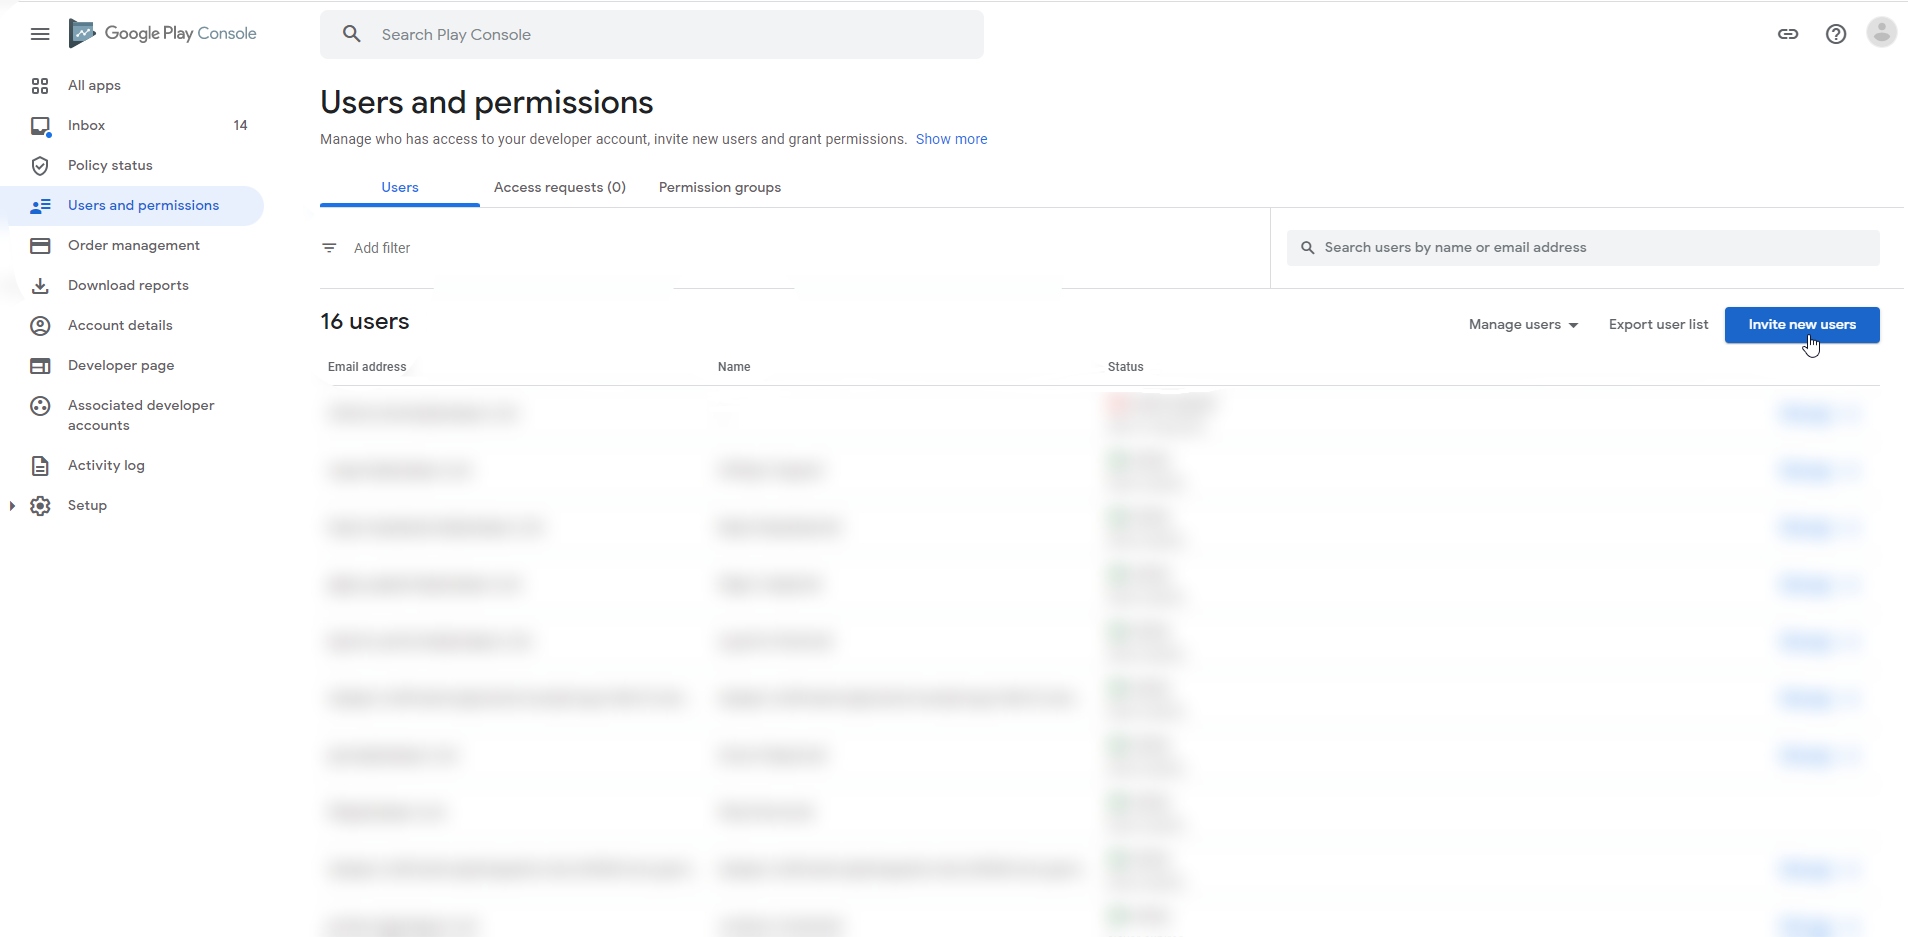
For the email of the new user, use the “client_email”: value in the Service Key you’ve downloaded previously. It will look something like this: inplayer-notifications@curious-entropy-309114.iam.gserviceaccount.com
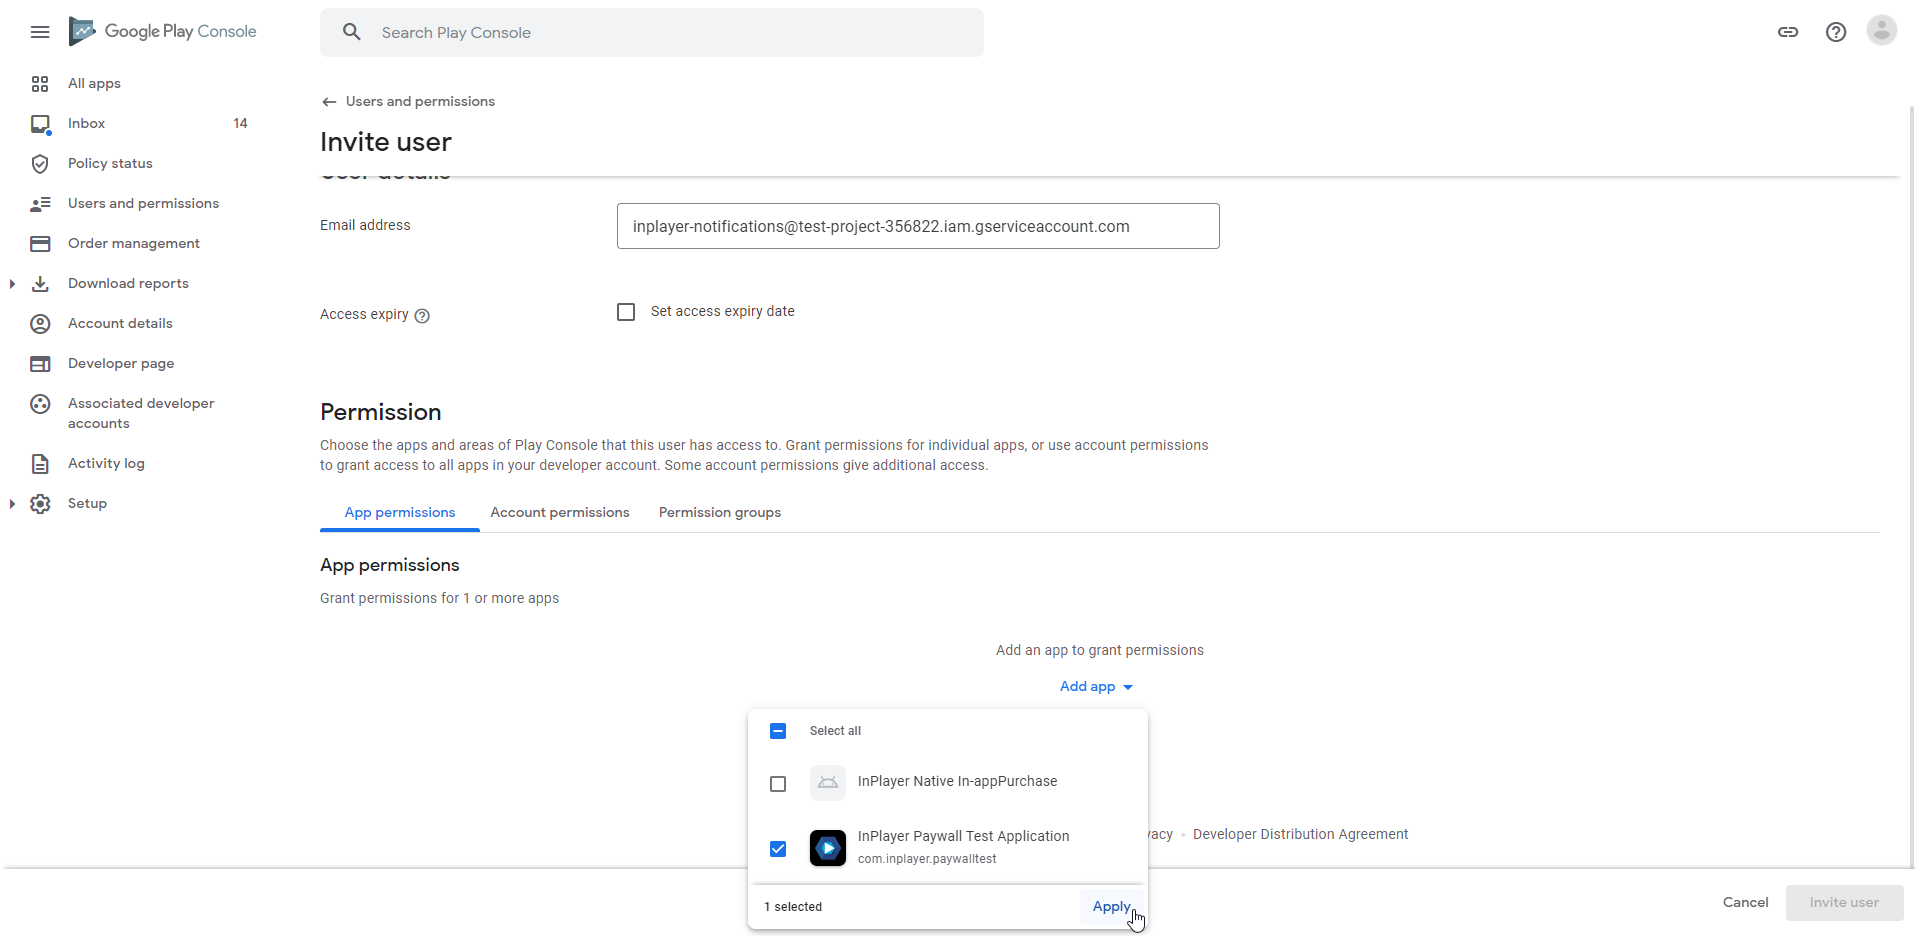
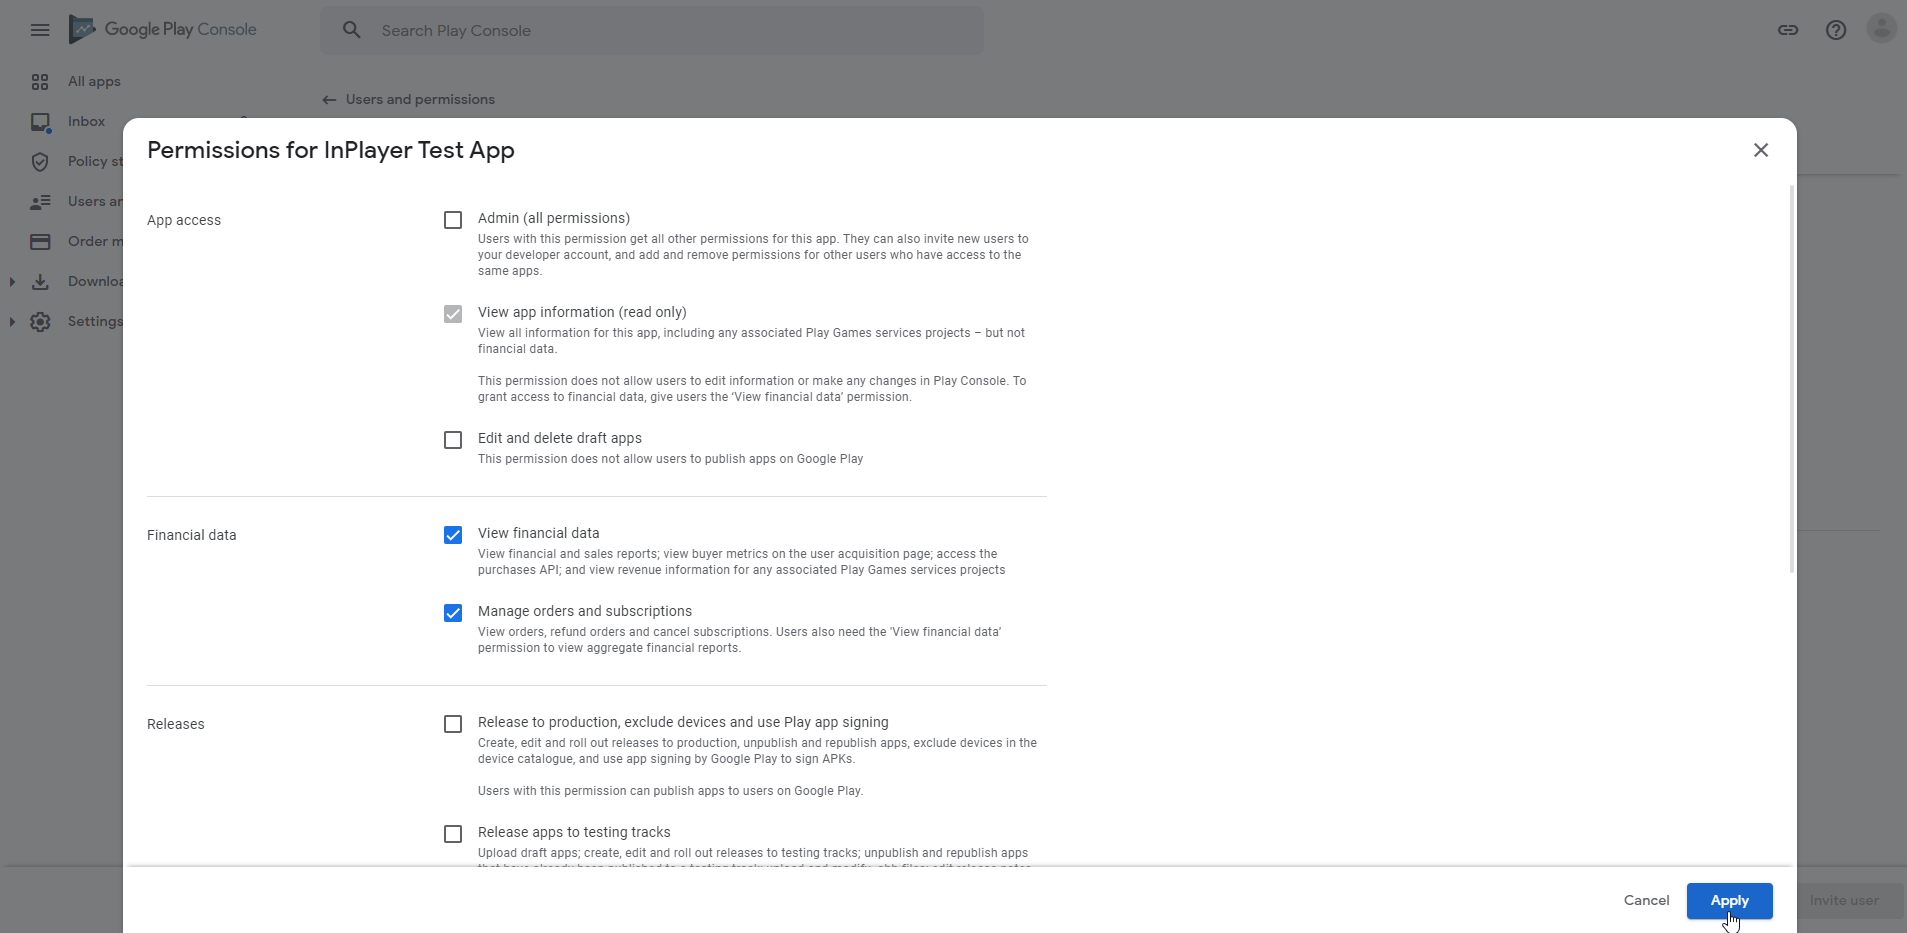
Under Permissions, in the App permissions tab, click on Add app, select the app you are going to use, and click Apply.
In the new permissions screen, check the following permissions:
View app information (read only)
View financial data
Manage orders and subscriptions
Click Apply.
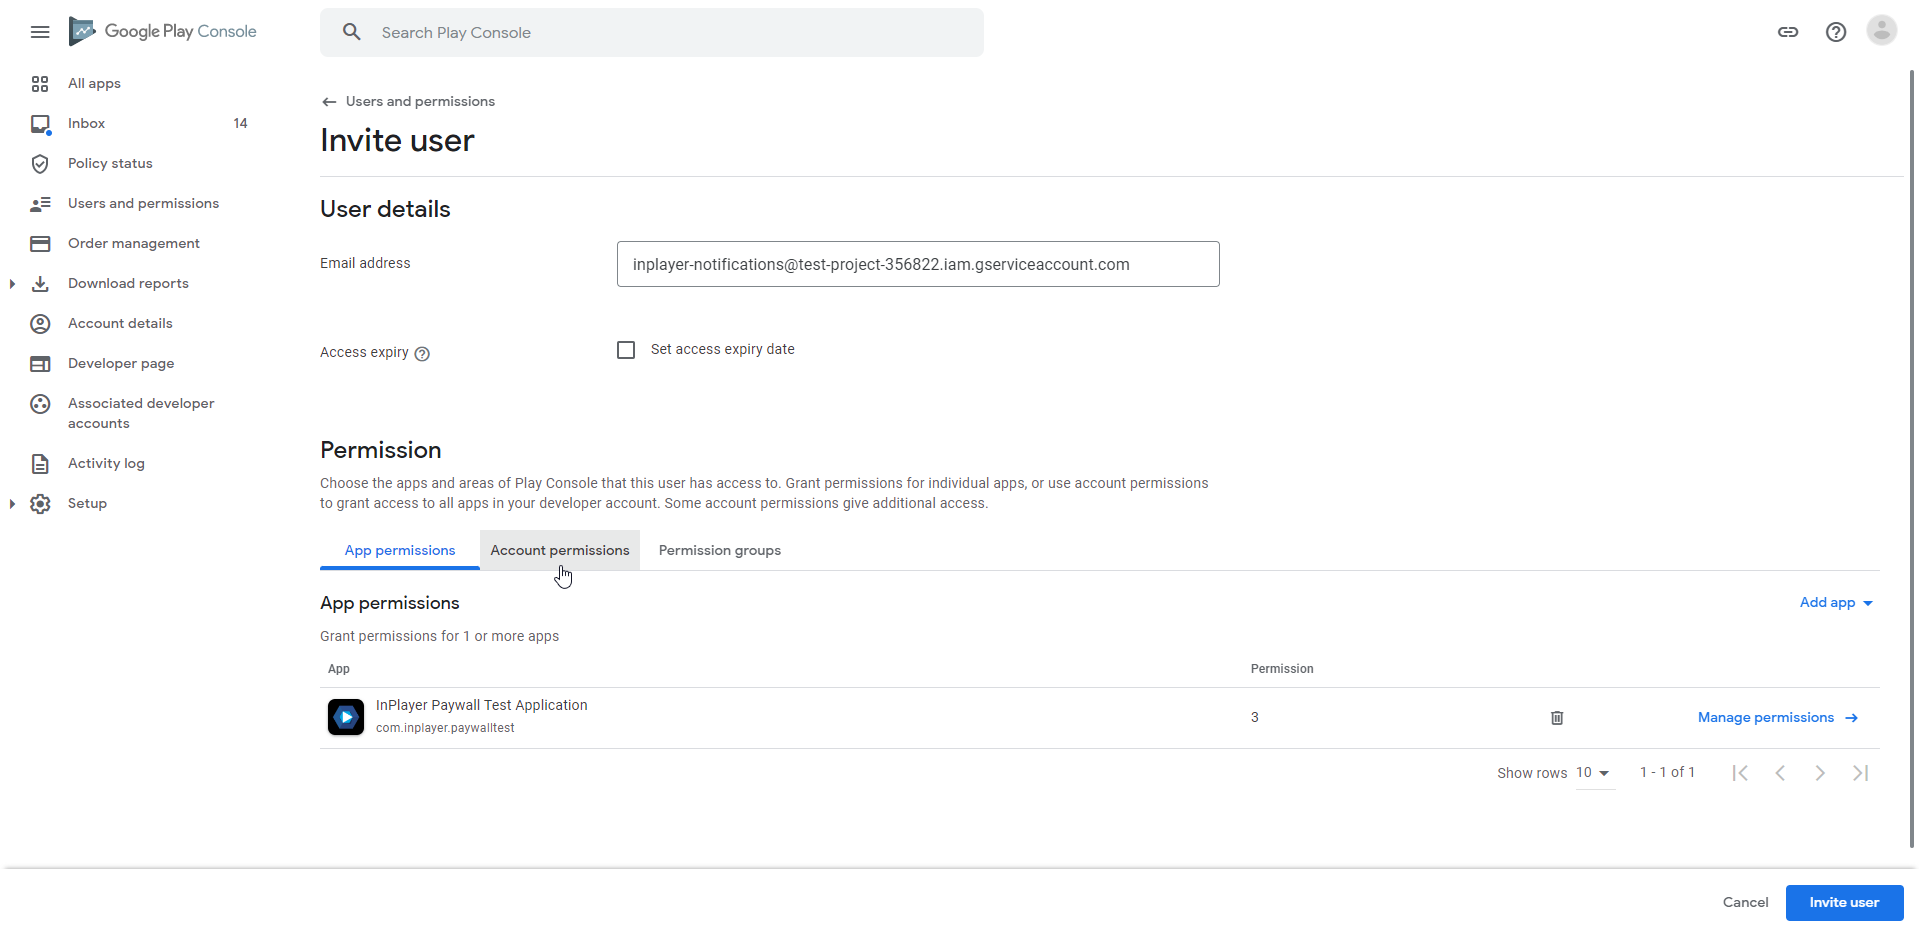
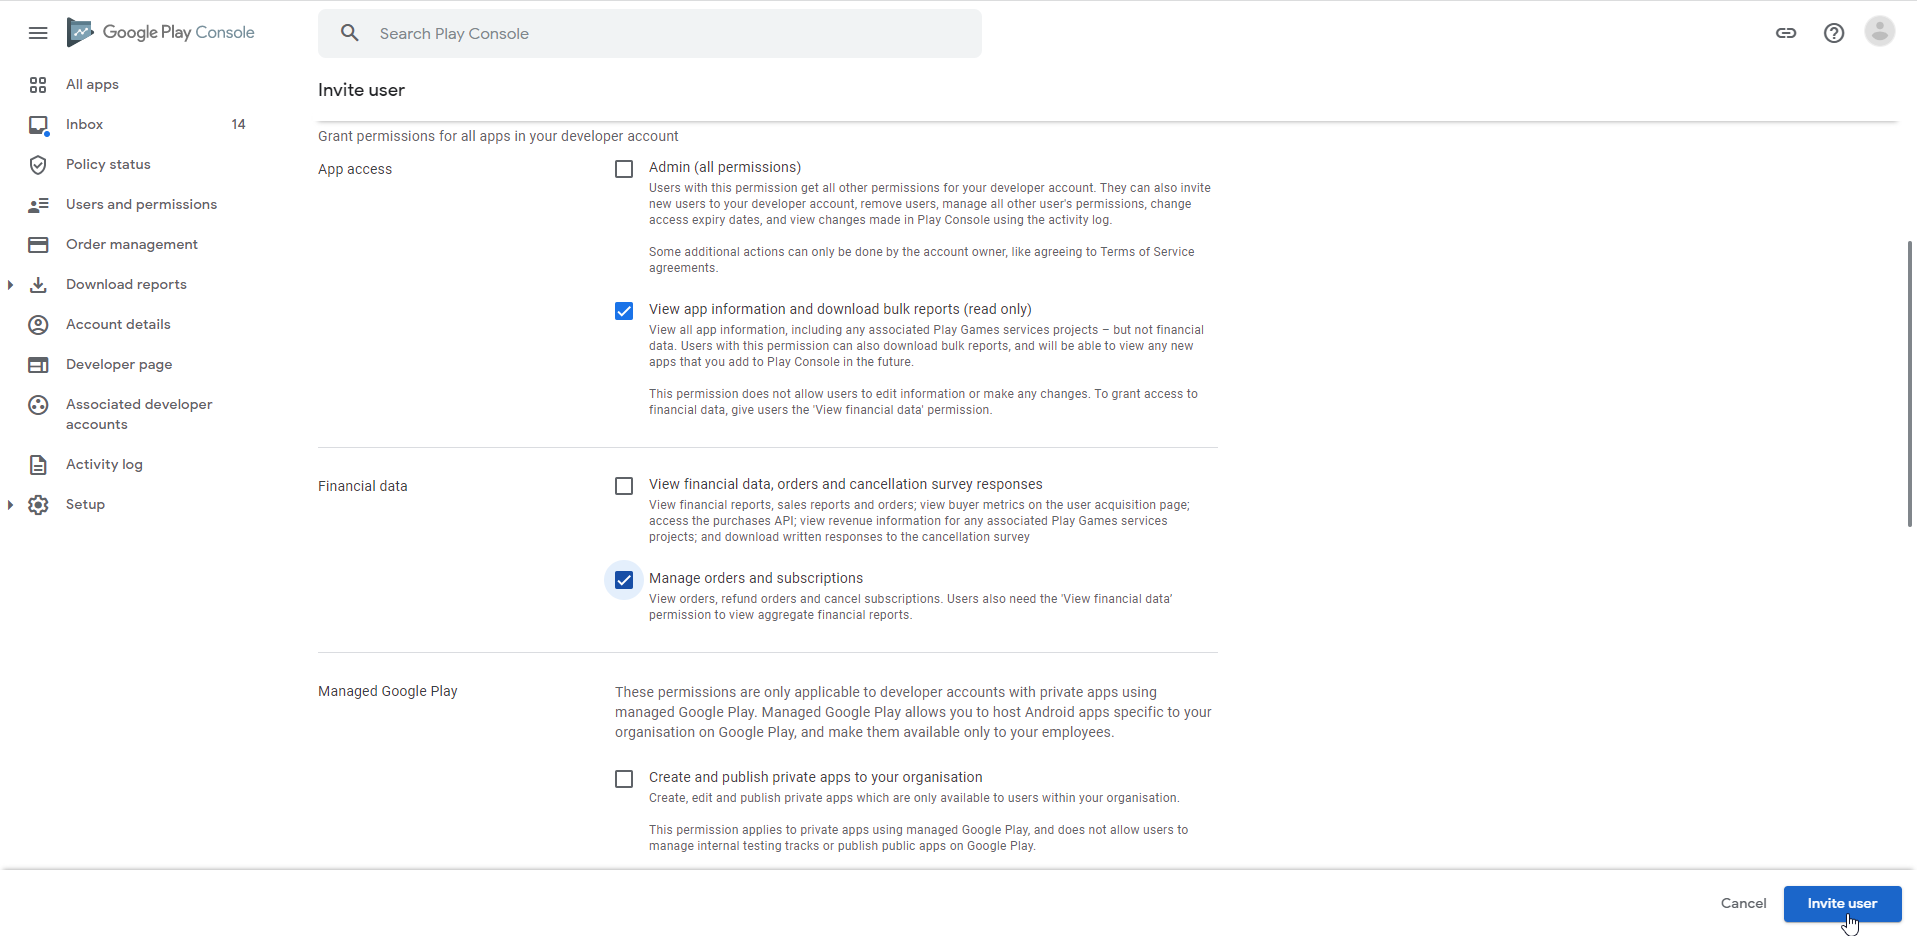
Go to the Account permissions tab.
Check the following permissions:
View app information and download bulk reports (read only)
Manage orders and subscriptions
Click Invite user and confirm the invitation.
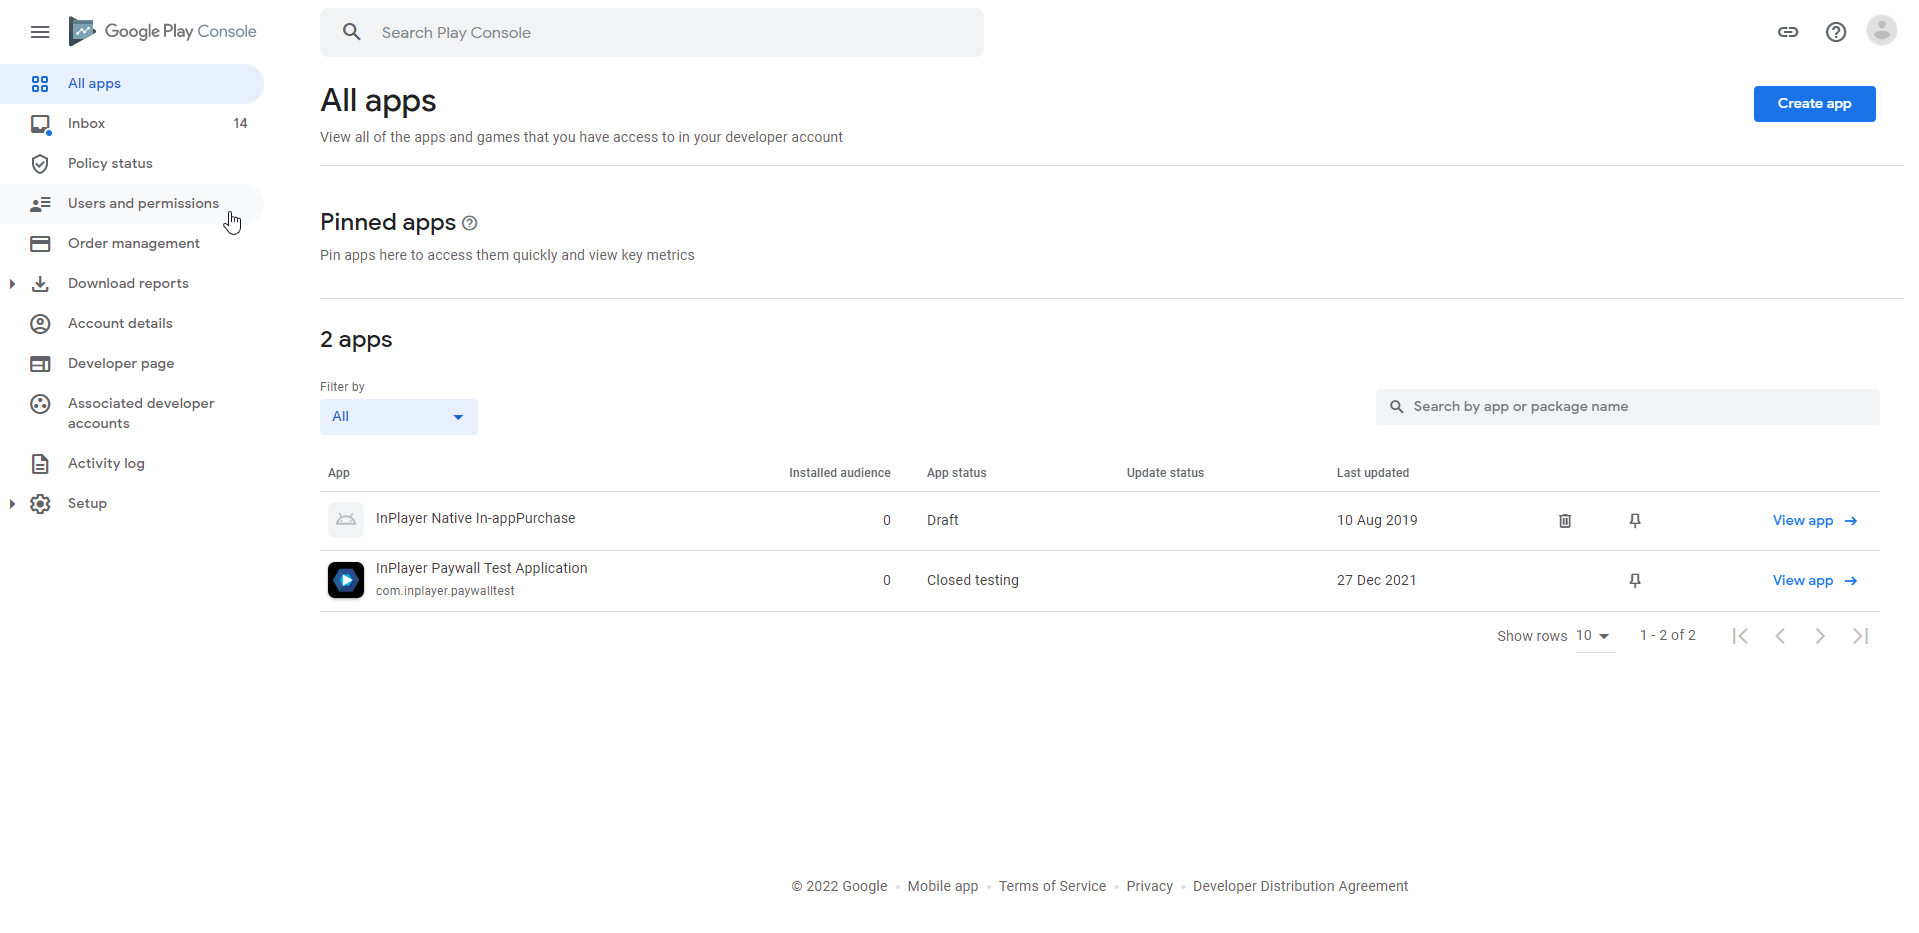
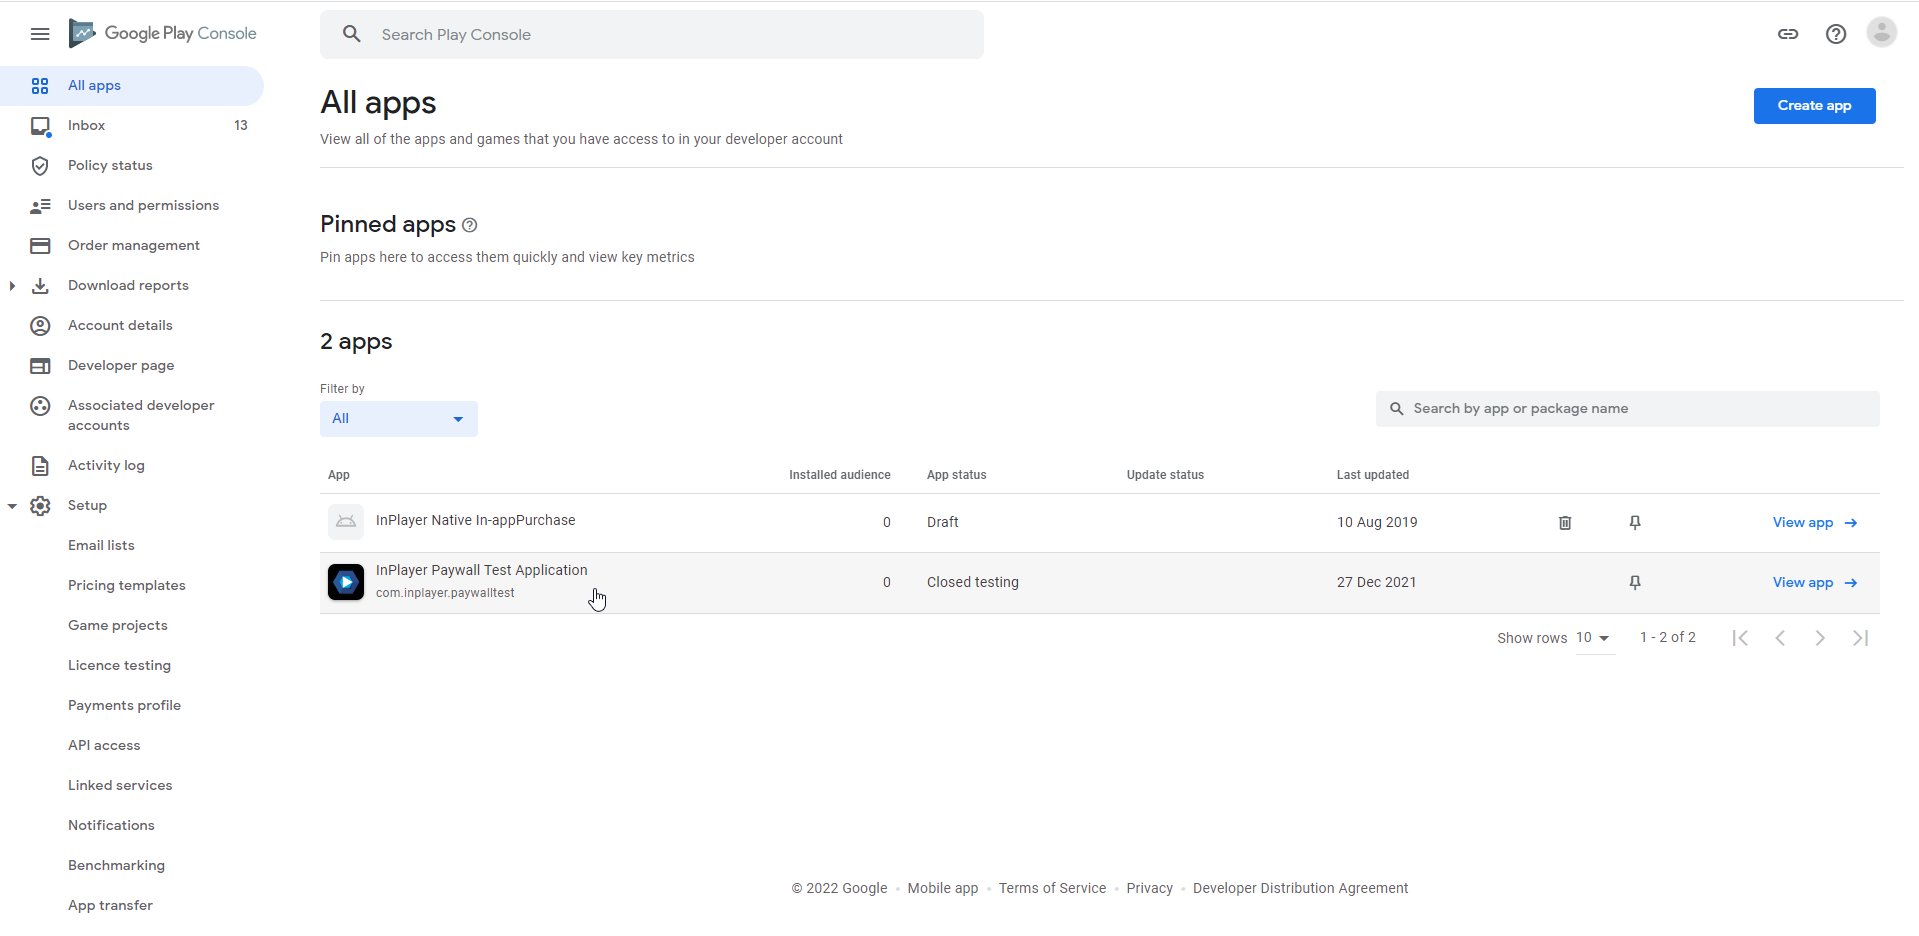
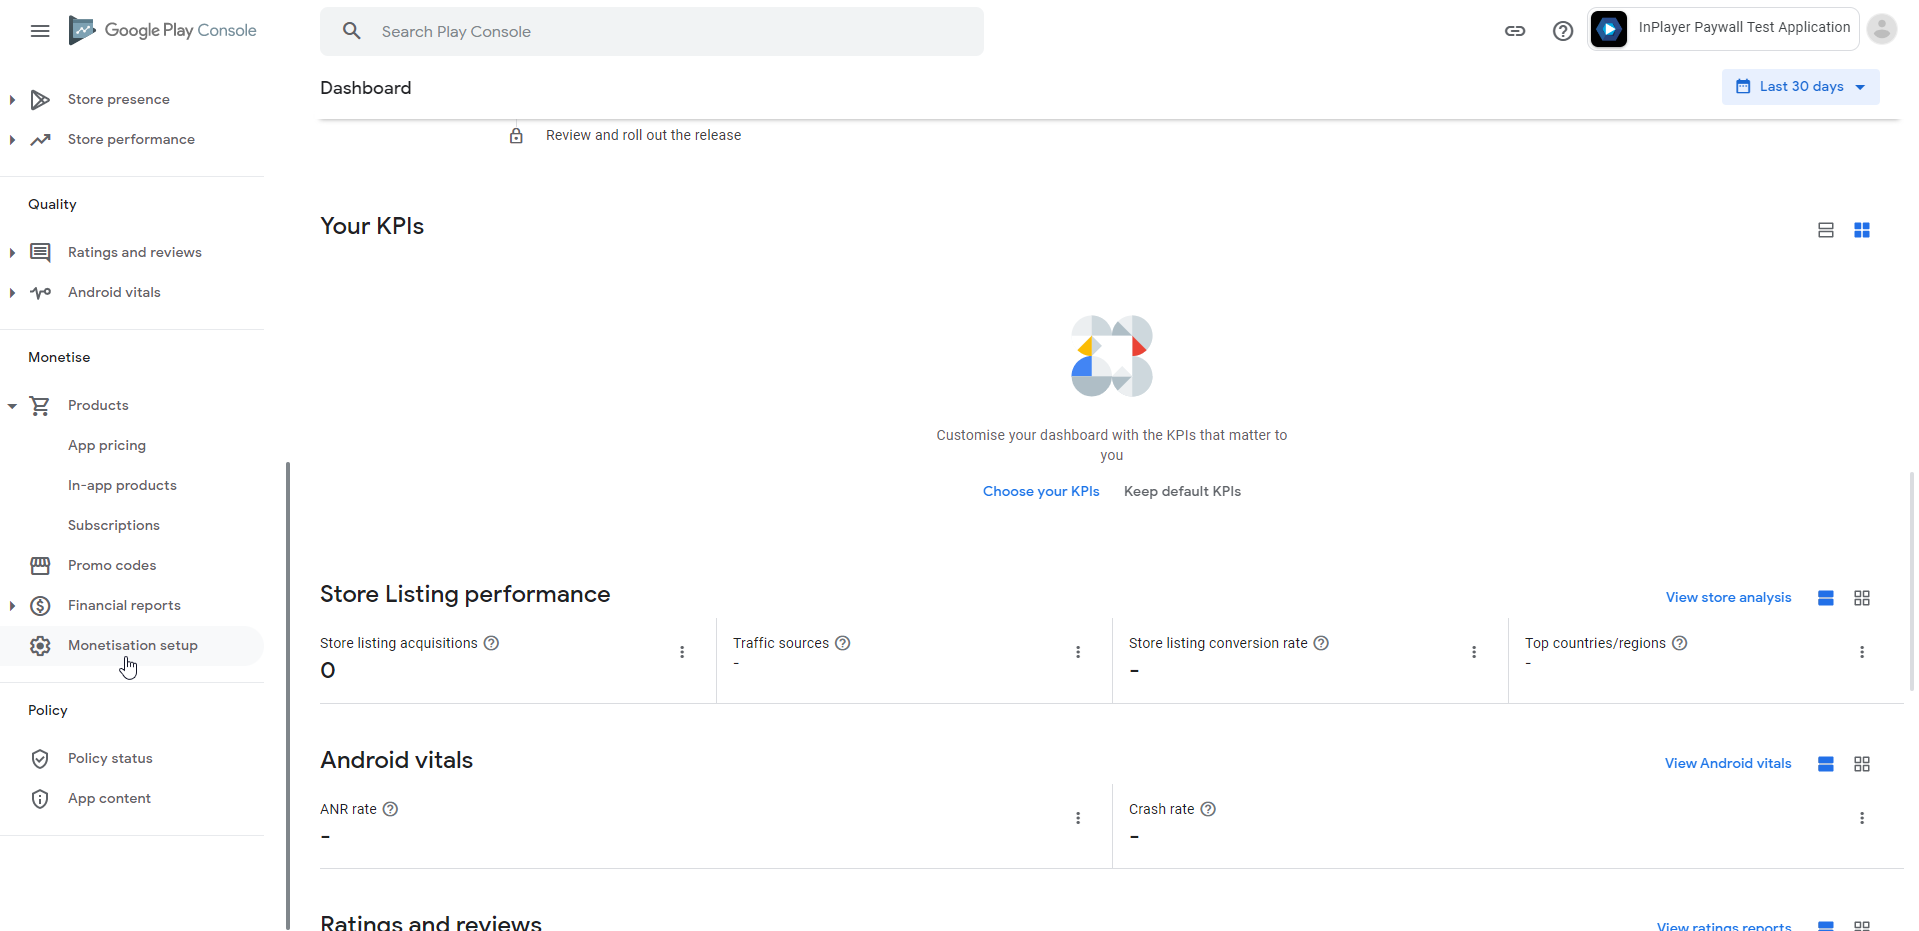
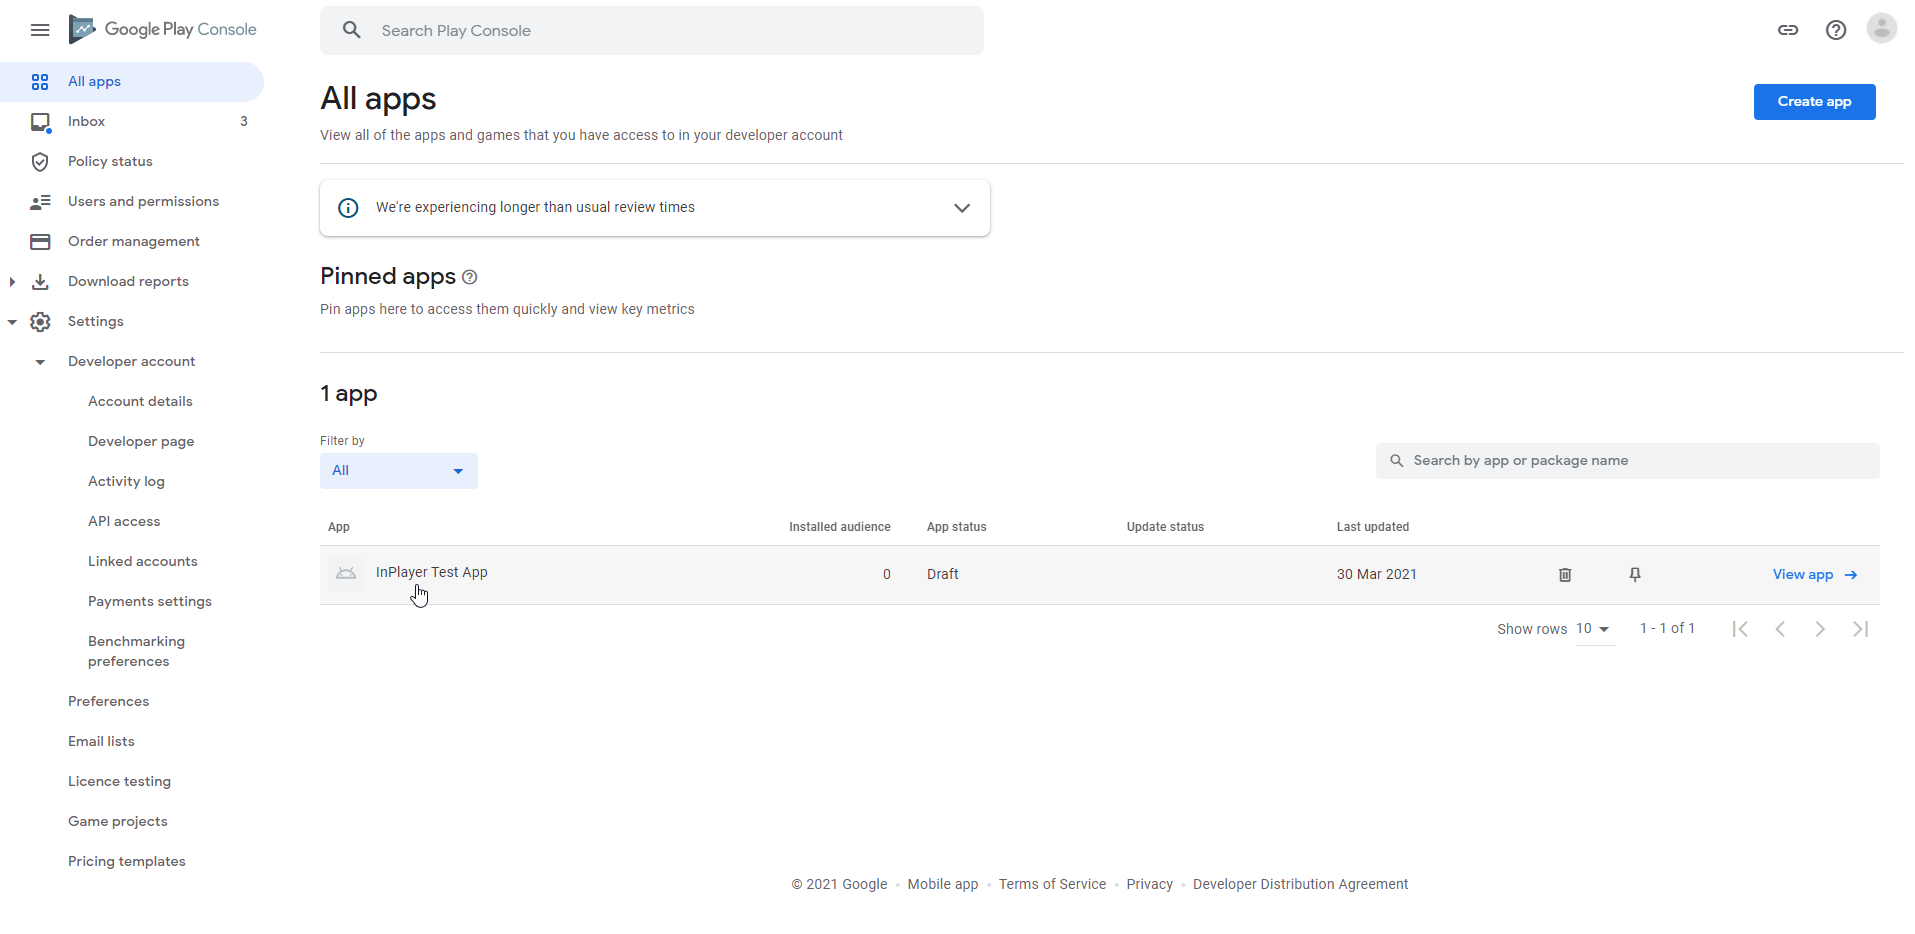
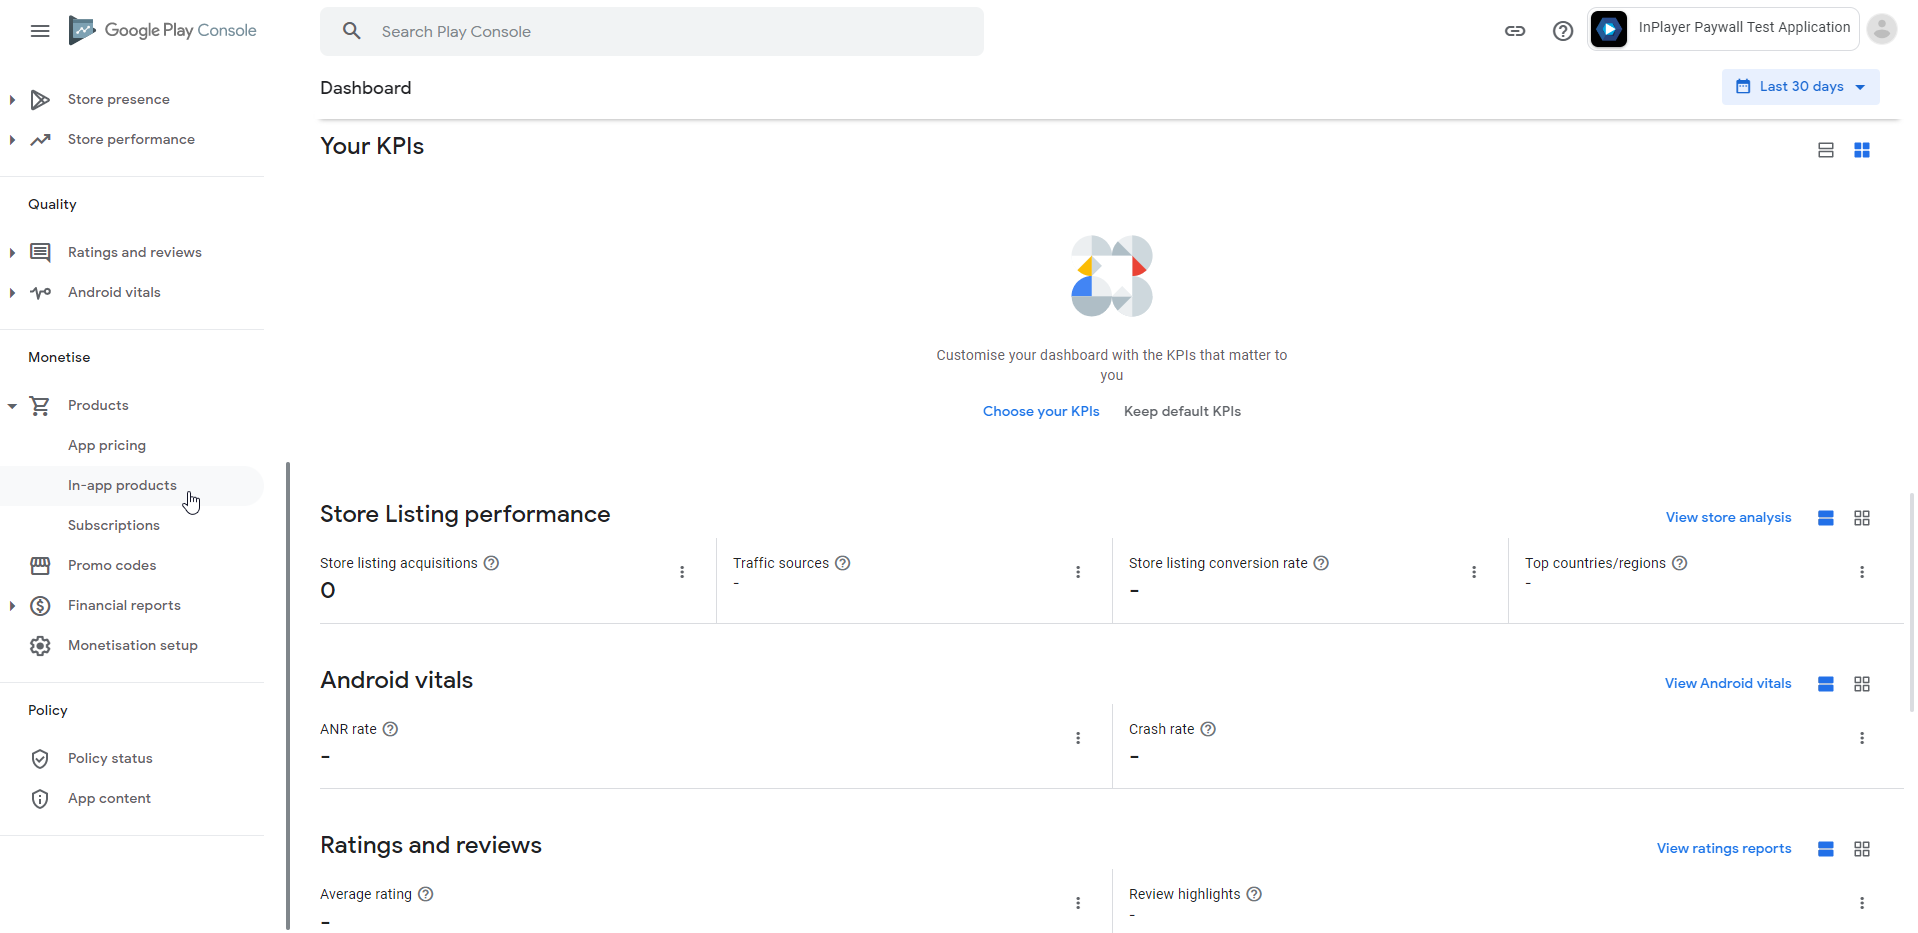
Finally, go to All apps and click on your app.
Scroll down and click on Monetisation setup.
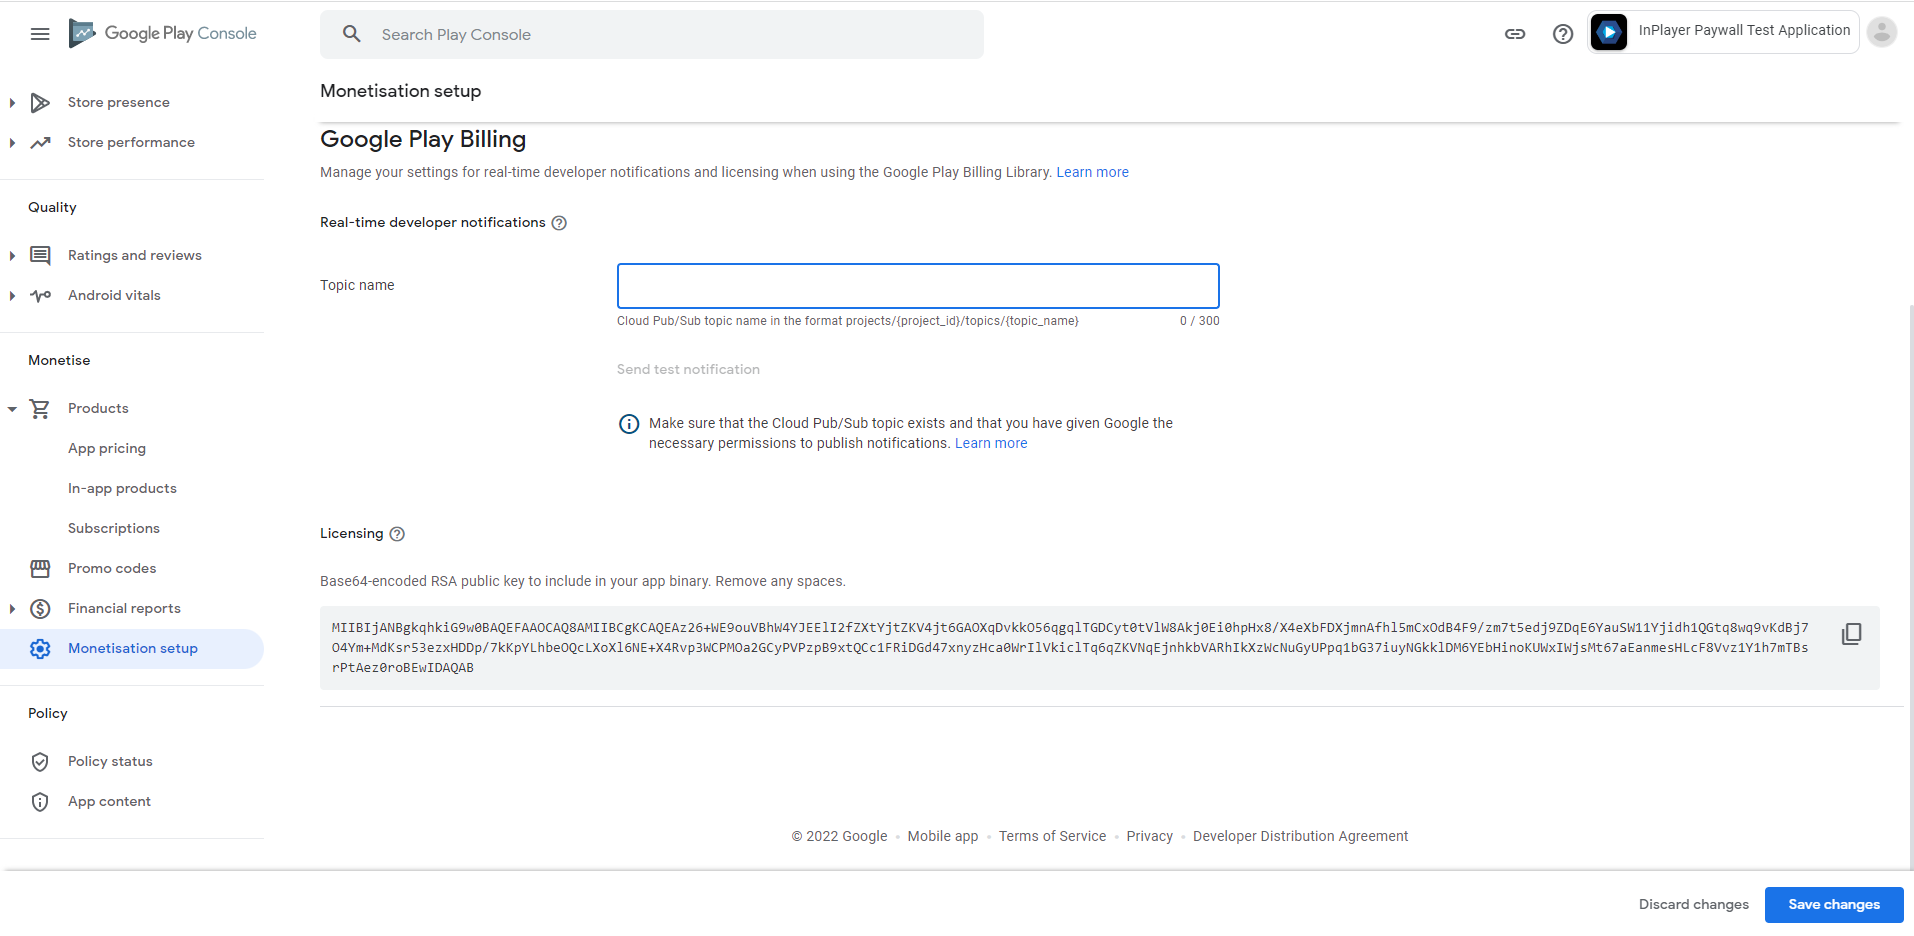
Under Topic name, enter the Topic name of the inplayer-notifications topic you’ve saved previously.
We offer several different types of assets, so make sure to look at this section for instructions on how to create the correct asset type, depending on your wishes.
After you’ve created your asset, the next step is to create the in-app purchase, i.e. the Google Play product.
Next, you need to create the Google Play product. This is going to be the Google Play Store counterpart to the price option you have previously set up for your InPlayer asset.
Note that Google Play Console needs a copy of your app before you can set up subscriptions or in-app purchases. Until you upload one, those features stay locked. Therefore, please make sure you’ve done the following:
1. Export your app as an APK or AAB. 2. In the Google Play Console, go to Release > Production > Create new release. 3. Upload the file there.
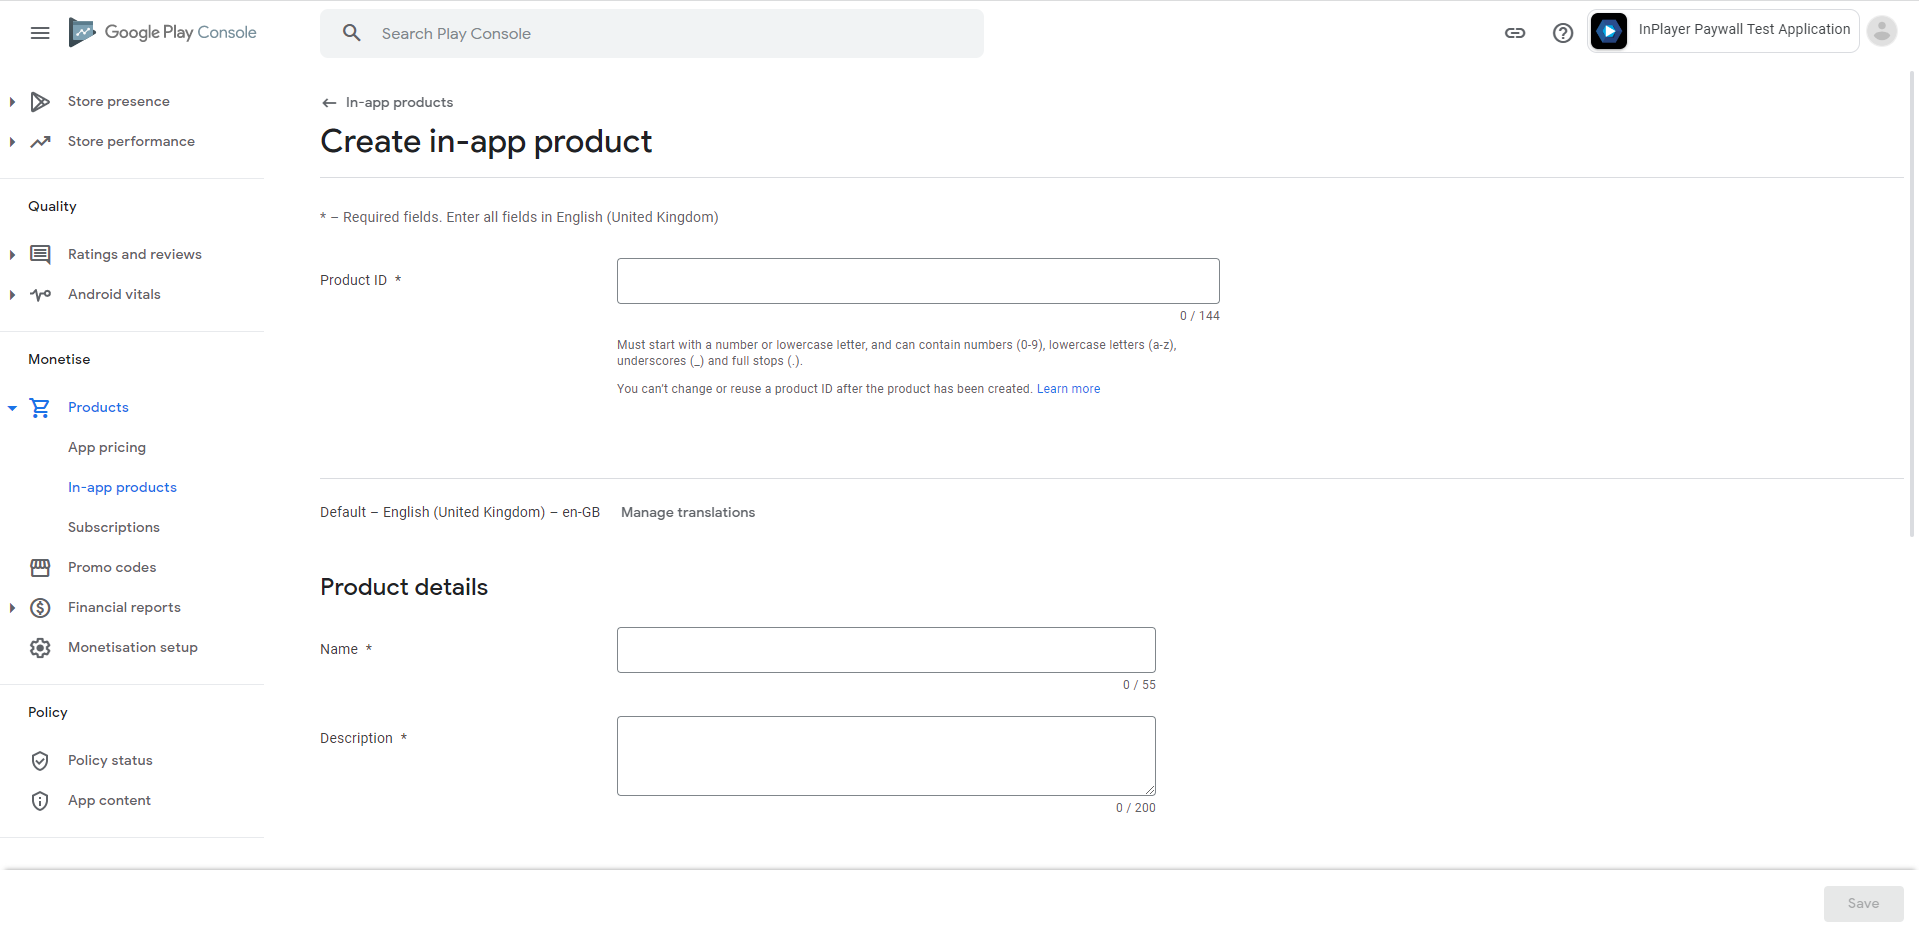
In the left-hand menu, under Monetise with Play, and under Products, go to In-app products.
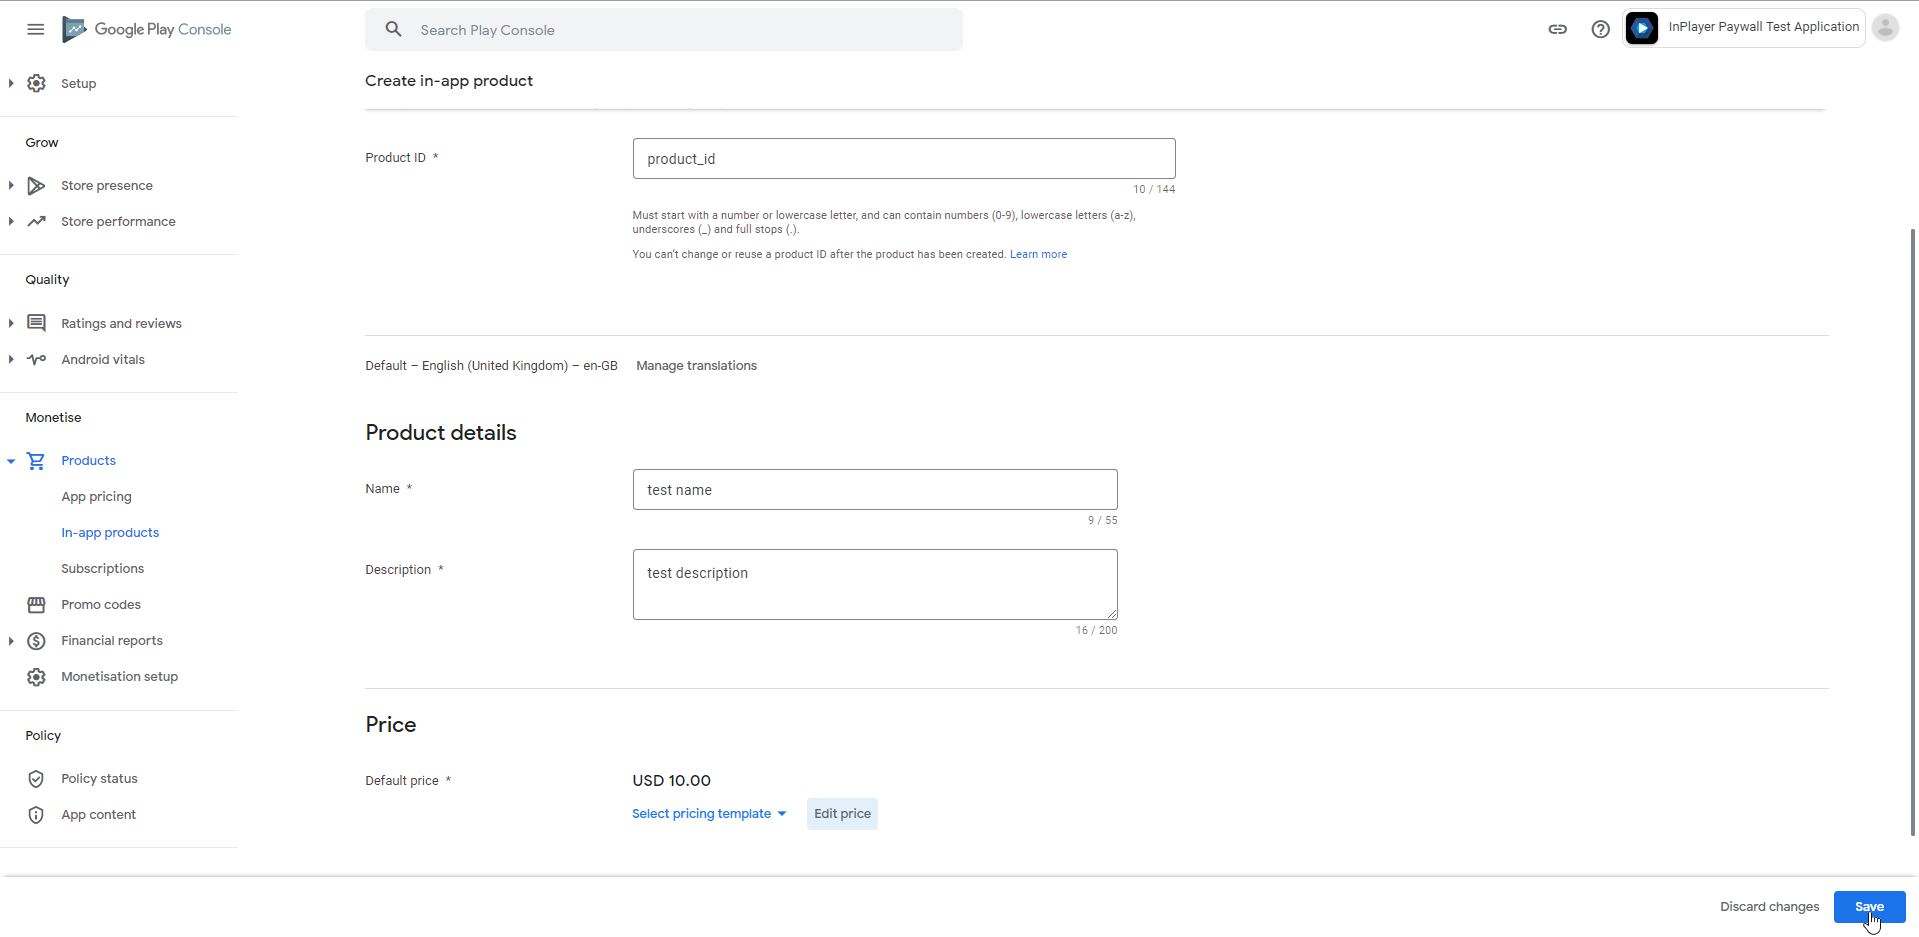
Click on Create product.
Set up the new product.
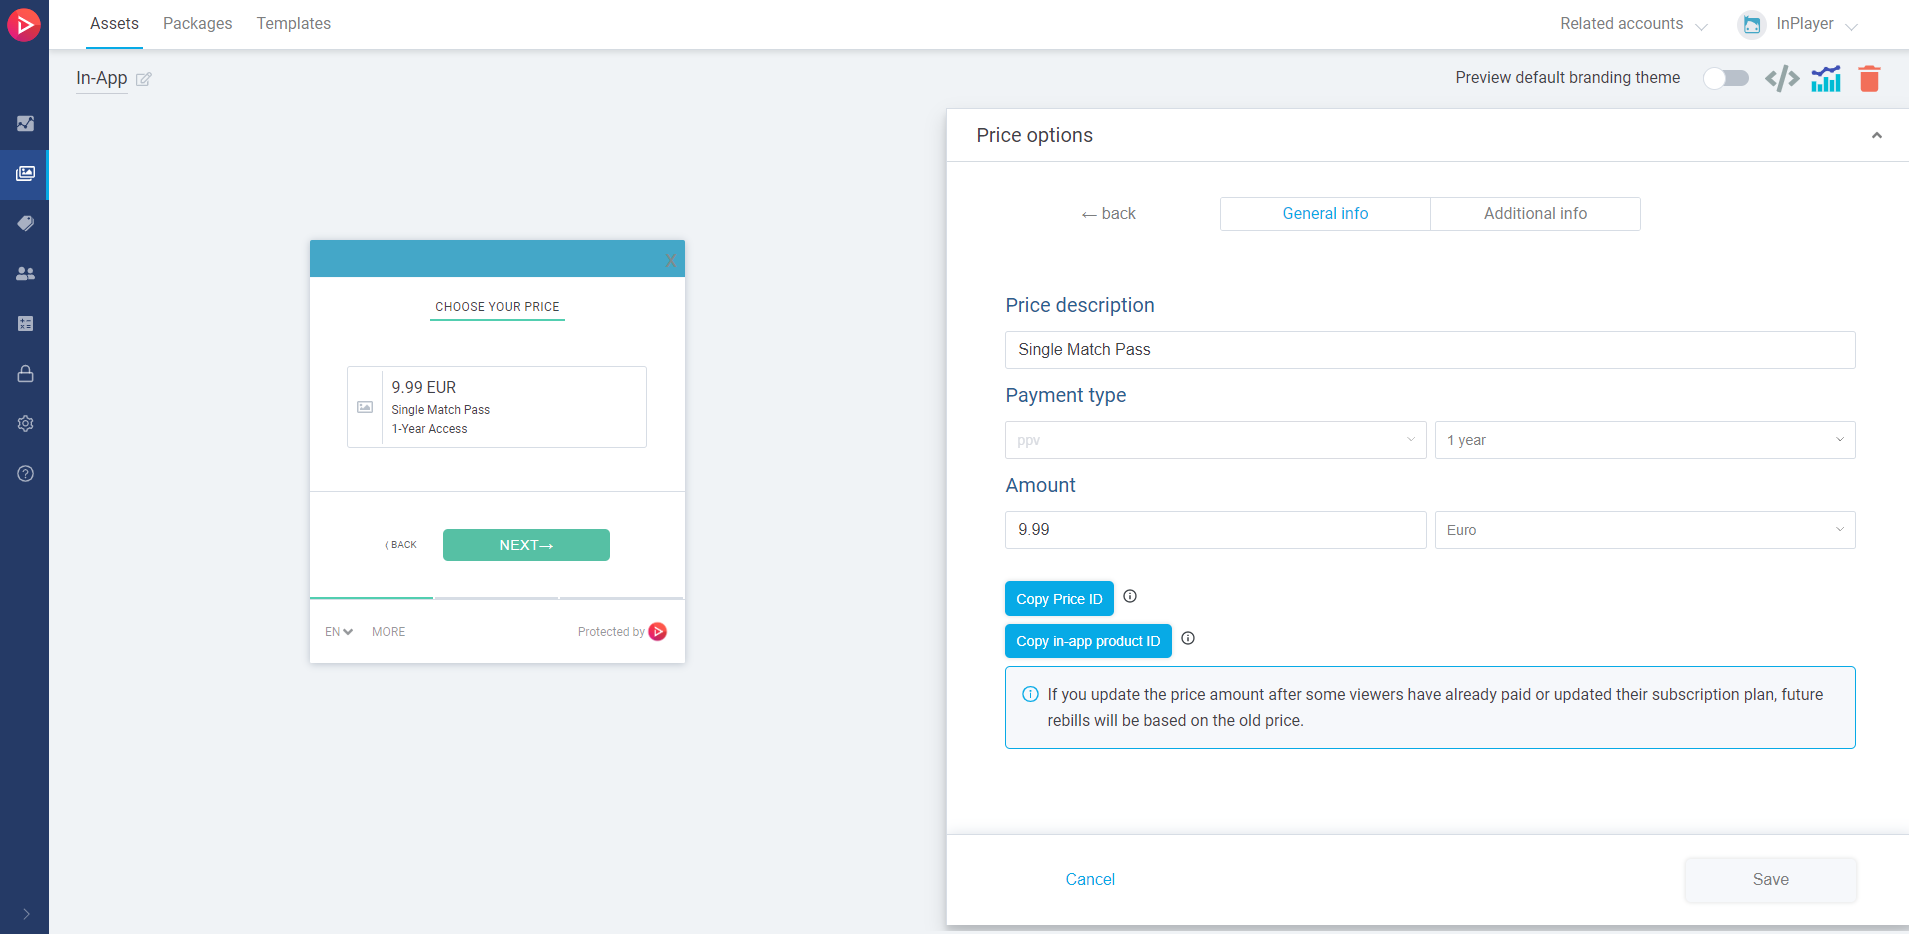
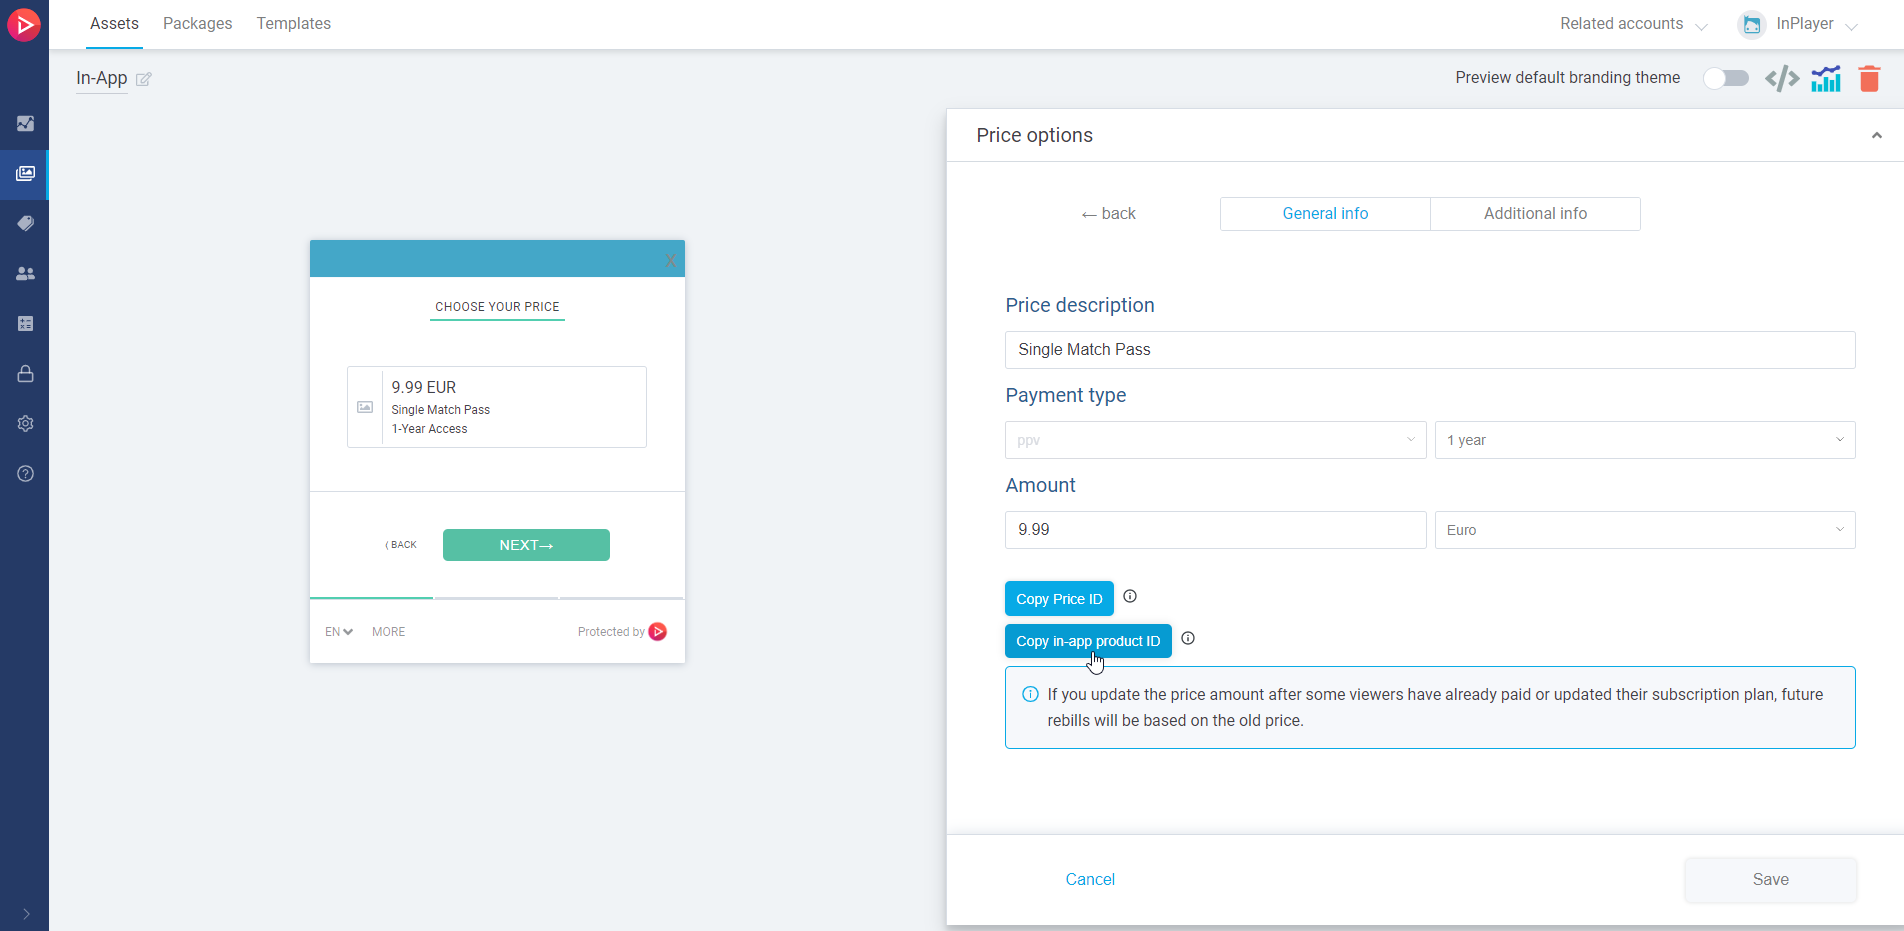
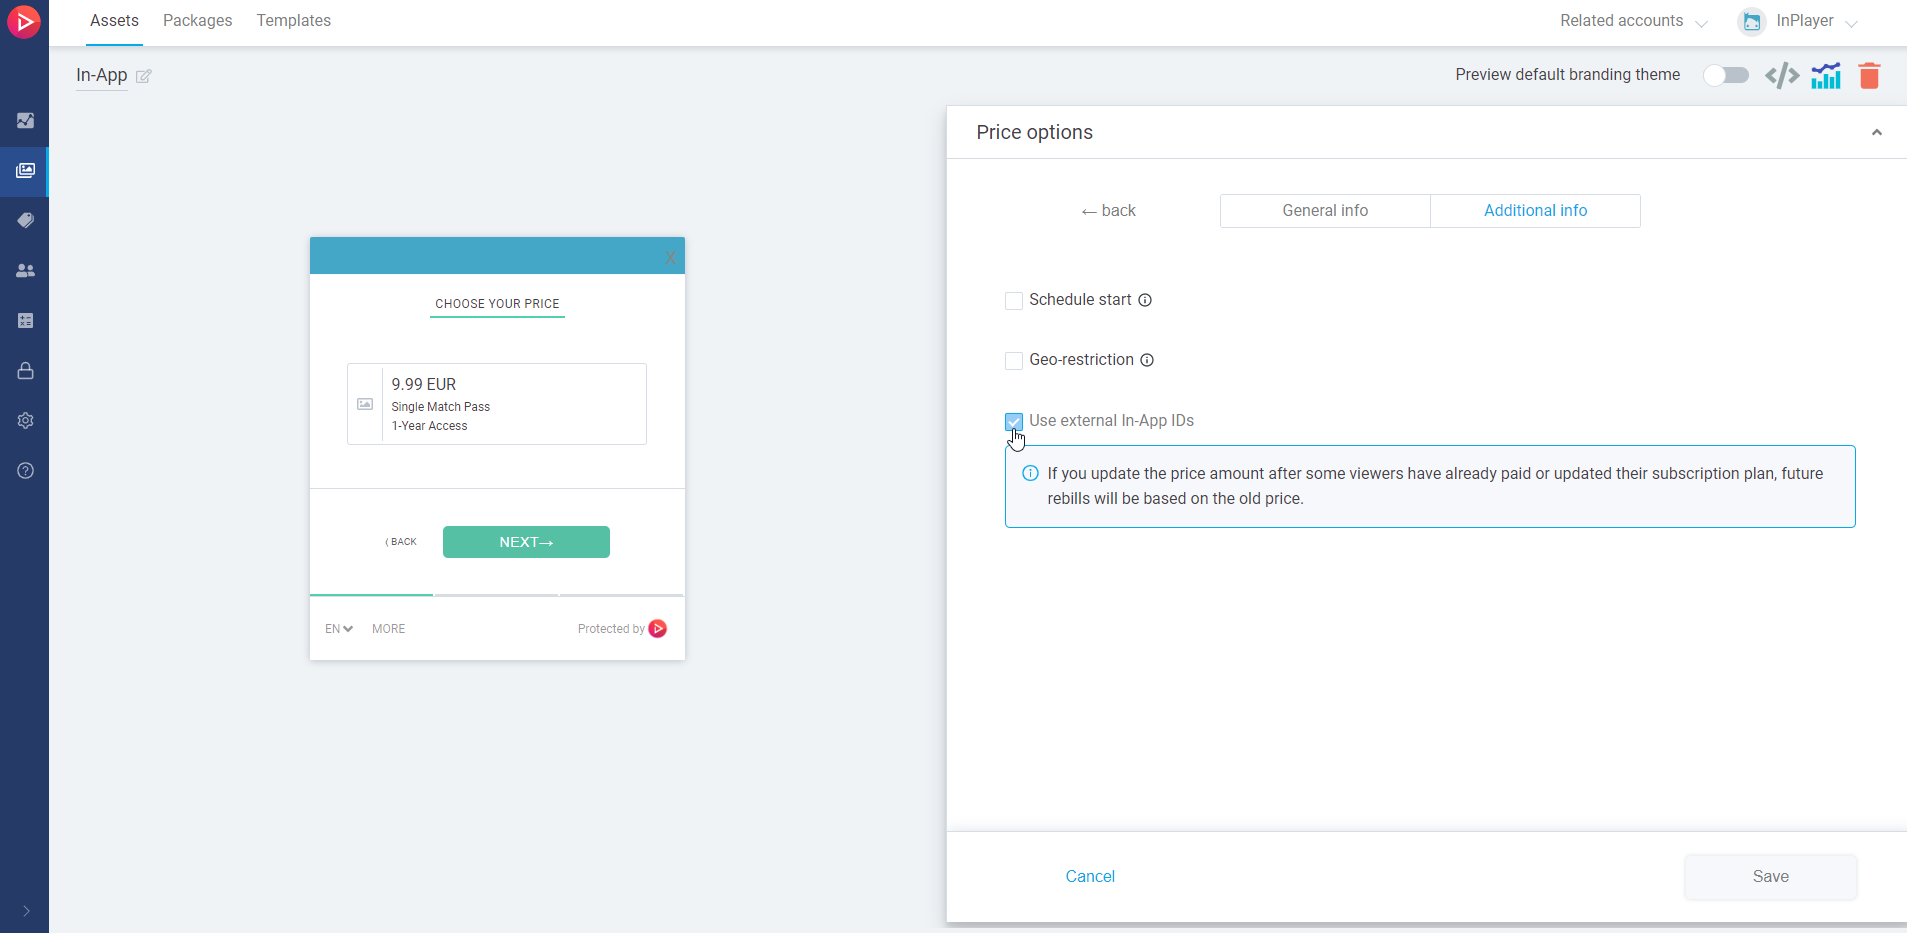
In the Product ID field, enter the Product ID of the price option for the InPlayer asset you are monetizing.
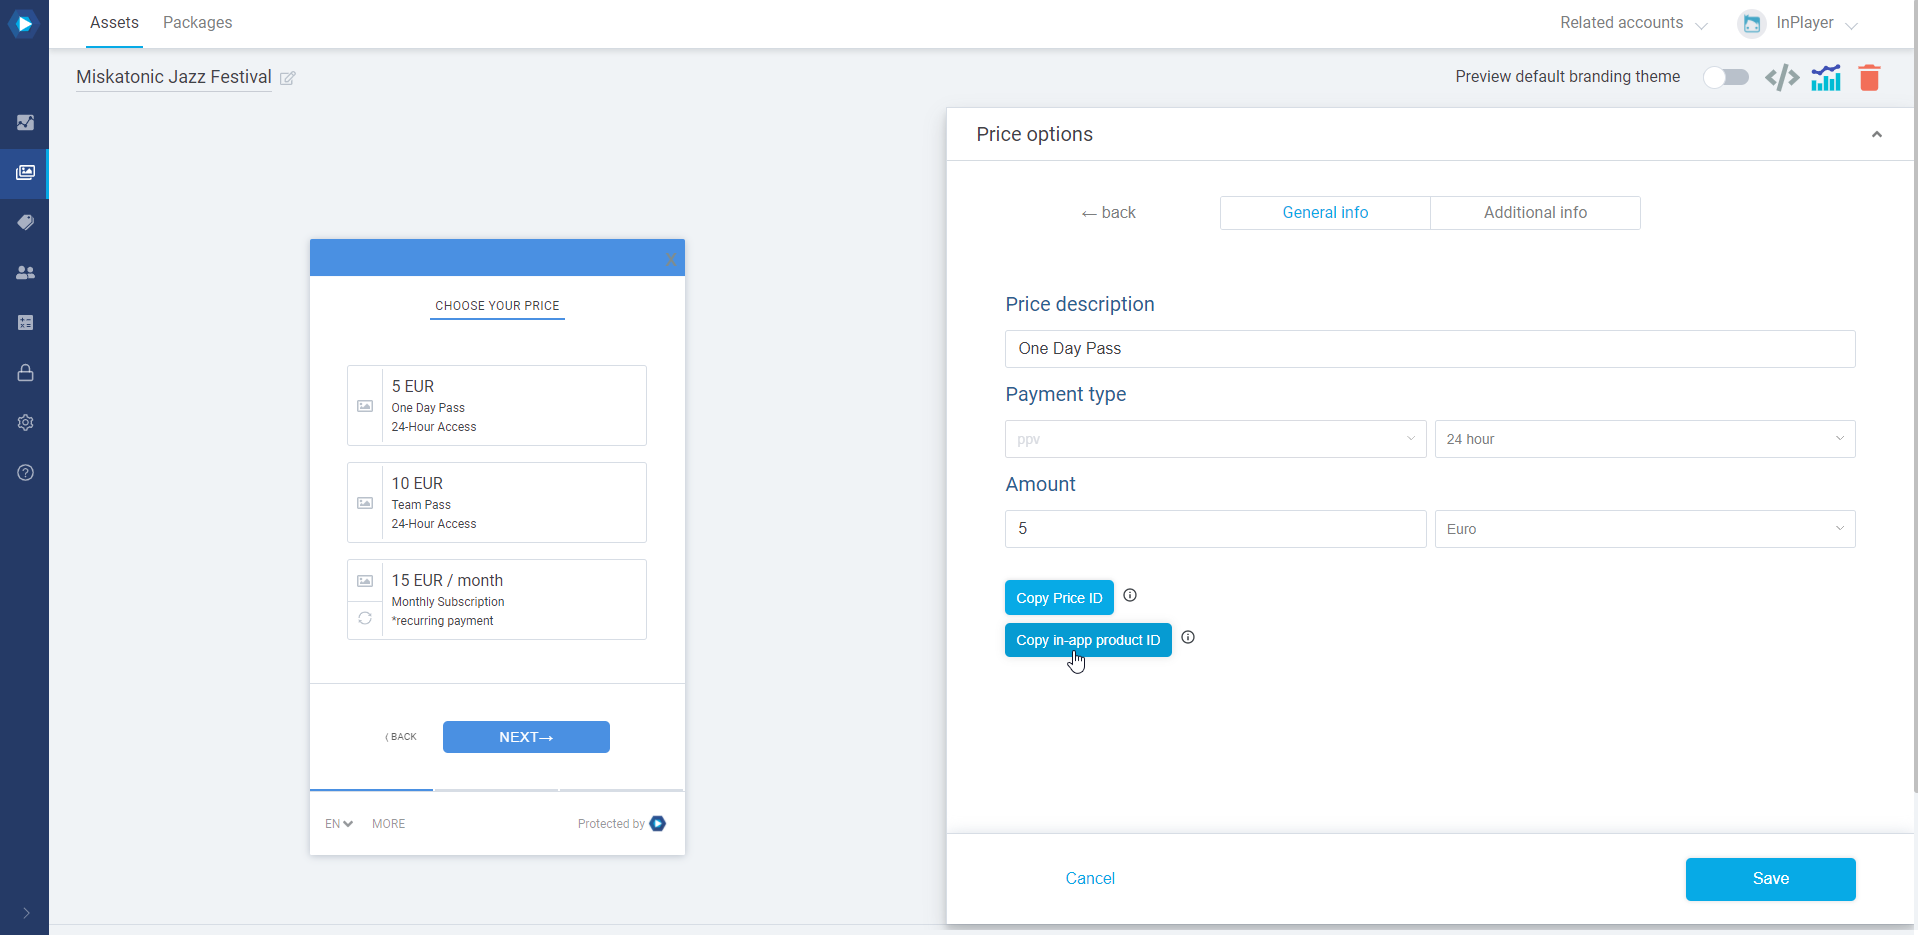
To get the Product ID, go to the Assets or Packages tab of your InPlayer dashboard and open the asset or package you wish to use. Go to Price Options, open the price option for which you are creating the in-app purchase, and click the Copy in-app product ID button.
Paste the Product ID into the Product ID field in the Google Play Store product form.
Fill out the rest of the product details.
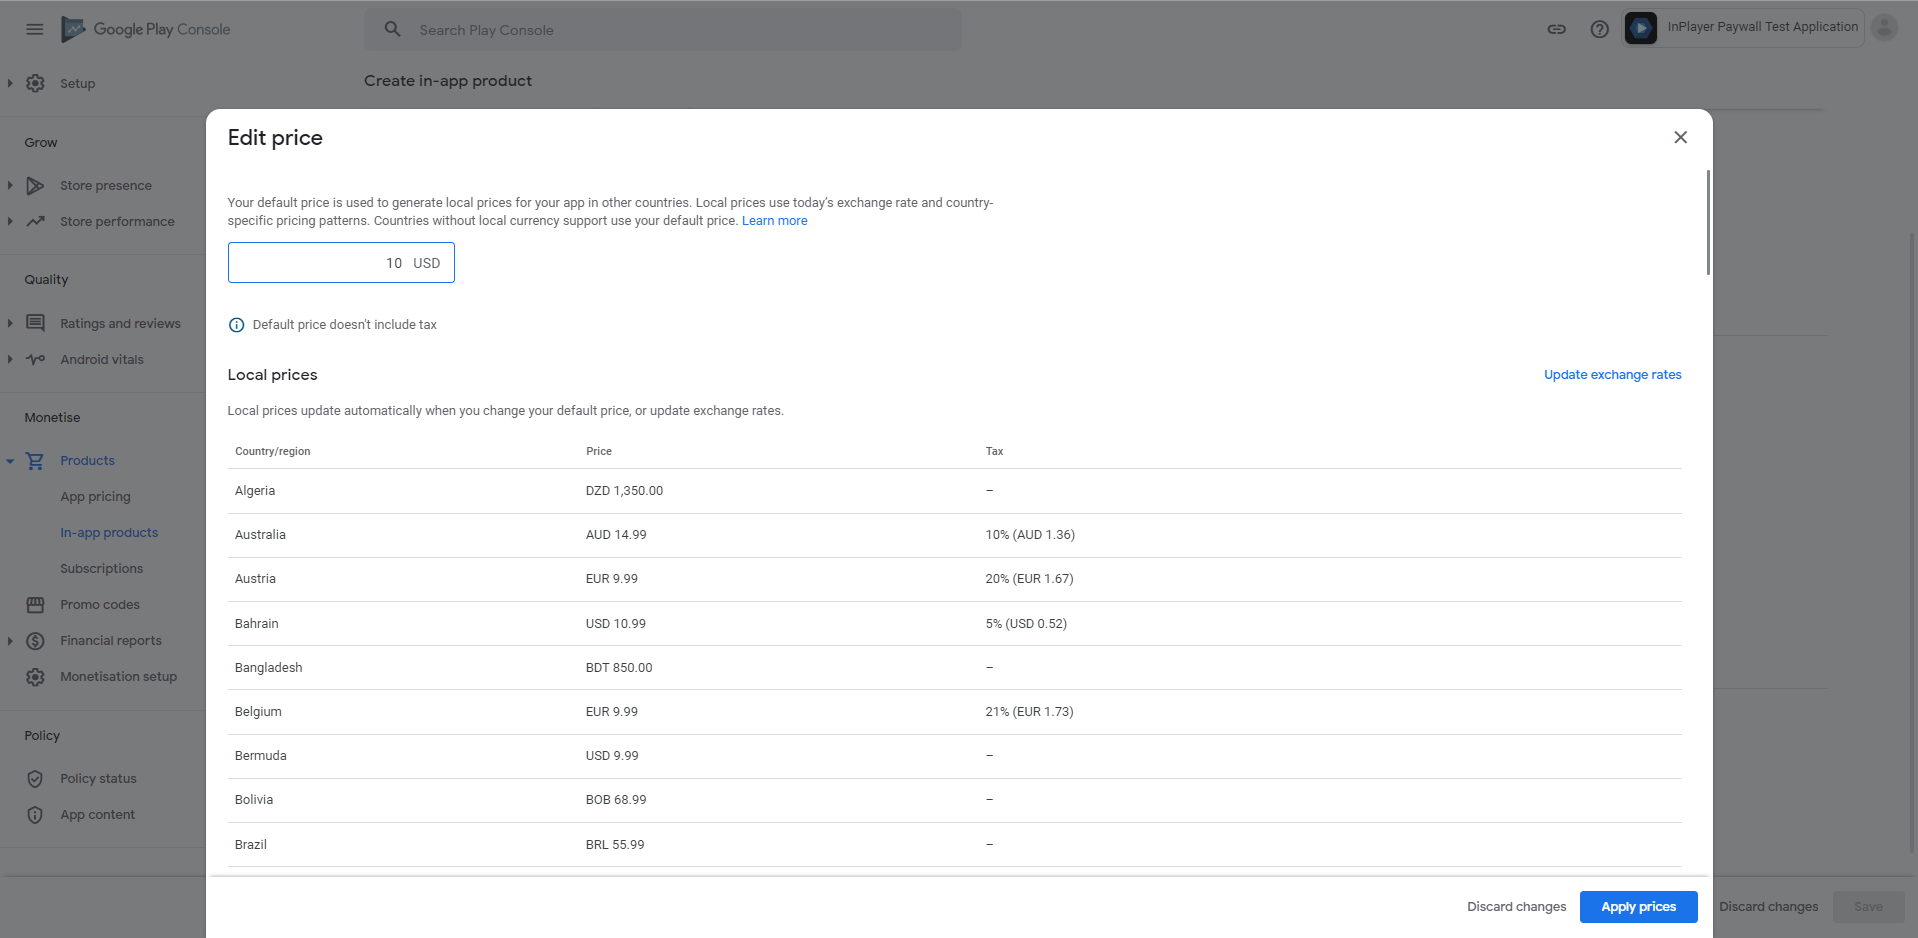
Set up the pricing.
Remember to use the same price as the one you’ve set up in the InPlayer merchant panel.
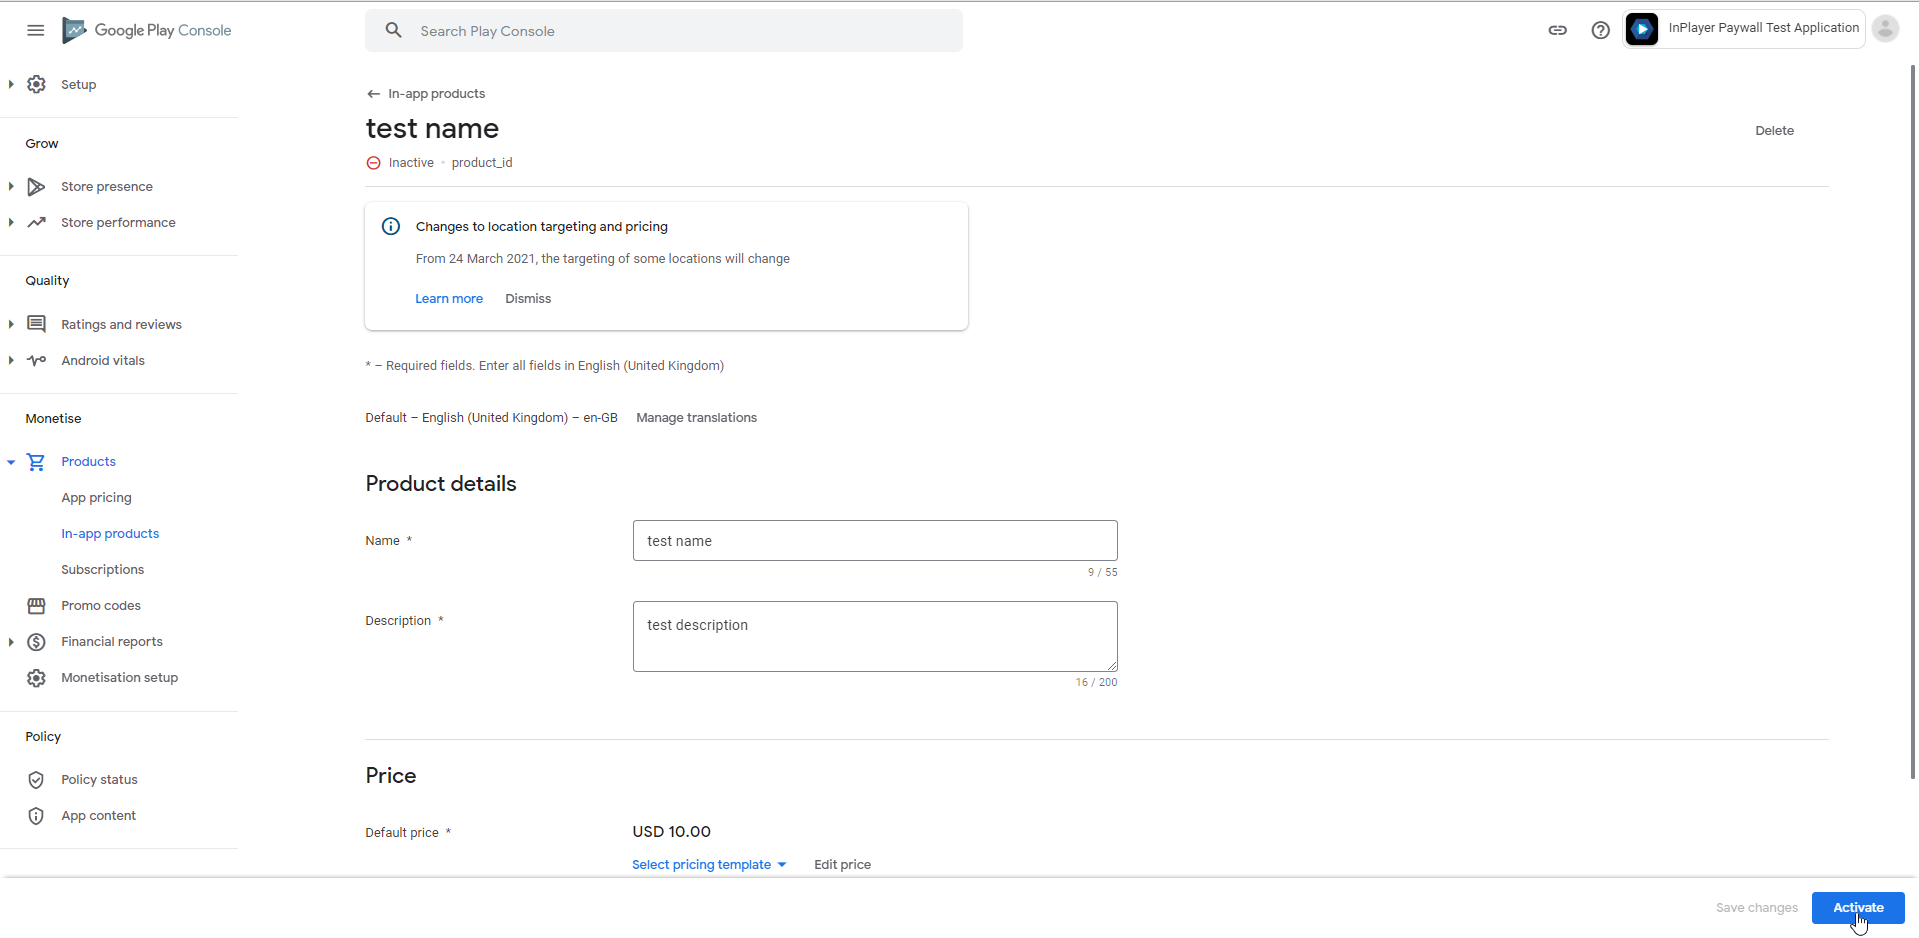
When you finish with everything, review your work and click Save.
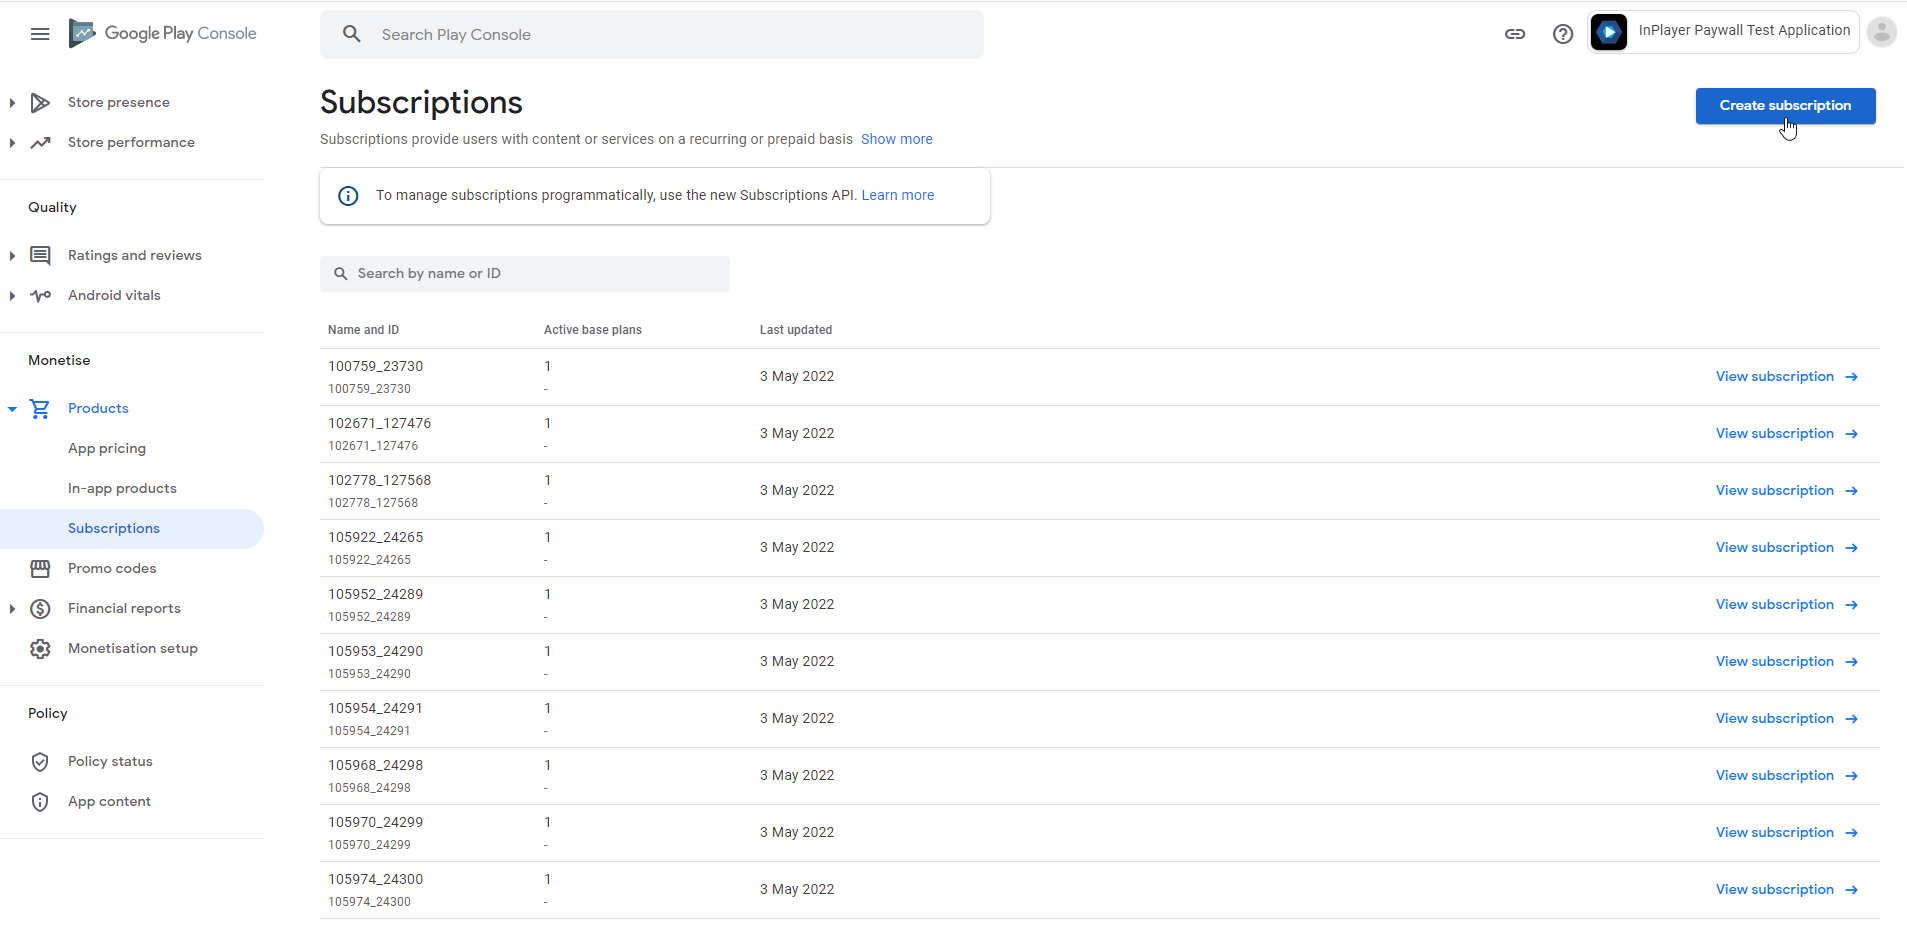
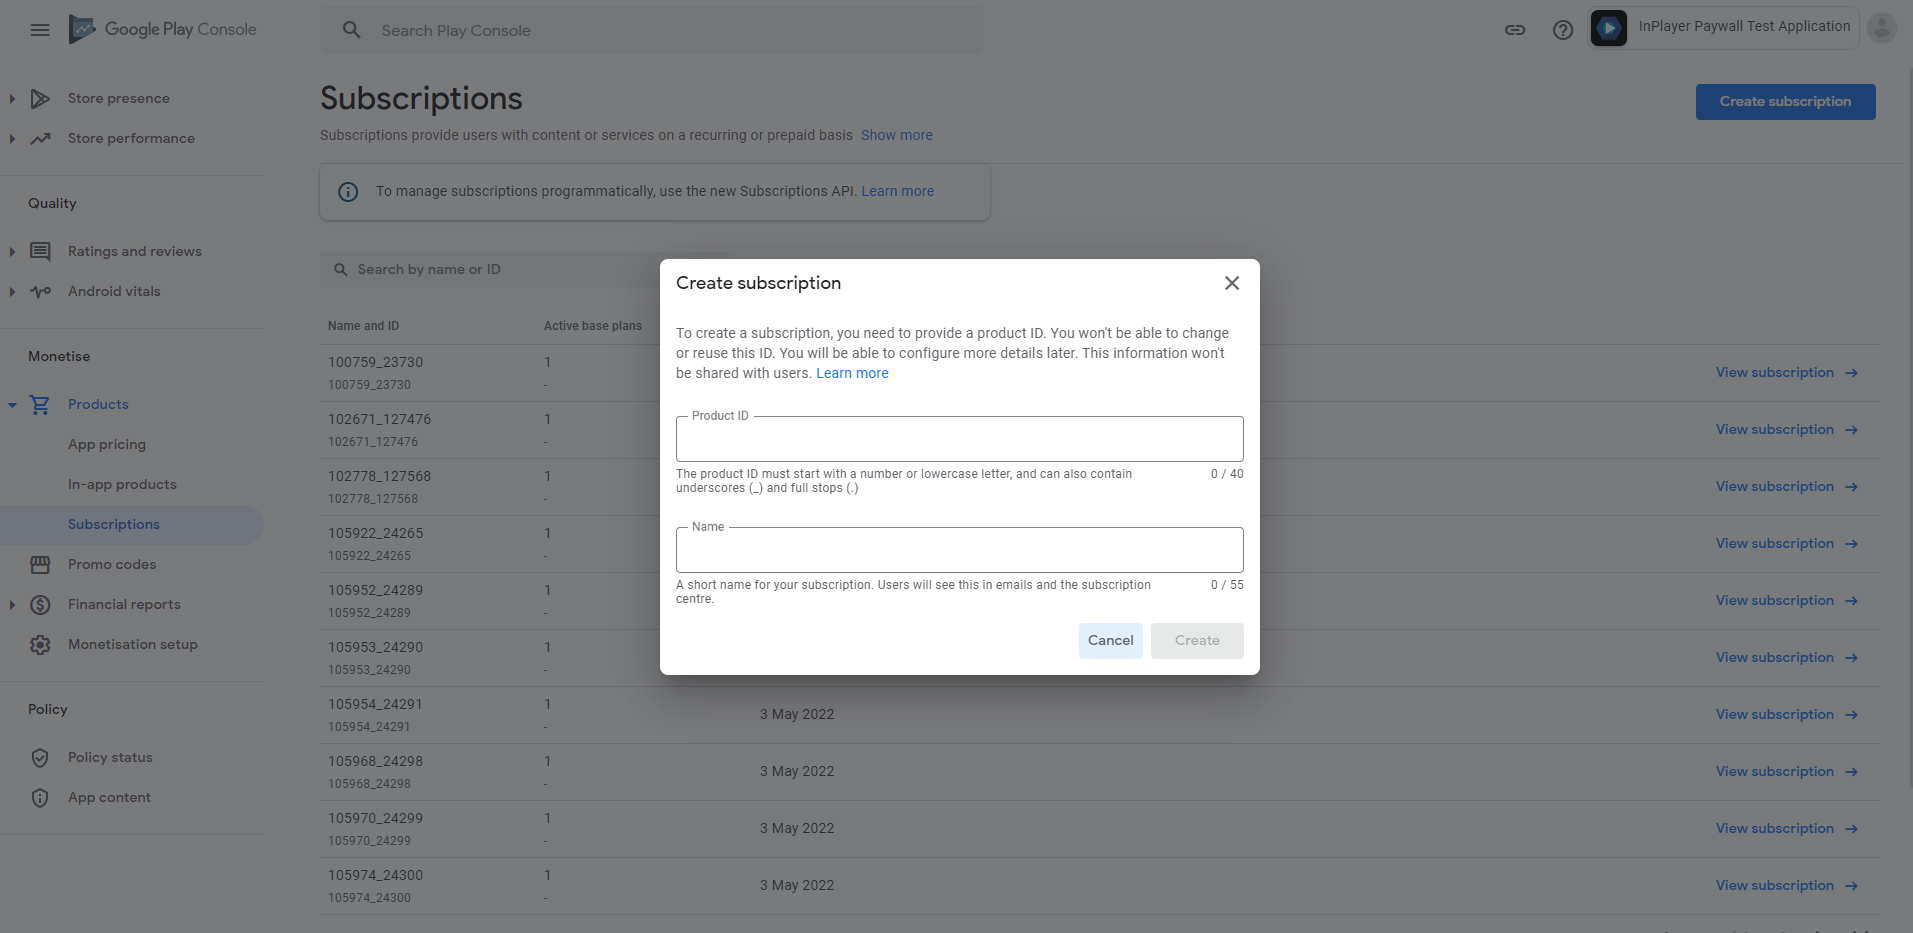
In the left-hand menu, under Monetise with Play, and under Products, go to Subscriptions.
Click on Create subscription.
Set up the new subscription.
In the Product ID field, enter the Product ID of the price option for the InPlayer asset you are monetizing.
To get the Product ID, go to the Assets or Packages tab of your InPlayer dashboard and open the asset or package you wish to use. Go to Price Options, open the price option for which you are creating the in-app purchase, and click the Copy in-app product ID button.
Paste the Product ID into the Product ID field in the Google Play Store product form.
You can only have a single in-app purchase (i.e. price option) for each subscription.
Click Create.
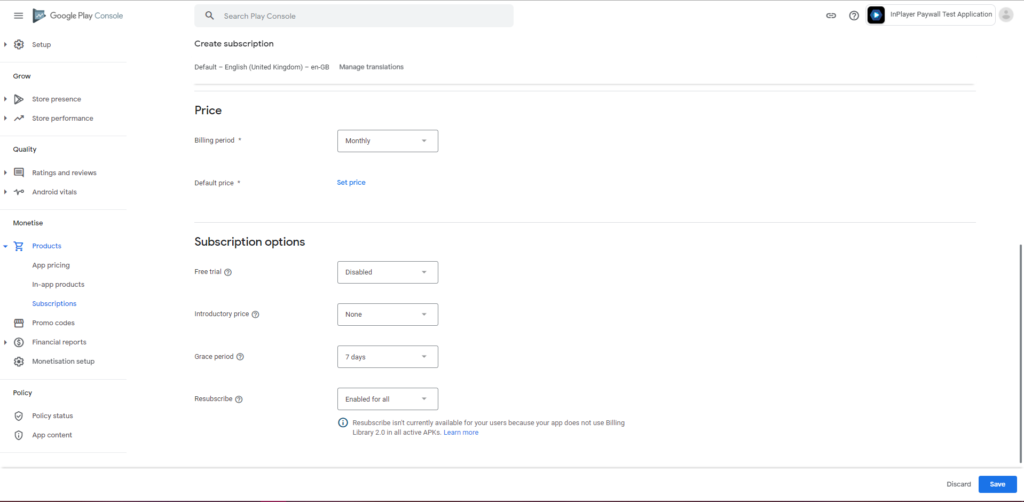
Fill out the rest of the product details.
Set up the pricing by clicking on Add a base plan.
Remember to use the same price and billing period here, as the ones you’ve set up in the InPlayer merchant panel.
Note that the default price here will be in USD, so make sure to take that into account.
Under Free trial, set up a free trial if you wish to have one. Remember to set the same free trial in the pricing of your InPlayer asset.
Using the Introductory price option, you can enable discount vouchers which you can create in your InPlayer dashboard. Read our In-app introductory offers guide for more on this.
Set the Grace Period to None.
When you finish with everything, review your work and click Save.
If you are using an existing Google PPV or subscription product, before you proceed with the steps below, always make sure that all the pricing and access type and duration details are the same in both the Google PPV or subscription product and the InPlayer asset. Once you do this, proceed with the step below.
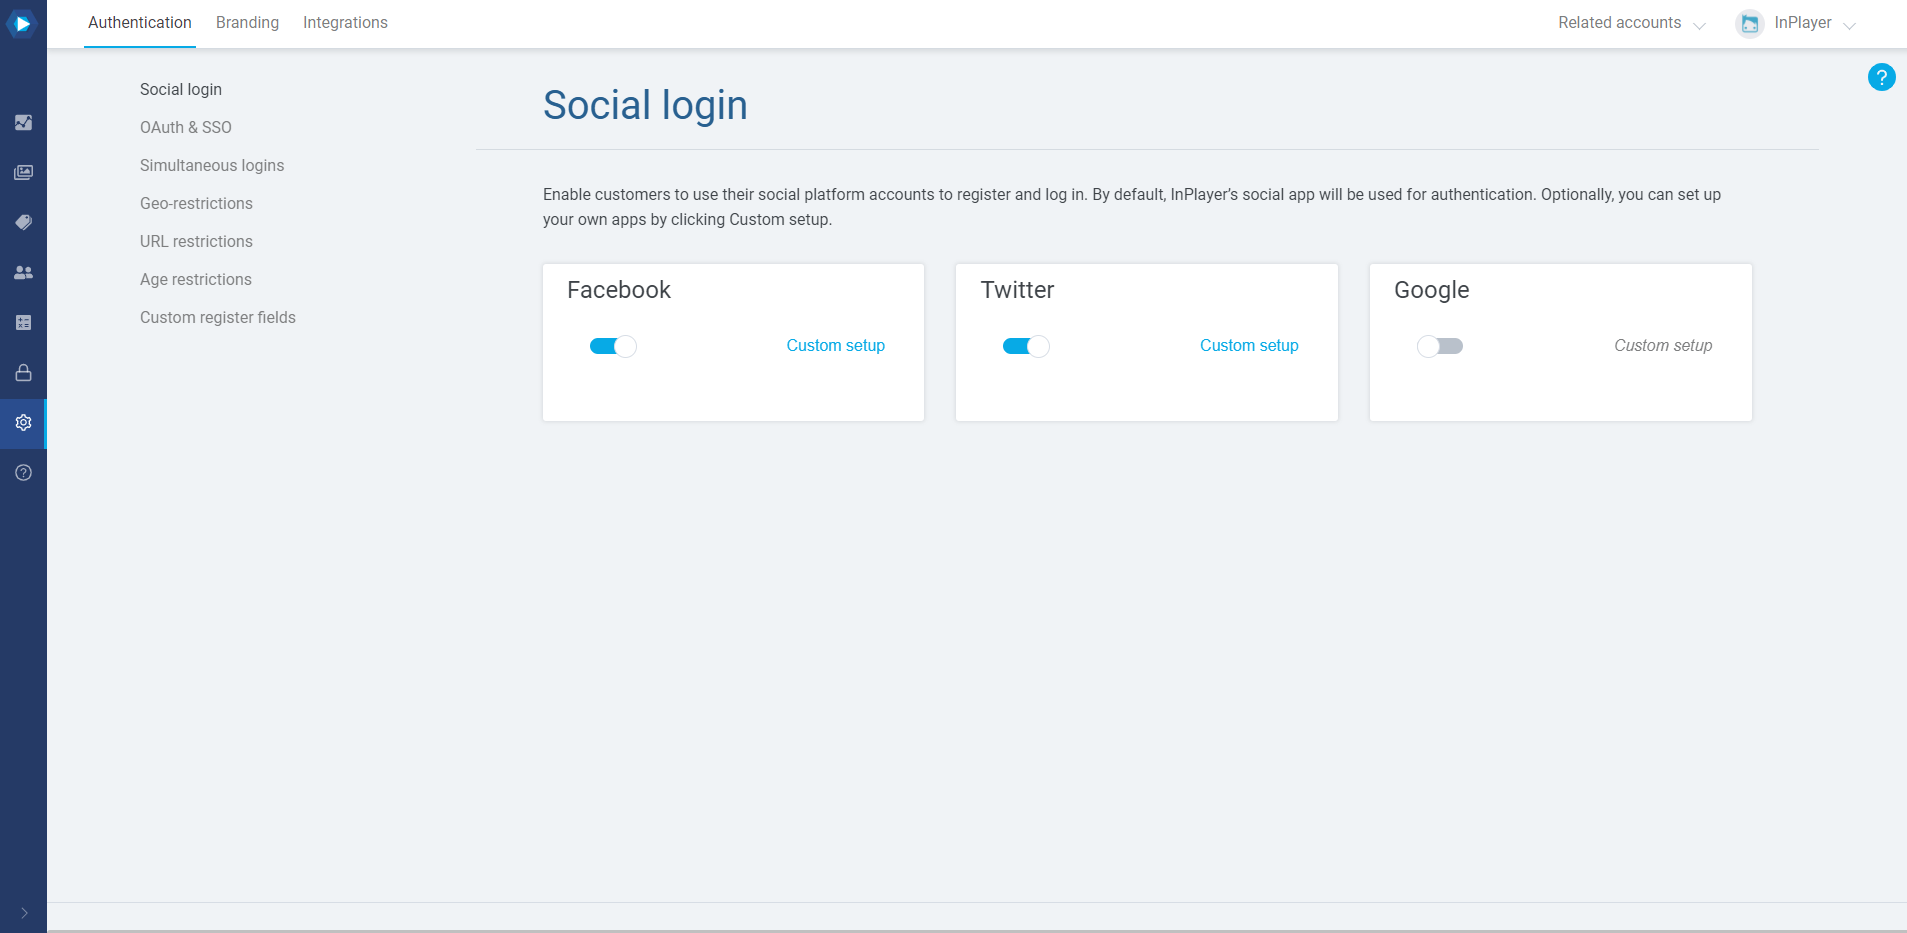
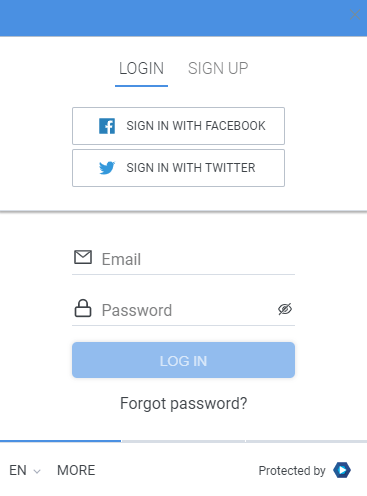
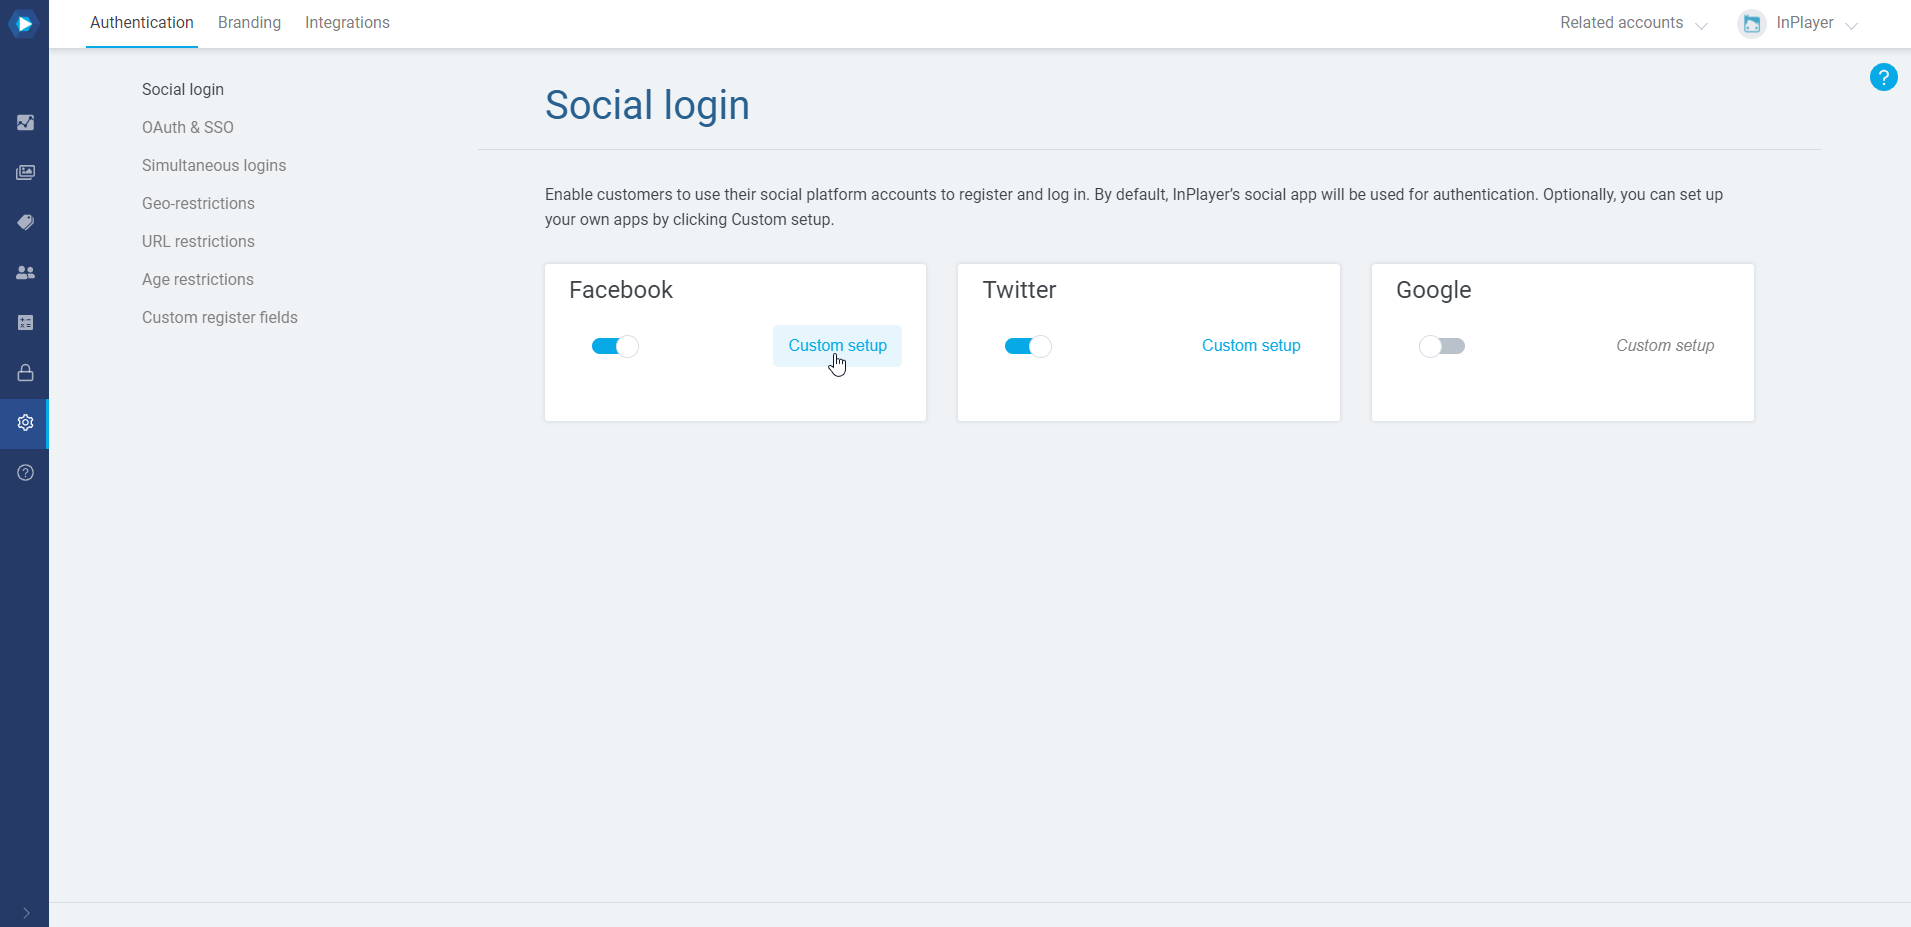
With Social login, you can let your viewers use their Facebook, Twitter, or Google accounts to register and log into your platform, instead of them using the standard paywall register and login forms.
You will find the Social login feature in the Authentication tab of the Dashboard settings.
To enable or disable a social login, just click on its respective toggle.
Once enabled, the social login buttons will appear on the paywall.
By default, our platform will use our own social apps to manage the viewer logins, but you can also use your own apps by clicking on Custom setup and setting them up.
When setting up the apps in their respecting social dashboards, make sure to use the following URLs: