Transactions

The Transactions section offers a live overview of each of your viewers’ payments.

It has two tabs: Payments and Subscriptions.

The Payments tab

The Payments tab offers a complete overview of your viewers’ payments. This includes both the ppv (one-time), subscription (recurrent), and season price payments.

At the upper right of the tab, you have the Generate report, Schedule report, and View reports buttons. You can learn more about making reports in the guides to reporting.

Below that, you have the search bar, along with the filter to list the payments by status.

Here is a list of the various payment statuses, along with their meaning:

RecurrentRegular subscription payment.
ChargeRegular ppv (one-time) payment.
RefundRefund.
FreemiumRegular data capture (free of charge) access.
Pending There are two possible reasons for this status.
1. Direct Debit payment where we await the bank to confirm the mandate creation. Viewer will have access during this time.
2. Other payments where the bank has not yet released the funds. Viewer has no access. If this status doesn’t change after a while, the viewer might have to contact their bank.
These payments are not included in the payment reports as they are still considered incomplete.
FailedDirect Debit payment that failed due to issues with the viewer’s bank account (ex. lack of funds).
DonationA viewer donation. No access is granted.
Gift-paymentA purchase that was bought as a gift. The purchaser of the gift has no access.
ChargebackThe viewer has disputed the payment for some reason, and their bank has reversed the charge. Access is revoked immediately after a chargeback has been received. If you are using Stripe Connect with your own Stripe account, you will need to process the chargeback via the Stripe chargeback flow yourself. If you are using InPlayer’s Stripe account, the InPlayer team will do this on your behalf, so you don’t have to do anything.

To use the search bar, click on it, choose the filter you wish to use for your search, and type in your search.

So, if you wanted to find the payment that was done by a viewer with the email carter@mail.com, you’d click on the search field, choose the email filter, type in carter@mail.com, and press Enter.

Note that you can search with just the first part of the email address, in this case carter, or the second part, in this case mail.com, however, you cannot search by typing any of the two parts of the email address just partially, in this case, cart or mail.


Below the search bar, you have the main part of the Payments tab, which is the table where you can see a list of the payment records and their basic details.

View payment details

To do this, click on the arrow button under the Edit column in the viewer’s row.

Here you can see all the available details for the viewer’s payment.

The Subscriptions tab

The Subscriptions tab offers a complete overview of your viewers’ subscriptions.

At the upper right of the tab, you have the Generate report and View reports buttons. You can learn more about making reports in the guides to reporting.

Below that, you have the search bar, along with the option to choose whether to view a list of the subscriptions by status.

Here is a list of the various subscription statuses, along with their meaning:

Recurrent Regular active subscription. Viewer has access.
Past-DueActive subscription for which the latest payment has failed due to some issue with the viewer’s payment method, or is pending for SCA approval by the viewer (more on this here). Viewer has no access. Viewer should be advised to either: check/update their payment tool or their bank, check their inbox for the SCA confirmation email, wait for the system to automatically retry the payment (might take up to a month) and re-grant access upon success, or cancel their current subscription and try purchasing a new one.
UnpaidInactive subscription for which the time limit of 30 days for the SCA approval has expired, which caused the subscription to be canceled. More on this here. Viewer has no access. Viewer should be advised to check their payment tool or their bank and purchase the subscription again.
CanceledRegular canceled subscription. Viewer will lose access after the end of their ongoing billing period.
Free trial There are two possible reasons for this status.
1. The active subscription is still under a free trial. Viewer has access.
2. The first payment after the free trial expiry is still processing in the system. Viewer has access. The status will change to Recurrent as soon as the payment gets processed.
EndedInactive subscription that was ended by the system due to some issue with the viewer’s payment. Viewer has no access. Viewer should be advised to check their payment tool or their bank and purchase the subscription again.
PendingThere are two possible reasons for this status.
1. Direct Debit subscription where we await the bank to confirm the mandate creation. Viewer will have access during this time.
2. Subscription paid via another method where the bank has not yet released the funds. Viewer has no access. If this status doesn’t change after a while, the viewer might have to contact their bank.
These subscriptions are not included in the reports as they are still considered incomplete.
PausedSubscription that has been paused. Viewer has access. The subscription can be reactivated at any time.
Note that Google In-app subscriptions are the only subscriptions that can be paused by the viewer. Other subscriptions made via a payment method that supports pausing (Credit card, Direct Debit, iDeal, and PayPal) can only be paused from the customer or InPlayer side.
Note also that if you’re using Stripe Connect and are checking these subscriptions in Stripe, they will have an active status, but a paused collection.
IncompleteSubscription for which the first payment has failed due to some issue with the viewer’s payment method, or is pending for SCA approval by the viewer (more on this here). Viewer has no access. Viewer should be advised to check their payment tool or their bank, or to check their inbox for the SCA confirmation email. These subscriptions are not included in the reports as they are still considered incomplete.
Incomplete expiredSubscription for which the first payment has failed due to some issue with the viewer’s payment method or for which the time limit of 23 hours for the SCA approval of the first payment has expired (more on this here). Viewer has no access. Viewer should be advised to check their payment tool or their bank and purchase the subscription again.

To use the search bar, click on it, choose the filter you wish to use for your search, and type in your search.

So, if you wanted to find a subscription that was purchased by a viewer with the email carter@mail.com, you’d click on the search field, choose the email filter, type in carter@mail.com, and press Enter.
Note that you can also search with just the first part of the email address, in this case carter, or the second part, in this case mail.com.
However, you cannot search by typing any of the two parts of the email address just partially, in this case, cart or mail.

Below that, you have the main part of the Subscriptions tab, which is the table where you can see the details of the viewers’ subscriptions.

Subscription management

In the Subscription tab you can also cancel a viewer’s subscription as well as view their subscription details.
Note that the same thing can be done in each viewer’s personal account as well, as described in the Audience management guides.

Cancel subscription

To do this, click on the  button under the Edit column in the viewer’s row.
Then click Cancel subscription.

Confirm by clicking Yes, cancel!

View subscription details

To do this, click on the  button under the Edit column in the viewer’s row.
Then click Subscription details.

Here you can see all the available details for the viewer’s subscription.

This concludes our guide.

If you have any questions, don’t hesitate to contact us at clients@inplayer.com.

Audience

The Audience section contains all the information about your viewers’ accounts. It also offers useful churn reduction and viewer retention tools.

It has a few tabs: Audience, Segmentation, Audience reports and Segmentation reports.

The Audience tab

Here you can see the viewer’s details, what payments they’ve made, grant them and revoke their access, manage their subscriptions and more.

Starting at the top, you can see some basic info about your viewers:

  • the number of viewers,
  • the number of viewers with purchases,
  • the average conversion rate.

Further down, you have the search bar, along with the option to choose whether to view a list of the active or deactivated viewers.
To use the search bar, choose the filter you wish to use for your search from the dropdown menu, and type in your search.

So, if you wanted to find the viewer with the email address carter@mail.com, you’d click on the search field, choose the Customer email filter, type in carter@mail.com, and press Enter.

Note that you can search with just the first part of the email address, in this case carter, or the second part, in this case mail.com, however, you cannot search by typing any of the two parts of the email address just partially, in this case, cart or mail.


Next, you have the Generate report , Schedule report, and View reports buttons. You can learn more about making reports in the guides to reporting.

Finally, you have the main part of the Audience section, which is the list with the viewer accounts and their basic details.
To open a viewer account, just click the  button on the right, under the Edit column in the viewer’s row.

Audience management

To see all the ways in which you can manage your viewers’ accounts, check out this page.

The Segmentation tab

The second tab of the Audience section is the Segmentation tab.

Here, you can see lists (segments) of viewers based upon various characteristics. This is mainly aimed at providing useful data for reducing churn and increasing retention, thereby eliminating the need for creating manual reports for this purpose.

There are a few viewer segments you can use: Cancelled subscriptions, Paying customers, Registered only customers, and Watching customers.

For an in-depth guide on all the segments and how to use them, check out this guide.

The Audience reports tab

The Audience reports tab is where you can download the reports you have generated in the Audience tab.

The generated reports will be kept for 10 days.

The Segmentation reports tab

The Segmentation reports tab is where you can download the reports you have generated in the Segmentation tab.

To see and download the reports for each segment, just select the segment from the drop-down menu.

The generated reports will be kept for 10 days.

This concludes our guide.

If you have any questions, don’t hesitate to contact us at clients@inplayer.com.

Promotions

In the Promotions section, you can create vouchers and in-app introductory offers that let you give discounts to your viewers.

The section is divided into Vouchers, In-app introductory offers, and Gifts.
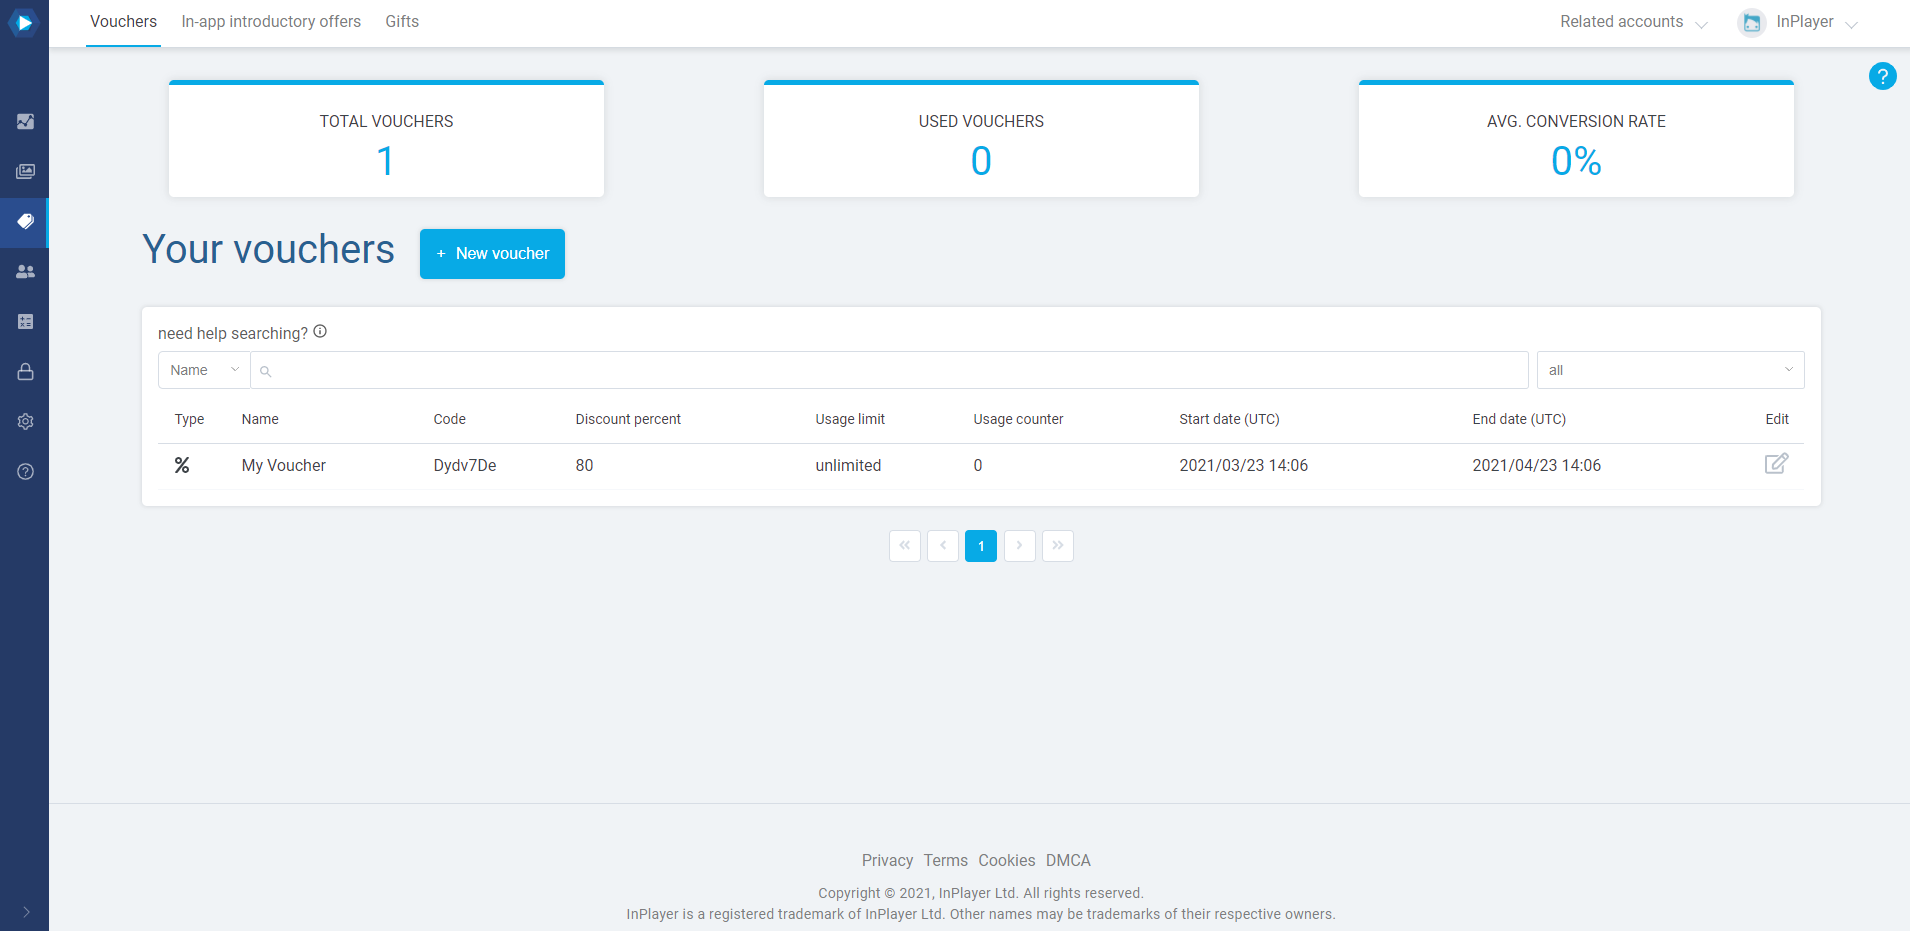
The Vouchers tab

This is where you create and manage your vouchers.

A voucher is a code that, depending on the type of voucher, either allows your viewers to get a discount on a payment, or grants them free access to content for a certain time.

Starting at the top, you can see some basic info about your vouchers:

  • the number of vouchers,
  • the number of used vouchers,
  • the average conversion rate.

Below that, you have the search bar.

To use the search bar, just select the search filter and enter your keyword.

Finally, you have the main part of the Vouchers tab, which is the list with your vouchers and their basic details.
To open a voucher, just click on the  button on the right, under the Edit column in the voucher’s row.

Voucher types

There are two types of vouchers:

  • Discount vouchers.
    Discount vouchers can be used for granting discounts on purchases done via a web browser, using a Credit Card, PayPal or Direct Debit as payment methods. It is the most common voucher type.
    Note that a 100% Discount voucher cannot be used for a ppv (one-time) payment via PayPal, due to a limitation in PayPal’s system. For subscription payments, on the other hand, a 100% voucher can be used via PayPal with no issues.
  • Access vouchers.
    Access vouchers can be used via a web browser, for granting free access to content. In this sense, they are the same as a 100% Discount voucher. However, there is an important difference: By using an Access voucher a viewer will get access for a period that is going to be specified in the voucher itself, while with the Discount voucher they will get the access period that has been specified in the Payment type setting of the price option of the asset the viewer is purchasing.

Creating and managing Vouchers

You will find detailed guides on creating and managing all the various voucher types here.

The In-app introductory offers tab

This is where you manage your in-app purchase discounts.

In-app introductory offers are different than vouchers, since there is no “code” the viewer needs to enter to get the discount.
Instead, the discount is in the form of a discounted price that is available to anyone that has access to your app.
This means that you cannot use in-app introductory offers to give a discount to only a specific viewer or a group of viewers. You can only have it as a discounted price that will be available to everyone.

Starting at the top, you can see some basic info about your offers:

  • the number of offers,
  • the number of used offers,
  • the average conversion rate.

Below that, you have the search bar.

To use the search bar, just select the search filter and enter your keyword.

Finally, you have the main part of the In-app introductory offers tab, which is the list with your offers and their basic details.
To open an In-app offer, just click on the  button on the right, under the Edit column in the offer’s row.

Creating and managing In-app introductory offers

You will find detailed guides on creating and managing In-app introductory offers here.

The Gifts tab

The Gifts tab will only be available if the Gift feature has been enabled on your account.

With the Gift feature, your viewers will be able to buy a content pass intended for someone else. The way this works is with gift vouchers.

Whenever a viewer purchases a gift, a voucher will be automatically generated and sent to the gift recipient.
The Gifts tab is where you can keep track of these gift vouchers.
You can’t edit these vouchers, only browse through them.

To learn more about the Gift feature, click here.

This concludes our guide.

If you have any questions, don’t hesitate to contact us at clients@inplayer.com.

Content

The Content section is going to be where you’ll do most of your work.

It has two tabs: Assets and Packages.

InPlayer uses assets as a way of protecting your digital content.

A simple way of understanding assets is to think of them as the box you put your content in to protect it.
So, you create your asset, you put your content in it, you set a price for it, and you embed the asset on your webpage.
With that, the only way for anyone to get to your content is to log into the asset and purchase a pass (we also support other authentication methods). Once they do, they will see the content fully displayed in the same spot where the asset used to be. Everything happens within the same page. If they log out, the content will be replaced by the asset, and the viewer will have to log back in to see the content again.

You can also group multiple assets into a package.

The Assets tab

Starting at the top, you can see some basic info about your assets:

  • the number of active assets,
  • the number of active packages,
  • the number of sales made

Under that, you have the search bar, along with the option to choose whether to view a list of the active or deactivated assets.

To use the search bar, just select the search filter and enter your keyword.

Finally, you have the main part of the Assets tab, which is the list with your assets and their basic details.
To open an asset, just click the  button on the right, under the Edit column in the asset’s row.

Creating and managing Assets

Creating an asset is a quick and easy process.

There are multiple types of assets, so make sure to check out this section to learn about how to create and manage the asset best suited for your setup.

Note that the HTML asset is our universal asset and you can use it to protect any web content that can be embedded on a webpage.

The Packages tab

Right next to the Assets tab, you will find the Packages tab.

Our platform offers the ability to combine multiple assets into a bundle, which can then be sold under one price.
We call these bundles Packages.
Once the viewer purchases a package, they will automatically have access to all assets that have been placed in that package.

Note that packages themselves are not embedded on a webpage.
The asset is still the thing you need to embed on your page because that is where the actual content is located.
The package only serves to bundle multiple assets under a single price.

When a viewer clicks on an asset that is a part of a package, the package price will appear in the asset’s price options, and by selecting it, the viewer will get access to all assets that are part of the package they’ve just purchased.
To access the assets, the viewer will need to navigate to the place on your website where the assets belonging to that package have been embedded.

At the top, you have the search bar, along with the option to choose whether to view a list of the active or deactivated packages.

To use the search bar, just select the search filter and enter your keyword.

Under the search bar, you have the main part of the Packages tab, where you can see all the packages you’ve created.

This is also where you create new packages, by clicking on the New package button. We’ll get to that in a moment.

To open a package, just click on it.

Creating and managing Packages

The package creation and management is very similar to the asset creation and management. It is described in depth in this guide.

This concludes our guide.

If you have any questions, don’t hesitate to contact us at clients@inplayer.com.

Analytics

The Analytics section is the first thing you see when you log into your InPlayer dashboard.

Here, you can see a visual overview of your revenue, audience, payments, and subscriptions.

The Analytics section has two tabs, MAIN and ADVANCED.

The MAIN tab

The Main tab gives you a general overview of your revenue, audience, payments, and subscriptions.

To show the stats for any of those parameters, simply click on its colored card at the top.

The ADVANCED tab

The Advanced tab gives you a more detailed overview of your revenue, audience, payments, and subscriptions.

To show the stats for any of those parameters, simply click on its colored card at the top.

This concludes our guide.

If you have any questions, don’t hesitate to contact us at clients@inplayer.com.